Working With Your Sketch to Assemble the Scene
Lesson 12 from: How to Shoot and Composite Levitating ObjectsBret Malley
Working With Your Sketch to Assemble the Scene
Lesson 12 from: How to Shoot and Composite Levitating ObjectsBret Malley
Lessons
Class Introduction
04:00 2Your Mind is the Camera
08:02 3Set the Scene
06:59 4Get Smart with Your Gear
03:20 5Posing Tips and Challenges
04:51 6Shoot Considerations
04:09 7Shoot Setup
13:02 8Shoot: Working With Animals
09:55Shoot: Creating the Look of Motion
08:54 10Shoot: Levitating Objects
11:04 11Starting the Composite: Organizing Your Images
12:37 12Working With Your Sketch to Assemble the Scene
11:23 13Selections and Masking
30:01 14Selections and Masking Continued: Painting Techniques
08:56 15Shadow Overlays
18:35Lesson Info
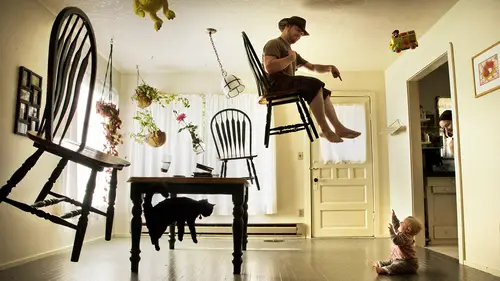
Working With Your Sketch to Assemble the Scene
let's start with the dog. Because that's gonna be tricky with with where we're putting that leash. So in general, and let's find where the the composited. So here. I'm calling us a typical walk. Right? Huh. Typical. So with this one, um, you know, have we're gonna be pacing in here, and I'll try to get that that proximity close enough. And that's the one we wanted, right? I think so. So with this as when I was talking about trying not to bloat my file my Photoshopped final too much as I'm working, uh, I'm going to just make selections for the area that I need. And this is not where I'm gonna go in with my quick selection tool and select just everything because I won't get it right when I'm just trying to do it quickly, and I will notice that Oh, a dog needs a tail still right. But if I copied and pasted that, you'd be gone. So make sure when you're first bringing your images together, you're selecting way more. Then you need because you will use it. So in this case, I'm selecting all t...
he way around. Give myself plenty of leeway. to take it off there. And yet still not bringing over the huge file in itself. Eso in this case, just a quick copy and paste. So, command, see, control, See if you're on a PC, and then I come over this guy and you'll notice we haven't looked at this yet. So let me paste this guy in here in a folder and the most sort of look at the breakdown of how how this happened here. And then you guys can decide if we want to go the magic route or not let you guys, we'll figure that out when we get there. Um, So I'm gonna make a new has got to be beneath the effects folder. We'll talk about later order and why that matters. Let's see, there's the right tree is gonna be beneath that. There's left tree. So right above this magic one that should do so I'm gonna create a new blank folder there and label this dog. Here we go. Remember that. And I can spell that too. That's great. Uh, Sil Isi. So there's our dog most times. Um, so I'm gonna pace that guy in there with command V for paste, okay, And in this case, I'm gonna shift over to the move tool with just 34 move. That's how they have it. M is for the Marquis, so it's already taken. What's great and what I suggest everyone to do is special. If you're compositing and moving things around a lot up in the options bar, which is this area up in here where all the options change Depending on what tool you have, make sure that the show transform control eyes toggled. That's a huge difference. That's what I call the Swiss Army knife for the move tool. It just opens it up to all these different features that you normally don't get when it's when it's not toggled. For one, you'll notice A soon as I switched to it that I get all the options of a transform in it in itself. I don't have to hit command T every single time I want to do that. Plus, if I click on one of these, it enables me to right click and be able to rotate warp right to call these. I mean literally. It's a Swiss army knife of movements and modifications. I can do so make sure show transformed controls is toggled whenever you're working. That's what I suggest. That's my thing. I'm gonna convert everybody out there toe that. It's a great future. Okay, so with this, I'm just gonna move this guy roughly in the right spot here. I'm gonna do some rotation. Ah, let's see. It's looking in the wrong spots. Maybe if we have it a little bit higher, we'll obviously have to change the direction that that brush there maybe not rotated quite as much. Okay, what do you think about in there? Okay. You want it up higher. You know what? Oh, yeah. Take that. So, yeah, with this again, I all sometimes composited image two different times, and I'll get two different results. Just experiment. So not only will everyone else have their own version of it, but, you know, even you and your sort of mood and looking at things and playing with it, you might come up with different varieties. So that's that's okay. Um let's see. So with this, I'm going to say that I don't like it. Um, and actually, yeah, actually, will see right there if I was going to change the scale and start moving it actually do that before to turn it into a smart object before we do that. Eso whenever you are rotating or transforming or doing any of that again. It didn't really affect this one because I was still keeping the proportions. I haven't tried toe move it or stretch it. But in general, when you're working with especially something that you want to possibly alter, turned into a smart object again, it makes your file a bit larger, but it's non destructive as far as this scaling. Uh, I guess I know what I mean by that. So if you didn't make it into a smart object and you shrunk it all the way down, change your mind and then you hit that you like that brought all the way back up, it would get all pixelated right. It's not gonna expand correctly, So turning into a smart object basically gives us a render of what it's looking at while hiding the the photo saw file the actual image somewhere else that you can't touch. So it's a smart object, so you can get to that by right clicking, clicking next to it. Here we go. Going down. Convert to smart object. That's my way again. 10 ways to do any one thing in Photoshopped can go off to filter convert four smart filters on yet there's even more I think you're gonna do it under layer. But anyways, I just like to right click to the right of the name. All right, here we go. Gotta LaBella's we go. Here s so now I will I will do that rotation. Okay. What do we have rotated and up? Like we had it. Right, Cause is about toe Bat it right? That's what we're looking at. Yeah. Okay. Here we go. All right. So we got the dog there. You notice it has a little bit of yellow cast. Like this whole image does wall right? Among other things there. But that that's actually gonna be looking okay for that. I'm gonna take off my sketch so I can just see what that's gonna look like. They're and just sort of imagine how that's gonna look. Yeah, that that might just work. This could be cool. Okay, so with that, I'm going todo leave that alone. I'm gonna bring in the subjects I'm gonna bring in those other pieces that are here once I bring over the dog or one of the pieces to the big puzzle here is basically a mind Jigsaw. I then close it right to make sure that I still have room from that bringing other pieces. So next let's do the subject ready. Here we go. No, this is great. Uh, so I'm gonna select this case. I want that entire length. So you guys are both gonna be in their a Z were working Well, mask you out, but I want that entire length. Just so I have lots of room with that shadow is gonna be a great reference to when I do the draw, the actual shadow on there. And so I'm just gonna copy with command. See? And let's see. Let's put this. It's gonna be behind. The dogs will make another another group folder. Here we go. And we will call this minute. I stick it in the dog. Yes, that's the thing. Alright, Right beneath. So do you see that? This is tricky. Even when you know what you're doing. When you get those sort of double lines, that means it will put in between, but it's really easy toe. Miss it a little bit. We're gonna call this the mom. Here we go. Uh, you have adopted my son. Apparently, uh, let's see. So we have this and I'm just gonna paste you. Remember that paste in place? Command shift V. So we do command shift V that's gonna paste it right in place there. And so it looks like we're getting some some double, but again, he has that. So that should be okay. So there's the mom, and we might, to a couple things with scale to put a little bit further behind the most part that that might work. Although if he just zoomed there, we could move it around. But, oh, another thing. As you're putting these objects in there, it's really helpful to change the opacity of it. That way you can play with, you know, see where that subject is. So just as we did that with overlay while shooting really helpful, just bring the passage down. It's not permanent, but just a sort of, you know, eyeball it to figure out where it is. If I wanted to change the scale of this before you change the scale or turn something into a smart object. Make sure you rapacity is up. Otherwise it will keep this a pass ity. They're embedded in the smart objects. That's a gotcha. So make sure passes up. I mean, I right click again to the right of the words Keep on Going down. Convert to smart object. Okay, so now I can start playing with the position of it. So if I was going to re scale this, what's nice is we had that vanishing point, which was right just above sort of the waste. If I change my anchor point and says I have the move tool, I don't have to go into transform. It's just they're automatically hence everybody switch over to my way. You can move this point over and let's see if you hold down shift. It will just do that that corner, but constraining proportion. But if you hold down, shift an option slash ault, depending on which system or see how it's scaling in proportion, but also toe what to the anchor point, which is awesome, right? So especially who want to make her feel further behind. We could do that as long as you put it right on that horizon, Mark. And that will be fairly seamless this far. As things go won't be exact, but you can get away with a lot more with doing that. Um, this case, I'm just gonna perhaps shrink down just a little bit. Typically Would want to make my a mask first, but I just want to make sure she's a little bit out of the way. Perhaps down a little bit. Lower run their stop. Okay, here we go. Uh, it's good. Practice toe. Speak out the narrative as you're working too, because it makes it more exciting. Okay, so with this. Okay, one point, we have the dog. Okay, Thanks, Photoshopped. We have the mom, and now let's get that other person in there. Hopefully, we'll have timeto edit those in there in the bag. Okay? And those air already in photo shops announced close this one. Yes. OK. And for this, I'm just gonna drag out there, so it may have been nice to grab a little bit more of the arm, but I think this will work just fine. So, command See? Come over here. Uh, and let's bring this person as another subject. Let's just put him in here so we can make it afterwards. What did I just do? What do you notice? See how it pasted right in the middle? What would do that? You know, if you just paste right, that's where it's gonna go. So that's where the command shift V is really important to make sure it pops up where we were needing it to pop up on. Then let's convert it to a smart object and take a look at where she's actually getting run over or not. Let's see. Yes, all right, Perfect. So that's Yeah, that's the idea. There. Paste in place. Really great command shift V or Control Shift V. If you're on a PC, Okay, so we ever elements. I'll save the bagels in the lemon or lime, depending on what we're gonna do with it for later as we go here. And let's put this in a group folder. If you have an object that you want to put into a group, you select it. They can do command. G on. It will take that, whatever that is and turn it into a group, which is great. Sometimes it's easier moving an object rather than groups tell ghost. So we will put, uh, head for a pedestrian. Right? That's on there. More angry. We could do something like that.
Class Materials
Free Bonus Materials
Ratings and Reviews
Molly B
I agree a bit with Eric Burke's review (which was a thumbs down), however, I feel like this is neither a thumbs up or thumbs down recommendation, more like a 3 to 3.5 star rating. :) That said, I agree that there was so much talking and not doing in the initial portion of the class sections. I feel like when there is a class offered for Compositing, much of the science people want to know is in the editing tips and tricks AND some of the shooting tips and tricks. Photography of the subjects is important to understand, but examples of live shooting should be kept fairly minimal. Aaron Nace still nails the science behind planning and shooting for composites and also rocks in the editing (in my opinion). Brooke Shaden is also a good example on the editing details. I feel like Bret had something different to bring to the table from the class preview with puppet warp and some of the cutting / masking tips... I agree that all the editing portions of this were super rushed and just touched on a lot of last comments of "oh isn't this neat" and no in-depth instruction on how that feature is used. I just felt like he really ran out of time. At the end he talked about re-shooting the dog, perhaps he could have gone in to puppet warp to change the lower legs and tail a bit as an effort to make it look more like his sketch? Bret seems likable, but does continuously talk about side stories and extra noise that seems could be more focused on the topic at hand. :) I still picked up some tips, but this would be more ideal bought on a sale rather than full price. :) I have a lot of photoshop knowledge and own some other composite classes on CL, so I don't feel too lacking, but this would not be for a very beginner of compositing. I wouldn't mind seeing Bret back with a more refined class structure focusing on the magic of puppet warp and other tricks to get the most out of compositing.
s
Had a good time with this course! Bret is a great instructor, you can really tell he enjoys his work and has a lot of fun engaging the audience. I've done some compositing in the past but with a much older version of PS. This course really helped me take advantage of the new features in PS CC and also helped streamline my workflow. It's a course that both experienced and beginner compositors alike can learn from. A big thanks to Bret Malley and CreativeLive for making this course!