Lessons
Lesson Info
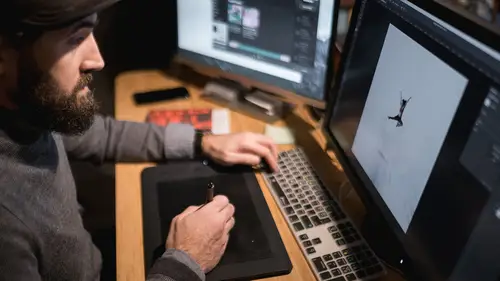
Wacom Components, Basic Set-Up & Installation
If you were just opening up a Wacom tablet, you would find a tablet, you would find a pen, and you'd find a cool little holder like this that you can stick your pen in. And you'd also get some other things with it. So these come with it. This right here, is surfaces. It's just examples of surfaces. I'm gonna show this to the camera over here so they can see that and one of em is smooth, one is standard, and one is rough. So this surface here on the tablet can actually be swapped out. So you can either, if you like, really it's what kind of ballpoint pen do you like to write with? Do you like the ones that you can't feel the paper? Then you need smooth. Do you like the ones that you can feel the paper a little bit, but it's not like dragging? Then you need medium, which that's what it comes with, is medium. But if you like real fine tip hard pens, let's say you're a calligrapher and you like that feel of that metal scratching that gritty paper, then you want to have a rough surface. And...
it's all about, what you're looking for is the correct amount of drag on the nib. So, as you're drawing you want it to either (imitates whoosh) sweep by and have no friction whatsoever, or other people like me, I like a little bit of a drag on it, because it helps to kinda keep me steady. If it's too slick for me, I get a little wobbly. So, it's better if you have that drag on there, okay. So when you first get the tablet, you're gonna feel this and you're gonna take your nib and you're gonna go... this one. And it's perfect for me, I like the standard, so I don't have to do anything. But if I like the rough better, I could just order a surface for the rough, pull this one off put the other one on. So, that's the first thing. The second thing that you have, is I have two tablets. So, you'll notice that this has a little blue line right here, see that? And that blue line can be changed out, because the pens are specific. It knows which pen is on which tablet. And so what I do, is I put a different color on the pens. So you can see that I've got a red, a green, a silver, or a black ring, that can be replaced on that. That's important because if you have multiple tablets, you definitely wanna have the different pens have different rings on it, so you know which pen you're working with. So there's my blue pen, it's my travel pen. Okay, and then the last thing that you're gonna get with these is inside of this, if you push down and open it up, there's a bunch of little nibs in there. See that? And there's black plastic ones, and those are a little bit slicker, and then these white ones feel a lot rougher. And so you wanna change out your nibs and play with them, and you can get all sorts of nibs, but these nibs are a little bit different. So you've got rougher and slicker ones, and so you wanna just kinda get a feel for it and as they wear out, they're stored right here, so that's a really convenient place to get em. But just remember that there are multiple types of nibs, so, if you want a slick surface, if you get the smooth surface, and a smooth nib, it's like there no friction. It's just (wind displacement whistle), you know. But if you get a rough surface with a rough nib, you're gonna have a lot of drag. So, just be aware that you have the ability to put, and this thing is always difficult to put back together so I probably should not have opened it. There we go, gotta push and turn. Okay so it's not just a pretty holder, it actually holds your nibs as well. So those are the things that come with the tablet, and I think they're important to note before you even start. You wanna get that feel down. And you can kinda play with yours until you get the sense that I need more drag or I need less drag, and then you can order a different surface or change your nib. Okay, so that's the first thing to know about a tablet. The second thing to note about a tablet is that's it has buttons, not only on the pen, so if you look at the pen here, you've got two buttons here. You've got a button right there at the front of the pen, and a button at the back. So there's a front button and a back button, and then you also have a button back here, and that's an eraser. And the eraser has it's, like you can turn the pen around and do other things with the other side of the pen. So we'll show you how to set that up. But it's important to note that you have all of those at your disposal, and of course the nib itself. And the nib is going to be pressure sensitive, okay? The next thing to note, especially on this Wacom tablet, this Intuos Pro is that there's a button right here, and that's the power button. Now, this thing is not attached via a cord. It comes with a cord. I could plug this in USB, but I don't need to, because it's also a bluetooth device. But it just lost its connection cause I haven't used it in the last 15 minutes, and so it just powered down. So I lost the connection here. All I have to do is push that button, so I'm gonna push this button and you're gonna see on my computer in a second that there's gonna be a little mouse signal that comes up, that says, oh it's connected. So if this thing becomes unconnected, I can just simply push that button and it will connect. Of course you have to set it up. So when you set it up, you're gonna go to your Wacom tablet setup program that comes with it, you'll install that, and then as you go through the process, it will explain to you how to set up that bluetooth device. It's like setting up bluetooth headphones, bluetooth mouse, it's fairly easy to do. Bot now that it's paired, all I have to do is push that and it'll turn on, and then if I don't use it for a while it'll turn off. Okay, the next thing to note is there's a little switch right here, and that switch, it used to be that you'd have to assign a button to tell it whether you want touch on or off. So it becomes like a very large track pad that you can use your finger on. But it used to be a button that you would assign to that. But now it's a switch So I can just reach over and turn it on or off, and if I turn it off then the touch doesn't work. It's just tablet. I have to use the pen. But if I turn this on, it'll use the pen. But if I just use my fingers, it will become a touch pad as well. And you can set up touch options as well. I'll show you where to set those up, but I'm not a huge fan of touch. I have a mouse, I have a track pad and so I'm not gonna really use that all that often, but it's there is I need to. I can switch it on and use it. Okay, so those are all of the various items that we need to discuss before we actually look at the software. So, when you first come into your computer and you've installed the software, you're gonna have two things in your computer that you need to look at. The first thing is an actual program from Wacom. And Wacom has a program in there specifically to allow you to backup your settings, and it's important. So what I'm gonna do is I'm gonna click right here, backup my settings. So I just wanna backup my settings. If I click backup, so I'm saving my settings right now, ad you can see that I've already backed this up before. I'm going to choose to back it up again. So I'm just gonna get the same name, and I'm gonna hit save, and I'm gonna replace it. Now it's all backed up. You can also back up to your, so you can set up on Wacom's website, you can set up your own account and probably when you buy it you already did, and it'll back up to Wacom's account. But I have a CC account, and so I just back up my preferences on my tablet to my Adobe CC account, and it just synchronizes and the beauty of that, is that that preference synchronizes up to my Adobe CC account and down to my computer at home, so that I have those settings backed up on all of my computers, everywhere I've got those preferences available to me. So I can then, if I take this tablet and this pen over to my other computer and plug it in, I can just use those preferences. So they're always available to me wherever I am. Now, that being said, it's important to recognize that each of these pens is different. And so I can't at this time, and each of these tablets is different, so I can't at this time, like I would love to be able to take that preference file and send it to all of you so that you have my buttons, but it won't work, because it will see your pen as a brand new pen and so none of the buttons will work. And I have asked forever for them to actually create a system in which we can program our buttons and then share them with people. But that's not happening yet, I don't know. So, anyway at this time what you're gonna have to do is come up with your own buttons, but what I wanna do is teach you how to set these buttons up and why. Cause you gotta think, this is all a very thinking process here when we're starting to talk about these buttons. And really this class can be about buttons and the methodology of using buttons, which sounds really exciting doesn't it? (audience laughs) I mean you're just like thrilled, right? Cause I'm gonna teach you the "methodology of programming buttons". (audience laughs) Yes! Yes. And you're thinking, what's the other class? Can I get outta here? Right, okay, we'll make it fun though. We'll have a good time. So, this is what you needed to know about this Wacom desktop center. This is where you back things up. This is where you can see how charged your device is. So this is 100% charged. I made sure I charged it last night, so that when I came here it wouldn't die on me, but I actually used it for five hours yesterday and it was at 98%. So it doesn't seem to use a lot of energy. So, you could probably use it for several days before you would ever have to worry about plugging it in. Maybe even weeks, I don't know. It'd never run out. So, but just keep it charged, and you can charge it with this, and the little brick that you use to charge your phone. You just plug that USB into the little brick that charges your phone and plug this in. It never has to be connected to your computer, but if you connect it to your computer, it charges from your computer. So, you do have to keep this around, even if you're using it as a stand alone thing, because you have to charge her. Okay, alright so once we've gotten done with our desktop install, we're also going to have a driver, and that driver, I'm on a Mac. On a PC, you're gonna have a driver that's very similar to this. You are going to have to translate. So I'm going to say command key, and the command key is not on a PC, and so whatever the version of command key is for you, I think it's-- Control Control, I think control. So if I say command, you gotta think control. And if I say option, you gotta think alt. Shift is shift, so you're fine there. So I want you to take those links, those two links that are gonna be on the chat rooms and I want you to copy em and I want you to paste them into a very special place that you'll always know where to go to. So that any time you're like, what was the command for that? All of you to do is click on it, and I'm gonna actually show you that right now. You're gonna go to this, you're gonna go to... You're gonna go here, keyboard shortcuts. So see that list? And if I want to see something, if I want to figure out, all I have to do and I'm on chrome but no matter what browser you're on, command F is gonna give me a find. Inside of this particular page, I'm gonna find the word let's say clip. So there, show clipping. Right there, see there's J. The J key in Lightroom is show clipping. So all you need to do is have these two links available to you, and then just search them anytime you're looking for a key stroke, and you're gonna find it if it's available. If it's not available, if there's not a key stroke, most of the time you can make one, and we'll show you how to make one so that then if there's something you want to do that you can't do because there's not already a key stroke, we're gonna show you how to make it, both in Lightroom and in Photoshop, alright? So that's really important. Know what your key strokes are. This is the official list. There are two links. Make sure you copy em and put em somewhere.
Ratings and Reviews
a Creativelive Student
Anything Jared Platt teaches is going to be wonderful!! Can’t wait to see him teach about the Wacom tablet!! I have a tablet and want to see a fantastic photographer use a Wacom!! I can’t get the hang of the tablet yet and I know Jared will inspire me and others!!
JUAN SOL
Interesting course. Jared is giving a full descripction of all the possibilities of this hardware and the tools to customize it to our own convenience. Good job, Jared, once again, and I love your sense of humor.
Jennifer Genevish
Great understanding on how to set up and use the Wacom tablet, I am glad it is like the shuttlePro v2. I was worried that I would have to create a new system to edit photos in LR. Just transfer my setting over to the tablet. He did a great job taking about the tablet in basic terms, while explaining and show examples. Thanks so Much Jared Platt and CreativeLive.