Lesson Info
6. Working with Brushes
Lessons
Lesson Info
Working with Brushes
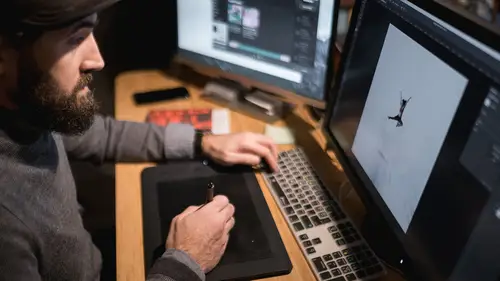
Let's talk a little bit about brushes, because that's another really cool thing about the Wacom tablet and that is in your brushes themselves, you have the ability to set up lots of options in your brushes. So let's look at a brush here, and let's play around with that. And I'm just gonna turn this brush to black so you can see what it does. And I'm just gonna zoom up into here, like this, and then I'm gonna paint black. See that? I just painted black. If I'm really light, so I'm just gonna lightly touch, see how it's light? And then if I push down harder, I get hardness. So you can set this up in the shape dynamics. If you click here, the shape of it is staying exactly the same because the control is off. But in the transfer, which is how much ink gets transferred to the paper basically, in the transfer, you'll see that my pen pressure is involved. And that tells it how much flow I want to have inside of, right? And you can also turn the opacity on as well. So like you have a lot of c...
ontrols here. You also have the control smoothing, but shape dynamics are important. If I want to change it so now I can also add size and opacity, then what I would do is I would go in here and say that the jitter size is controlled by the pen pressure. And so now if I start out here, see how it's small? So if I'm really light, it's small and light. But if push hard, see how it gets bigger and darker? So that gives you the amount of control that you need instead of having to change the size of the brush. When you're painting on something or you're burning and dodging something., if you just use real light strokes, you can kind of just burn in just a little bit, and if you use big heavy strokes, then you're gonna burn and dodge a lot. Does that all make sense? Okay, so it's important then once you've done that, once you've done that, you need to come into your brushes and save that brush. So to do that, just go into your brush settings here under the brush panel and click on that little drop down menu and then you can just save that new brush, so you're just gonna make a new brush preset, and then you're gonna save it and call it whatever makes the most sense to you. But here's something important to me, and that is notice that I have capture brush size in the preset off. Because every time I go to that brush I don't want it to go back down to whatever. I want to leave my brush at the size I'm currently at, and then just give me the settings. Other people want to go to the specific brush size because it's like that's there go to eyeliner brush, click on it, right? And that's fine. But just recognize that you have that. And I would suggest that if you do both, that you actually put it in the name. So like actually put 600 size in the name so that you know that's a big brush, small brush, etcetera. And then also, I don't include the color. So I just include the tool settings themselves as a general rule because I don't want to change everything about my brush. I just want to change this general settings of you know, opacity and shape and stuff like that. Alright, so then, when I'm working on a photo, I can use all of these tools to my advantage. You saw me working inside of Lightroom, and now if I were to go here to work on this image, I would then create a burn dodge layer. So and again, here's another important thing. If you already have presets, and those presets are sitting up here really nicely, it doesn't take any time for me to be here and go over here and click on burn dodge layer and get one and then go back here. Did that take me any time? No it didn't. So there's no reason for me to click a button to do something that's just as fast to go here. Do you see the decisions you need to be making? When you're setting up your tablet, you want to set it up so that you are only putting stuff into buttons and radio filters that are complicated to get to. That you have to go to a menu to find and push and do this. Or that you have to hit a series of key strokes to do. That's what you want the buttons to do. If you have presets already, or actions already set up here, it takes no time to just go click them. So don't waste your time building a button for something that you can just go over and click. So now I have a burn dodge layer, and because I clicked on my button that told it to go to the burn brush, and it told it to be a mid tone burn and it told it to be 30% exposure, now when I go here, and I start brushing this, so now I can just, see how I'm brushing in and I'm burning dodging the surrounding. And then I'm gonna create a smart dodge layer and I need to go to my brush. So a smart dodge layer is just a curve, and then I'm actually playing around with, you can see right here that I've got a, I've got a mask so I want to paint white on that mask. If you're looking right here, do you see that little, this little area right here? Okay, so right below that is the color, I don't know why I can't see it. Right below there is the white or black. And if I click on this little arrow, it goes from black to white to black to white to black, do you see that right there? It's kinda, it's hidden but it's turning black to white? I'm trying, it won't, oh there it is. Got it. Okay, so that's your black and white, right? So you either paint white or black. So if I paint white, I'm adding a curve. If I paint black, I'm removing that curve. So in order to do that, in order to facilitate doing that easily, instead of having to come over here to click on that little trigger, I can hit the x key right here. Notice that it's really easy 'cause my hand's sitting here anyway. So I just hit the x key, and now I've got white. But I also need to be at 30%, and now I'm just going to increase the size of my brush. Now remember that I've got that auto zoom scroll, so there's the zoom. See how it's doing that? So I had to do a brush size toggle over on the bottom quarter because that auto zoom and scroll thing zooms in and zooms out, but it doesn't, so I had to set one up with keystrokes that would increase the size of my brush. But I want to show you something even cooler than that. If you want to change the size of your brush, you can do it with your pen and your hand. All you have to do is hit the control and option, or alt key together while you're on a brush, and just simply click and drag this way to increase the size of your brush, and drag up and down to change the feathering. So wherever you happen to be, if you want to change the size of your brush, just do that. It's just control, option or alt, and click and drag this way, left and right, or up and down, and it will show you exactly what you're gonna get out of your brush. So then you can come in and say okay, now I want to go in and I want to dodge her out. I want to get some lightness to her eyes and stuff like that. So I need to just click those two, and I'm gonna take my, see how I'm changing my brush size, or the feathering, there we go. So now I'm just gonna kinda go, see how I'm just adding light to her cheeks there? Oops, I accidentally hit my radial. So I'm just, see how I'm just adding a little bit of a touch of light? And there's pressure sensitivity so if I just barely push it, I can get the crest of her nose, and then when I go to her forehead, I have to push down a little bit harder so that it expands the brush a little bit. And then I come down here on her lips I can just barely touch her lips and it's just getting the top of her lips. So now she glows a little bit. I'll show you the before and after. See that? But all of that was done with pen and this hand pushing these two buttons. That's it. It would very difficult to this and push that button with a keystroke here, so you're better off just using these two and knowing that that's your keystroke. That's a really valuable keystroke to know. So don't discount that one. Again, control, option or alt, and then use your pen tablet and you've got your brush. So now you don't even need a keystroke or a thing to do that. Right? You just do this. Don't need to go choose a brush size, and that's why I tell my brush settings not to include the brush size, 'cause it's really easy to get the brush size exactly the way you want it, right where you are. And it's actually better because instead of trying to guess at the size, you're actually looking at the size and you're looking at the mask that it's making. So when you're working with a tablet, and there's so much more you can discuss, but if you understand the things that we just discussed, you'll have a really good start at making your tablet really useful to you. Because not only do you have the ability to free yourself from the mouse, which is not a very accurate way to work, and you also have the ability to pressure sensitize so you can get your brushes bigger and smaller as you're working, and you also have tilt. So as you tilt the pen, you can program the tilt to change the way the brush reacts as well. And that's a much more complicated move, and most people don't find a way to use that except for like illustrators and stuff. Burning and dodging, I wouldn't put tilt into it all that much. It doesn't make a lot of sense, but for like artistry work and stuff like that, it does. But just remember that you have all that pressure sensitivity, you have all of that tilt ability, plus you have all these buttons that allow you to then control and manipulate what you're doing. So it is a work flow tool that is invaluable. I can't work without it. I literally cannot work without my Wacom tablet anywhere. So I have one that sits in my bag at all times, and one that sits at home at all times, because otherwise, I can't get any work done, 'cause I'm just lost without it. I miss my buttons, I can't work, it's crazy. So it is an addiction once you get it, but it's a very important and useful addiction because it will save you time and more importantly, not only is it saving you time, but it's also making your work that much better because you have so much more control over things. And you just have that natural ability to do things. You can even create signatures very easy, just choose a brush appropriate or a pen and then sign your name on your artwork, and each signature can be different as opposed to stamping the same signature every time. So that's, I mean the uses are endless, and it's the most beautiful tool that I have on my desk. It really is an absolutely amazing tool. So, remember that you got to pair it to the size of your monitor so that it feels right. Make sure that your nib and your surface feel right to you so that you feel nice when you're writing with it. You want it to feel the way you like it. So those surfaces and those nibs are important. Make sure that when you're programming all of your buttons, that you do so in a rational way. Don't just start programming buttons. Think about it. Where's your left hand gonna be and what buttons do you have access to over here very easily like the space bar. Where is your tablet gonna be? Is it gonna be in front of your computer? If it is, then you need to change that up a little bit because your left hand is gonna actually be right in front of these buttons, and it'll be more difficult to get to your computer. So you want to think about those things as much as possible, and then organize your workflow such that the top buttons do things together, and the bottom buttons do things together, and do them in order, in a rational order. I do this, then I do this, then I do this. So use the buttons that way. Make sure your radial filters, you're using them. Because the radial filters is like a host of things that you don't want to get up in the menus to get, but you need to get there. Like for instance, in Lightroom, you'll have six images that are a HDR image. Well I just have it in a radial filter, make a HDR out of it, it just does it. So I select six and make a HDR and it just does it. So think about things you don't want to go to the menus for, and use those. And then really think about what kind of steps do I take all the time, doing it over and over and over again. Like you could even have a button that's programmed to set your files up. So if you always copy your layer and then make a burn layer, and then make a curve layer on every file, just push a button and have it do all of those things all at once, so that you're ready to work. If you do those things, you'll be much more quick about your work, you'll be more efficient, and you'll just have a nicer time and no more carpel tunnel with the mouse thing because it just frees you up, it's natural. It's very natural as opposed to the mouse which is completely unnatural. So my hats off to Wacom for all that they do. I mean they've been a staple in the artist world for years and years and years, I mean as long as I can remember now, they've been there. And I've just updated every step of the way because they keep making brilliant things.
Ratings and Reviews
a Creativelive Student
Anything Jared Platt teaches is going to be wonderful!! Can’t wait to see him teach about the Wacom tablet!! I have a tablet and want to see a fantastic photographer use a Wacom!! I can’t get the hang of the tablet yet and I know Jared will inspire me and others!!
JUAN SOL
Interesting course. Jared is giving a full descripction of all the possibilities of this hardware and the tools to customize it to our own convenience. Good job, Jared, once again, and I love your sense of humor.
Jennifer Genevish
Great understanding on how to set up and use the Wacom tablet, I am glad it is like the shuttlePro v2. I was worried that I would have to create a new system to edit photos in LR. Just transfer my setting over to the tablet. He did a great job taking about the tablet in basic terms, while explaining and show examples. Thanks so Much Jared Platt and CreativeLive.