Lessons
Lesson Info
Lighten Blending Modes
Lighten Category is basically the opposite of the Darken Category. So if you notice, here in the drop down, we have five blending modes. Lighten also has five blending modes. Lighten is the opposite of Darken, Screen is the opposite of Multiply, Color Dodge is the opposite of Color Burn, Linear Dodge is the opposite of Linear Burn, Lighter Color is the opposite of Darker Color. So earlier I said that Darker Color kept the darkest pixels of the two. Lighter Color keeps the brightest pixels of the two. So you only really have to remember one category. You just remember that the category below that does exactly the opposite. So in this example, you can see that when I change the blending mode to Screen, which, again, is one of the blending modes that I use the most in this category. Oop, I selected the wrong lighter. There we go. Screen, there we go. So this Luminosity layer is set to Screen. Notice that the boxes that were black here completely disappear, because black disappears with al...
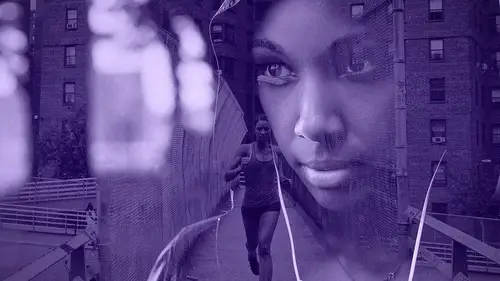
l the blending modes in that category, and the brighter boxes remain. And the same thing is true for the Color layer. So Screen keeps the bright pixels and makes the dark pixels go away. Simple as that. And I have a few examples of how that will work on every old project. For example, if we have this model here, and we wanna make a more interesting effect, maybe we wanna add snow to that layer, you can either shoot snow yourself or go into, in this case, I went to Adobe Stock to look for a stock image of snow. Snow is white, obviously. The background is black. So then now I can use a blending mode that hides dark pixels so that we can keep the bright ones. So I can select the screen blending mode, and now it seems as if she's right here in this photo with all this snow falling on her. So it's a very realistic effect really quickly just because we know what colors we're targeting, what colors we want, and what blending modes work with the colors or luminance values that we need. And you can do that for all sorts of things. For example, we can even add a lens flare. Same thing, select Screen. And now she has this cool looking lens flare effect there. Again, same thing. The layer was predominantly dark, but the bright pixels, which is the lens flare, that's what we wanted. So using Screen allows us to keep the brighter pixels. The Bokeh effect is really popular these days. You could also use Screen for that, to apply a Bokeh overlay. So Screen is really powerful in just simply removing dark pixels and keeping the bright ones. The next example, and this is gonna be a little bit of a longer example, is using the same category of blending modes. We're still working with the Lighten group of blending modes. And one of the more popular effects that you see these days in photography, at least in creative photography, is the double exposure effect. And that one's actually really, really easy to create using blending modes if you know how they work. So we have this model here. He's in a white background, that's very important. And if we want to apply that double exposure effect to him using this second layer, then we can simply use one blending mode and we get a really convincing effect. With that city layer, I can change the blending mode to Lighter Color, and right away we get a pretty convincing effect. And we're gonna work on it a little more in a few moments, but I just wanna show you what happened here. If you recall, the lighter color keeps the lightest pixel of the two. So since the background is white, nothing is brighter than white, so the background is kept. And then you get this double exposure effect on his face depending on which pixel is brighter or darker. And then we can use the layer here, this layer, to position the effect anywhere we want. And you can of course transform it by pressing Control T, Command T on the Mac. Notice that, now here's a little trick for you, right now I press Control T/Command T to transform and I can't really see the handles. I do see the pivot point, the reference point here, but I really can't see the handles, so. Of course, one way of bringing the handles out would be to click and drag until you see the handles to transform it, but a faster way is by pressing Control zero. If you're on a Mac, that's Command zero. And that zooms out. So if you ever press Control T/Command T to transform and you can't see the handles, press Control zero and it zooms out so that you can see the handles. Now that I see the handles, I can continue transforming the selection, or, excuse me, the layer, so that it matches the composition of the image better. Earlier, I showed you how I could use adjustment layers to change how the blend works, and I can do the same thing here. I can create a black and white adjustment layer. So now we have a black and white photo. I'm gonna clip it to the layer below. So notice how, now, the city only has black and white pixels. So I took away the color from that. So that could be an effect that you may wanna apply. Also, I can do the same thing for our model. I can apply a black and white adjustment layer. Instead of clicking on this button, I'm gonna show you the keyboard shortcut. It's Control Alt G, Command Option G on the Mac. And it turns it into a clipping mask. So now this black and white adjustment layer is only affecting the model. One of the reasons that I like using that particular adjustment layer for the double exposure effect is that it give me access to the black and white sliders here in the properties panel. What this allows you to do is control the luminosity of the original colors. So I think he was wearing a blue jacket. Yeah, he was wearing a blue jacket. So I an adjust how that jacket blends by clicking and dragging on these sliders. So again, we're using luminosity to adjust how the pixels blend, and how dark and bright they are. I can also do the same thing for the city. And you see how I'm changing how it's blending. That's because that area was originally this orange, reddish color. So I'm making things darker and brighter, and you can see how the blend changes. And you can control all of that just through that adjustment layer. Also, if you wanted to apply a color to this, you could simply create a solid color adjustment layer. And I'm gonna sort of, just pick a random color here. Or, not really that random, I had it in mind. But I'm gonna change the blending mode to color. I'm gonna explain what Color does later on, but basically, it applies a color to the image. And we have a double exposure effect, like, with that particular color. So I've included a template for people who purchase the class that has smart objects. Smart objects are just these little containers that Photoshop has that you can swap things in and out. So basically, and actually, I'll open it up. Why am I even explaining it if I have it right here? I have it there. And that's me, by the way. It's actually a much more complicated, ah, not complicated, much more, it has a lot more stuff, let's just word it that way. A lot more stuff than the example I just went through. So basically, you have two layers. We have a bottom photo and a top photo. All you need to do is double click on that smart object. It opens up on a new tab, and you can simply drag in any photo that you like onto it. I'm just dragging a photo from Adobe Stock, just to have something different. I'll close it, save it, and there's that effect applied to the image. Now, you have that same black and white adjustment layer that I was just talking about, and you can use the sliders to change how it blends. You can change the exposure, because that's really what we're doing, we're changing the exposure so that one layer shows up more than the other. So I can click and drag on the exposure slider. You can see how the effect is changing now. And we have a color. And not just one color, I have also included more colors. Actually, the yellow might be a little too light to see with the exposure being so low, so I'll make it a little bit brighter. And I just included all these different colors that you can use on your double exposure effect if you like, or you can just leave it black and white.
Class Materials
Bonus Materials with Purchase
Ratings and Reviews
ML
CreativeLive has many excellent instructors for whom I have nothing but high praise, and some have classes or segments on blending modes, but Photoshop Week 2017 was the first time that I finally "got" blend modes. Kudos to Jesus Ramirez for covering a lot of ground. In this class, Jesus explained the rationale behind how blend modes are grouped and how each group affects pixels. His methodology - applying each blend mode to the same photo, blended first with a luminance chart, and then with color wheels - was very effective at illustrating the impact of each blend mode - a visual representation of what each blend mode does accompanied by an introductory explanation of the algorthm. He also illustrated how he had used the effect in his own work, provided useful advice, and left room for our own creativity to take flight. This one-hour class has something for beginner to advanced Photoshop users alike. Well done!
sam
wow! Amazing!
George Fargo
I would recommend it for beginners but when it said "like a pro" I assumed it would be more advanced. It covered the groups with mainly one example from each group. What I was looking for was some knowledge of all the modes in a group and the relationships. I know that lighten lightens and so does screen but what is the difference and when to apply each. Same with color dodge and linear dodge, and all the various members of all the groups. Otherwise I am doomed to merely "scroll through and pick one I like".