Jeweled Mandala Pillow
Lesson 6 from: How to Turn Junk Drawer Jewelry into Top Drawer AccessoriesBlair Stocker
Jeweled Mandala Pillow
Lesson 6 from: How to Turn Junk Drawer Jewelry into Top Drawer AccessoriesBlair Stocker
Lessons
Lesson Info
Jeweled Mandala Pillow
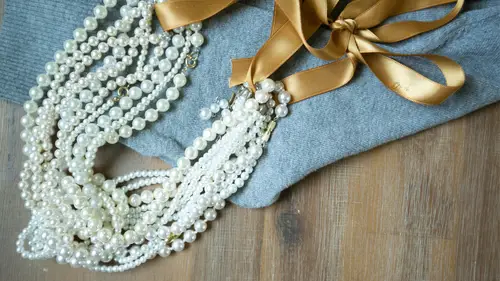
So another thing that I like to do, a costume jewelry, that's really fun is so it onto fabric, and I want to show you a couple things that I've made with costume jewelry. This is a pillow and the sister tive those mandala designs, and I'm talking about where they just sort of start in the center, very meditative little symbols. So this pillow was just a pillow cover that I had made with what you see here except the button. I used the button in her charm bracelet. So so as you can see, I bought these at the thrift store and that's what you have and it's so easy, tio. So these things would be so fun for, like, a teenage girl's bedroom, or even for girls to do themselves like he could do your initial things like that on the fabric here's another example of just jewels sewn onto a little piece of ribbon. And this is actually in my book, and I thought this would be so cute for, like, a flower girl bracelet or something like that. It's just a little bit of shiny for them to have, and then yo...
u can also use speeds to put around. I know that you guys have seen those sweaters that they have now, where they've got the beats around the neck or the beads down the down the plaque it like this, but I mean it's such a fun way tio just take apart something and and sparkle something up so we're gonna learn how to make this pillow and we're going to actually take apart a piece of jewelry so hopefully that will work and way will make one of those or begin to make one of those it I'll tell you how to do it, they need a pillow cover and I would suggest either recycling one that you have or you know, just some sort of solid pillow cover this is about I think this is like an eighteen inch by eighteen inch pillow cover, but it doesn't matter what size you need your costume jewelry, we have tons of costume jewelry here, but you need jewelry that you can take apart, so we have some of that you need just some scissors. The reason we keep the scissors handy is because if you're taking a part of necklace sometimes it's just cutting that's the string that holds them all and maybe they're strong with string and sort of wire or cord you need some flatten his pliers. Here we go so we don't use thes as much in this as we would if we were actually making a piece of jewelry, but they're good to have because you need them to take the costume jewelry apart um fabric embellishing glue. So even they were sewing these on there are glues that will allow just a little bit more of a hold. Sometimes when you so like a larger bead pull this over here sometimes when you so a larger beat, it may only have one hole at the top, like this teardrop shape here, and that just allows you the fabric loop allows you to have a little that more stability and sort of hold it in place to keep your design intact. And so I have resource is available with this class that show the type of glue that I like to use. And I have tried many different types of glues to hold jewels to fabric, and really, they all work really well, they all hold really well, I think you just want to make sure that it says on the container that it drives clear. You don't want to see it after it drives, but you do need that. And then you need ah hand sewing, needle and thread and you want your threat to blend. I'm using white thread today. So hopefully you guys conceit against the blue pillow. But you would want it. Each case is different that you would want it when I said this one eye. Sort of match the threat to the pillow if it's a really strong contrast between the beads and the pillow you might want to match the beets whatever it looks better and you also want to make sure that your needle will go through the hole in your beads most of the the, uh, costume jewelry that I work with the holes are sort of large but if you're using smaller beads sometimes she may need a beating needle and again there is a resource in your materials those you can get any craft store if I tried to thread one of those today in front of you I would probably fail so but those you know you just want out like when you have yes a thread fiber content preference when you're selling beads teo I don't okay I just use whatever I have okay um I've even used embroidery floss and just pulled out a strand of it I mean, the good thing is is that it's costume your e we're having fun with it so we're not making museum pieces and secondly I used the the fabric glue to sort of reinforce where it is so it does hold in place but do you have do you have any experience with thread for yeah, I think just any type of thread that seems too teo like an all purpose thread that the color would coordinate would be fine so yes, just test these air just regular all purpose hand selling needles, but just test and make sure that they're going to go through the tiniest of what you're trying to do. And like I said, those costume jewelry works really well, the holder large enough. Um, let's, just jump right in and start creating this. Oh, the one thing I didn't mention that I'll demonstrate now is to plan your design and I have this in the resource is I use the friction pin, the's are available at office supply stores, they are erase a ble, but they draw a nice, strong line. And so what I like about these is you contest the mark on a corner of the fabric, but these draw directly on the fabric a nice strong line, and then they disappear with the heat of an iron so you can plan your design are, you know, if you plan your design and so the beats on and you're left with little marks that you want to get up it rid of just aim a hair dryer at it, and they just sort of disappear it's pretty easy, but like I said, test an area of your pillow and just make sure I've never had a case where the marks didn't disappear, but it's always good to test, just to make sure, so to start my design I found this really cool clip that I was I thought these green beads would look really pretty I don't know these might be all global, so we'll combine these with some that will so on but you're gonna want to deconstruct your jewelry and really this is all about just going for it just wailing on it. It's yeah and luckily some of these air coming off really easily already but this is I'm using my wire cutters because it's kind of cut into a lot of this costume jewelry is really just plastic with with a finish on it so it's really easy to take apart once it gets going time is like you start bending and you send it into shock and it just was like, ok, yeah and then just collect your beat something good for these bigger ones here I heard one fly over there they're sometimes they'll fly away so just yeah, but it's good to use your pliers to go in and just take full individual parts out so it's good to have this handy this one's coming apart actually way easier than I thought I wass and again, if you know these green beads here, if I didn't like the color especially I could shine it up with clear polish or I could change the color completely and just I could make a black and shiny which is kind of fun and you want I do this in batches I take my jewelry apart I put it in a little jar and then I go for my design I start drawing it out this was actually coming apart in chunks so honestly, if you liked a big chunk just the way it is you could so that on in just a little designed like a little filigree pattern which is kind of fun but this was actually donated to this class by someone at creative live so thank you creative live so we've got a pretty good assortment of these yes so we've got those and then I'm also going to do some that have you seen pearls at this point blair do you know what your design is going to be, what you're going for stone just coming together you know, it's just have fun with this I mean it's just so what I'll show you next is how I, um plan the design on the um on the pillow and so it kind of happens all at the same time so I thought this was really fun so something like this like a nearing you could just so this down just so somebody used that because this is really pretty too and just take it all off so as I collect the's let's talk about the design portion so a mandala shape it's round and it's going to just build out and so what I liked about this particular shape is that you can start small in the center and then just continue to build out as you like I can continue adding needs to this if I found another color that I thought worked so take your pillow cover and you want to just fold it into quarters just so you can figure out where the center is because that's where you want so I just sort of press that in my fingers there just to mark this is center like a little center area marked and then with my my erase a bullpen and you guys put a little red dot or something on the because man if you actually grabbed a sharpie that would be really bad so yeah you want to mark this I keep all of these erase a bill pens in a special place what I did and this one is I started with the larger piece in the center which I kind of like to do so let's find a larger piece so I have this piece here actually really like this when it's um got a ship it's got uh little loop appear or a place but if you wanted to start in the center with something like this I would cut that off I would not so it down because it's kind of asymmetrical and it just doesn't really it's not gonna hold it that well and I would glue this down and what I will say if you're going to be using your fabric lou if you've got untold ziploc bag or something that you can put in between the layers of the pillow just so that the glue doesn't seep to the back and I usually use I don't think I haven't appear but usually is like an old cutting ward like a one of those um plastic cutting boards and just stick it in there so and then I'm going to take my fabric glue which comes out white drives clear we want to make sure that happens and I'm just going to put some on the back of this and so because you want this toe hold you're going to want to use a fair amount of lou you don't want it too steep from the sides but another reason why you would put something in to protect it's time to put this right in the center and because that's not so down I'm gonna give that a second to dry while I accumulate more beads and I put in the resource is but if you're looking for costume jewelry just to have fun with just to play with rather than going to thrift stores and buying one at a time you can search on online places like at sears ebay jewelry like costume jewelry lot and it will show up a ton like people will will sell them by the bags so it makes it a lot easier if you just want, like, an assortment of things to play with. And they also sometimes do that in thrift stores, too. So I'm just taking apart this necklace because I think these beads are kind of fun, and normally I would probably collect these in like a little dish of some sort. I've got some more pearls. Yes, I just want you want to go ahead and, uh, plan your design enough to have your jewelry ready. You don't want to have to stop and start deconstructing more jewelry and then coming back over. So so, assuming that that is dry enough, I'm gonna unzip the back. This one has a zipper that goes across that's, not quite dry enough, so that back on there.
Class Materials
Bomus Materials with Purchase
Ratings and Reviews
a Creativelive Student
Disappointing!! This is such a basic course with the instructor having less knowledge on the tools, materials and all pertinent information that would make it a tutorial that I would purchase. The instructor has surely taken "her" time meddling deconstructing and putting things together for minutes as if she has not much to talk about with awfully long .... gaps of silence and at one point commenting on " Well, this can be done if you give me 30 minutes!" ( Putting a bead through a jump ring! ). She does not seem to have a "better" system on putting this on without fuss that I and perhaps the students may know! I suggest that if Ms. Blair has had it prepared to get the beads she needed, do a research in youtube and really know beyond whats presented then it would sell. The students seems to even suggest and identify the materials for her ! Her tentative use of words and even contrasting themselves made it more confusing to follow along! Example , " Let's now do this .. You can do this ... but you don't have to" , "Let's use this ...but you don't have to" ..."Where is? ... I forgot to bring it ... then proceeded to do it anyways". and MORE :( I suggest that Creativelive would screen their instructors thoroughly and not based it on just a book somebody authored etc. Experience is MORE RELEVANT and the ability to convey a thorough knowledge and burning passion of what their teaching. I really want to learn more about Beaded Jewelry and Creating Clasp etc... I am sure there are a lot out there! Amazon book best sellers with high commendations from their reviews and YouTube. Keep up the great work! Creativelive !!! I am a fan.