Lesson Info
4. Forging the Tapered Bracelet
Lessons
Lesson Info
Forging the Tapered Bracelet
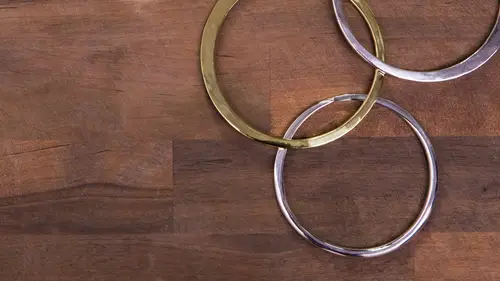
Tapering so as you may recall this piece has a nice tapered point now I just did a small taper on this basic one you could taper the whole thing the taper could be as long as you want it to be this is not hasn't been taken that far but we'll show you how to start this so we working on silver here actually work on silver again actually have a brass won here back and forth now the breasts and the silver have very close density to each other so how easy it is to hammer these pieces out they're fairly similar so it'll be just like the physical force and if it was copper this actually go a lot faster because it's so much more soft than the other two and so if you want to it's a really if your fund this might be a little heavy duty for you um you can do use copper wire and you couldn't find copper wire and the same thickness to and it's a good place to start so with this you know you're going to actually hammer the tapers first then you're going to make it round and close them together so ki...
nd of a different process here so I'm going to start with my ah neal piece of silver we'll use this piece in a minute now I'm gonna start by squaring out my wire again like I mentioned so let's use the big guy here now this takes a little bit more finesse in what way now miss square out my whole wire here even the center and to end so now I'm goingto have established my flat side on one direction right now so that's this side on both sides now I'm going to do it on the other edge on and since I'm only gonna be tapering on each point and you can kind of mark this again for yourself, I'll just kind of put a line they're sort of making reference it I'm only going to go about an inch back and your engine a half back once again it's tolly amount of preference of how long you want your paper to be you see that? Okay, wait so now I'm going to go that far back using the round side of your hammer once again. Now when you're hammering this time around, you really want to make sure that when you're focusing your hammer blows that it's in the center it's not on one side of the edge of the other. If it is then you're gonna have some issues because it's not going to taper out, move evenly and it can get a little bit wonky I could show you howto fix it if that happens, but ideally speaking you want to try to avoid it because it's kind of a not a fun thing to have to fix so now we have our square out wires little rectangular, the money comes suit there on edge but it's kind of gotten a little shaping, but you kind of have a defined shape now that is more geometric or clean edged opposed to round now to make sure that these stay even my points when they meet later I'm a jump to the other side and do the same thing so it kind of do the steps and in like in time with each other at that way that everything stays even if you jump and finish one side and try to re create that side on the other and later and maybe uneven if you kind of repeat your steps, you tend to stay a little bit more focused. So when a mark that again then start hammering, switching until we get our square again, you know also know at a certain point we're going to actually one ends going to be thinner and one is gonna be wider. One side is and so when she start to establish that, um, you can kind of see right now I need to make that a little more clear this is wider here than it is on this side, and since they're going to meet up later, you want to make sure that you kind of keep that in mind that you maintain the evenness of those ends so now that it's square now we're going to start focusing on tapering in as you start to taper your piece you're actually now kind of not going as far back so before we this is where I started right now I'm actually going toe start to taper this and I want the table tio to be gradual gradual so you're actually going to kind of come about here now and work then when any time you're trying to blend a direction, then I'll go backtrack to where it was before just to make sure that the hammer marks overlap but now I'm going to go this far yeah, I kind of see how I'm starting to create that slope out starting to get thinner it's coming down, I'm gonna go on the other edge so I've been working here with that sheriff is switching other side now I'm kind of really see how it's actually to grow in length and we see that in comparison to where it was before as you're watching me hammer you can actually see it start to grow and you can also see here it's a little rough being see how start to taper that edge too and then you're gonna come back to the other side and do the same so once you have done the first round comparison here fully in kind of see how that shapes starts to come together a little bit more of a taper here we'll get more of a slope finer point, but I can tighten that up a little bit so this has been and kneeled I'm switching to this other one so this would be like round two so right then I could hammer it a hair more and then I would stop a neil quenching neil and so on and I'm ready to do a little bit more now that I have a finer point. Um I less surface area to hammer on even though the weight of this could be really great to move things quickly, you need to use a smaller hammer face that way you don't have to worry about smashing it. We're basically going too far, so no switch to the smaller hammer now this can be a little tricky noticed once again I'm not going all the way back up here you kind of see from my file marks where have been so started back here can kind of see so the only kind of working on this tip right now this area of the wire switching sides you go see how that's gotten a lot finer than this opposite end here now if it starts to go off a little killed her like I was saying, it starts not be square anymore what you can do is hammer on this edge the corners to fix that up unfortunate didn't do that so I can't totally show you I could do it on purpose if you'd like um because that easily happens and that happens when you're not hammering directly in the center so let's get started I started to do it it will get a little smushed so you start to lose your shape a little bit there it will start to kind of look like a slant like this and we see that starting to do it a little bit what you're going to do to fix that is that you're gonna hammer on the opposite corner to kind of round it back out so so this is where you point that up so this is where I've been hammering right right over here so I would come to this corner not this corner to fix it so I'm gonna hammer here on edge a little tricky to hold when you're doing this how you need to kind of find that happy spot it wants to roll around when you do this so find where it's gonna hit make contact with your base forward a little bit eventually going over that a few times you'll bring it back to square which all the enough I made it a little more walking by time but that's what you would d'oh to get it back to square on you just have to kind of meet it up a little bit more they're also when you're doing this, it's not about ideas switched here, flat faced out of your hammer to get square back up. Which direction? There we go, that's we're back up all right, so let's say we actually hammer this out to the table that we want. If you want to do a little cleanup, you can by taking your flat file and just kind of going over that edge. Help true it up a little bit, or you can sand it by using your three twenty sandpaper or your two twenty starts to smooth that over. Also, you may notice, here we get something a point. This south you had a little wrinkle sometimes that happens, so if you're hitting on one side excessively and you're not hanging the other, the walls kind of squishing together and it creates a little wrinkle dimples you're seeing right here, you can go back and hammer on that side to get that out, smooth it out like I was doing before with the other previous peace were using the flat side to kind of get rid of that any hammer texture, essentially and that's what some people, actually, if you're doing any raising or any three dimensional meddlesome thing, you use the planting hammer to get hammer marks out that's his traditional use there's other hammers that you can use to do this forging process I have personally find that this is the most efficient that's why I use plan ish ing hammers some other people might feel more strongly about a different type of hammer, but I find these to be useful but eso typically speaking the planting hammer is is used to get hammer marks out like you're seeing here so you khun file them out or you can hammer the mountain so once this has gotten tio shape that you water the length that you want on and you can also you know, once it's got enough of that just your happening you could also like if you wanted to have a little bit more point to it, you're gonna have to just spend some time filing that edge is down a little to define it more. Um, if the only difference is is that you I won't lose material if you're doing it via hammering, you will lose material if you're saying if you're filing depending on what you're working on let's say there's gold and yeah, you wouldn't want to lose that material because it cost quite a bit, so um let's say it's ready, we've got to the shape we want now we want to bend it round to do that nice little overlap detail so I would come back over here to our bracelet mandrell it would be better if it wasn't upright like this I personally feel sometimes it still could be hammered on and we'll make it work but you're just gonna hammer like he would before rounds way tuck it in switching sides now these tips or work hard, mind you I would've been healed this prior tio coming to this step but eso this wood actually shape a little bit easier but for the sake of time we'll move on that's why I kind of the other parts of this area are moving a whole lot easier than you're hammered areas so you can never kneel too much if you feel like you might if the medal is not moving that well if you're trying to create your taper and it's not cooperating if you had that little slip up like I said it's not square anymore and you have to fix it sometimes stopping and healing is a really good idea because your little soft again going cooperate you more you're hannibal is there going to be more effective and so you it'll save you a lot of physical labor too so I kind of just shaping this round, getting these points where I want them to be sometimes like a little wonky and see how it's kind of walk I can just camera on that you can kind of move it back and forth a little bit certain questions at this point it's self studio you seventy people they're all raptured I saw a hand so that's why? All right so we're really close we are going to do a nice little overlap detail here so I'll go back to my mandrell and do that detail work here so it's supported on the rest of the mandel here but now I can kinda really tap those pieces in to the curve that I meet weapon to g come over to my soft surface area and really starts to bring these in now depending once again this is one of those instances that it doesn't have to be round right now it can be um we can get it round later because we're gonna sort of those two ends together so it's all about getting them to meet up the way you want them to, how far apart you want them to be on that they're going to sit right up against each other so you want them to kind of sit flat up against each other so when you're actually hammering this out, make sure that the wire does not twist it all this twisted on me a little bit mainly because, um it's been work hard and quite a bit so another example why you want to soften your medal during certain processes so um this could be a little bit flatter of a connection and kind of see how this isn't sitting perfectly flat is because this edge isn't perfectly flat either so what you can dio I would stop it a neil this would be the best thing to do for the sake of slaughtering it together I can also describe pair of flat tires and just kind of tweak this by gripping onto it and also if it's not sitting too flat I could have actually open these up home apart a little bit like that grab myself a seat and file it once again you could always correct a lot of these errors that happened during the hammering process by filing some people consider to be the cheat your way but when you're just learning how to do this and you're trying to get your rhythm down when you're hammering it's not always gonna be the perfect shape and you can still get the results you want I just kind of cleaning it up in a different way so it's a little bit more square so that I can kind of bring that together but across these overs a little tension there it just kind of tap on your screens them together like that and then just a matter of how much do you want that overlap to be chip was kind of a little high for me so I'm gonna try toe then that down and then your next step once you've got it to the shape that you want. Sorry. So saying that a little bit. So it's. Easier and just spending on how square you want that to be. If you're okay with that coming up a little bit, or if you want that to be tighter, with enough no overlap, just a matter of aesthetic. At that point, I also getting these to meet a little bit better is easier on your bracelet. Mandrell, when it's soft. So this is not cooperating fabulously with me right now, mainly because it's really hard.
Class Materials
bonus material with purchase
Ratings and Reviews
user-fecce6
Short and sweet. It is an intermediate class so it is assumed that there is a certain level of experience that the viewer has and doesn't rehash a lot of information. I appreciate that. I would add that there is a brass solder sold by Rio Grande. I have been using it for several years and it is a great color match.
Be Perfect As God Is
I truly enjoy watching and learning. Step by step. Some of these so instructors , miss steps and never finish the projects, its unacceptable to pay for those types of learning classes.