Lessons
Lesson Info
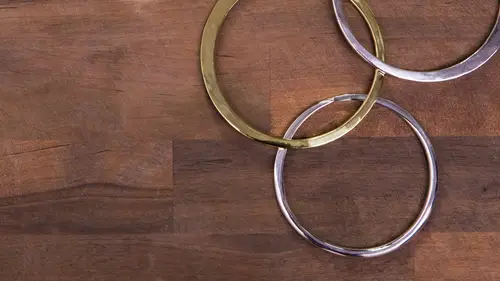
Shaping the Bracelet
So now I'm going to come over here and use the hammering station teo, and we're going to use this big shaped piece over here. This is a bracelet, mandrell so we're making rings we used a ring, mandrell so we're going to create a brace that we're going to the bracelet. Mandrell now, this happens to be a round one could come on this site and kind of see the profile of it. They come in different shapes since we're creating bangles, we want them to be around so they also come in oval shapes, but we want a nice perfectly round circles were using a round mandrell. Now you need a good, sturdy vice toe hold this in place when you're hammering and since I'm just trying tio shape the piece, I'm going to be using a mallet once again, and I'm gonna start hammering it over. So now, depending if this clamped well enough, this may shift on you, so try he clamped well, and you're going to make this kind of wrap around itself. So those ends meet and you can do some of this with your hands o or over a s...
oft work surface area to get the ends to meet. So for me, I could actually want to make sure that when you're bringing ends and you don't want him to be straight, so I'm just kind of pappas back over here really quick and make it so that this is curved in a little so you see how it's coming in it's not like a flat straight line here, that kind of tucks and older that allows me to kind of bring them closer together and get a cleaner shape. Now once again, when you're doing this, we're going to make it round later it's not important that it stays perfectly like ground during this process, we're going to meet up starts to get a little wobbly like that kind of just hammered flat like that you can do it on your block here or you have a sobs surface like a stumper you can't do that, so I gave them just to be lined up again. I'm gonna bring these yeah until they meet, just like he did with our ring once they're touching again there's no gaps then you're going to come over here and sauder it closed just like we've done before and it's like any other time you're sauntering make sure medals clean, you're going to use hard sauder once again to make sure that it's a nice strong connection cause we're going to bring a lot of hammering on this piece once it's been sawed erred so we do want tio make sure it's a strong connection so that's why I'm going to use hard there is no other sauder seems so once again hard is always kind of a good bet to go teo, you have to worry about what's happening next if anything else is being attached and so you have to think about other others saw her joints flowing or the temperature of it at all or anything so once a thought or closed we're gonna make it round so bonnie you've been using a silver colored sort of up till now does that matter with this particular metal you're using now? Does it matter that the two don't match? Um no in some senses yes color wise you do wanted to match there is no brass sauder there is no copper some well there is copper sauder but no one uses it's not very good quality thing for structural integrity when you're working as a jeweler and the thing is any time you are uh doing your budget it's all about keeping a really clean connection. If you saw that perfectly, if you filed that perfectly, there should be such a fine line like barely there tio really we should even be able to see the sauder if you connected it really well and so you don't have to worry about that color difference so um but we are using a sterling silver slaughter again yes so now that we've had um this slaughtered close I'm going to shape it round now you can move your tool up right if need be if you're vice isn't cooperating with you for this particular steps I can drop this on here and I kind of kind of just hold it and press it down onto the magical it's not the most ah easy way to work with it but just like before kind of just going around in a circle preferably this is clamped into a vice and so you can you don't have to hold it, but if this is a case, you kind of just press it on to your mandrell and just kind of make your way around that circle now remember you're doing this on a taper and if you don't want your piece to become tapered well kind of sort of lean in like this a little bit for this instance it'll be very minuscule but you'll want tio switch directions periodically and once again I'm using a mallet so that you don't have to worry about any hammer marks and we're nearly there nearly a perfect circle you do want to make sure that it is a perfect circle that way you don't have to worry about um irregularities happening during the forging process because once you start to lose the shape as you hammer it's really hard to get it back, and so you might s so you really need to pay attention to maintaining your shape, as well as the forging element that you're trying to do so in a place this back here, my advice for later use hammering when they've been using capo the brass in the past, they found the hammering is actually makes it brutal does have experience you've ever had, so if you work hard in a medal when you hammer on your work hard and get and the more you hammer, the more work hard and it will get, and essentially it starts to become brittle through that process. So what you can do then, if it starts to feel like it's hard, not moving as well as before same ideas if you take a piece of wire and you bend it back and forth several time it's going to break it does become brittle. And so since we we really have to pay attention to the fact that we're going to be hammering on this a lot, work hardening a lot, and so you do need to stop periodically in and neil so this got a kneel during the saw during process because you go past the kneeling point with all most medals when you are actually saw uttering so this metal was already softened prior to during the slaughtering process. I didn't have to soften it when I started to should come over here to shape it was already soft. Now this got work hard up it. If you're feeling really precautious, you could stop now in a neil, um, but I'm just going to move on for now and then well and kneel in a minute, and we'll kind of swap back and forth between the two different styles. Well, we wait for things to sit in a pickle. One thing is you'll learn if you really get into jewelry. Multitasking is a really smart thing to do, always have projects more than one project going. For while you're waiting for something in the pickle pickle limbo like collective paul, it was like you're working on so much, you're not because it's just sitting there, um, you can have work on a different part of the project, so that way you're always things were always happening. You're not just sitting there twiddling your thumbs.
Class Materials
bonus material with purchase
Ratings and Reviews
user-fecce6
Short and sweet. It is an intermediate class so it is assumed that there is a certain level of experience that the viewer has and doesn't rehash a lot of information. I appreciate that. I would add that there is a brass solder sold by Rio Grande. I have been using it for several years and it is a great color match.
Be Perfect As God Is
I truly enjoy watching and learning. Step by step. Some of these so instructors , miss steps and never finish the projects, its unacceptable to pay for those types of learning classes.