Dipping and Rinsing the Cloth (Batik)
Lesson 10 from: Intermediate Shibori Indigo DyeingKaari Meng, French General
Dipping and Rinsing the Cloth (Batik)
Lesson 10 from: Intermediate Shibori Indigo DyeingKaari Meng, French General
Lessons
Introduction
02:46 2Creating the Dye Vats
03:40 3Nui Overview & Fabric Preparation
03:48 4Stitching the Fabric
12:25 5Testing the Vats
02:40 6Dipping and Rinsing Cloth (Nui)
07:47 7Untieing the Cloth (Nui)
06:25 8Batik/Wax Resist Overview & Fabrication
08:32Lesson Info
Dipping and Rinsing the Cloth (Batik)
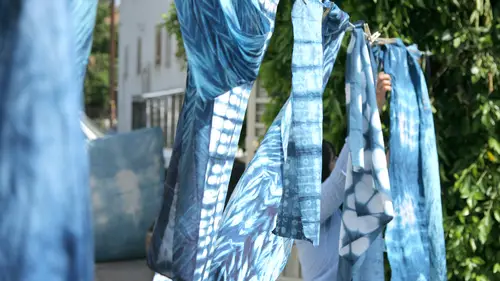
Ok, so now we are going to dip our batik cloth into the ending of that before we do that, we're going toe kind of look at the surface of our vat, and if there's any sort of oxygen buildup or bloom buildup, we want to go ahead and take that out, and I do that the same way is I just use the strainer and I skim the top of the surface, so once this once its surface is nice and clear of any bubbles it's ready to go, so we're going to take our batik bag, which has been soaking in water and carefully ring out the water. You don't want to bring this so hard that you damage your waxwork so it's just a very careful, uh, ring and you can see the wax is still the resistance still on the front of the bag, and then we're just going to go straight down into the end ago that and kind of massage through the water, and because this is such a large piece and this that might not be as big as this bag wants, you've got to keep moving it so that it gets completely covered. Sometimes the five gallon that's w...
ork a little bit better for these bigger pieces, so once you've got it totally immersed in that and you've moved it around a little bit. You are ready to pull it out and try to pull it from the top here is he conceded it and there it goes from yellow to green now there's some I see a lot of pigment that's kind of spotty on it so I'm going to do a quick rinse and bring it back out and hopefully that'll take some of that off and we rinse it as much as possible without again without damaging the wax and then we'll let it sit over here from in it and oxidize so you really get the green on this one, which is great and as you can see little boo boo right here a little bit of wax got on to the side so wherever the wax might have dripped is going to create a resist so we'll let that completely turned blue and it's kind of nice to get some air in between there this is really important if you're ever dying clothing like like a men's shirt, you always want to make sure that you know, capture any air bubbles in the sleeves because then you'll get a big air bubble right on the surface of your fabric so always let everything you know kind of air out can you can do that you can do it by turning it inside out or you can just do it by kind of opening it up and letting the the air oxidized in there let that sit for another minute or so we also did this small little sampler thiss batik samplers so let's, try that too put it in the water, I've rinsed it out, you can barely see the wax on there, but it's there and we're going to go ahead and dip it in and give it a minute to really this is a real simple little piece, so it shouldn't take long this first step and there's our yellow to green and you can kind of see can you see the wax just kind of it's just starting to appear, which is nice, you can see where your design is, so we'll rinse this out, keeping it nice and low down to the vat. So is not to create too much oxygen and then we can let this go ahead and dry and go back to our first piece, which is looking pretty good. You've got a little bit of it down here that still needs to go, but most of it looks pretty blue, front and back and that's what we're looking for so we can go in again and this this canvas bag, this cotton canvas bag really has toe soak in the water for a good amount of time before we dip it, so the longer you soak heavier material, the more the fibers will open up. So think about that when you're choosing your fabrics for each of these chivalry projects because each fabric needs to have its own amount of time to absorb the water to open up the fibers and the heavier the fabric usually the longer the time it needs to soak in the water that ok, so we're gonna let this trip try again a little bit, so now we've dipped that twice and again, you want to make sure you don't get any pigment that settles right in the front because then you will get kind of a darker blotch and this piece is oxidized and you can see the design is slowly showing through so did this again, so this is this is a real basic way of doing batik fabric and indigo dying and you know if you study or read any of the great books on indigo dying, you'll see that this technique is used all over the world beautiful african fabrics, beautiful indian fabrics and each culture is really kind of developed their own technique for batik and dying, but I find that with the indigo it just it really pops and works really well and it just you get the real distinction of the design and the dye, which I really like, so we'll put this in I like to do it at least three times, so we'll put the bag and one more time I don't know if you just saw that, but that is what they call a burp and that just burped and it was because when like I said, whenever you have like a shirt or something with a closed area on it like this bag has you get an air bubble that gets trapped in there and you kind of want to see that burp happen so that you know that your piece doesn't have an air bubble stuck inside of it ok, maybe it out slowly careful not to damage the wax you don't wantto flake any of the wax off of this point there you go things are getting messy now well there we go okay, so we didn't miss one three times maybe we'll do that one one more time so it's looking good that the indigos still it really nice dark blue and you're getting a lot of good ox ization that's happening which means that the vat is still really nice and strong. So once these have now been dipped three times and once they fully oxidized which looks like the bag is then it's ready to be rinsed so we're going to go ahead and we're going to rinse this I've got a clean bucket of water and we're just going to go ahead and dip this in the water and kind of sloshing about just to make sure that you're getting any extra pigment out of there this won't be the only time will wash. It will wash this again to get out any last bits of die. But this is just a nice way, so that too much of the pigment doesn't get stuck in the fiber, the excess pigment. Okay, so that peace we can now set to dry, and then we'll rinse off our little practice cloth. Ok, there we go, starting the show through. So what we'll do is we'll go ahead and let both of these pieces dry fully, and then once they dry, then we're going to go and take the wax off of the fiber. So in order to do that, everything has to be nice and dry. And then we'll set up our iron, and we will remove the resist, and the pattern will come through.
Class Materials
Bonus with Purchase
Ratings and Reviews
Bonita Davis
The class was very enjoyable. Good for beginners or intermediate indigo dyers. I can hardly wait to try. Please do some more classes. Well worth the money. Highly recommend to anyone who loves Indigo.
fbuser e565259b
I love this class. What a wonderful and easy techniques, Only problem is streaming. this class stopped at least 20 times.
Student Work
Related Classes
Fabric Crafts