Lessons
Lesson Info
The Elements Editor
Alright, let's talk about fixing some of this stuff. So let's go back to our whole collection of images, and I have a photo here with red eyes in it. And, if I double click that photo I get a larger preview, okay, and it knows there's Cole. It tells me the date and time, this is old, 2011, he's a big kid now. But I could add a caption here if I want to, but what all I really want to do is fix these little red eyes, and it's pretty simple. Right here, within the editor workspace we do have the ability to do what's called an instant fix. So I'll just click instant fix, and it's going to bring me over here, so I'm still actually within the Organizer, and there are a few very limited tools over here for things that I can do to my photos. One of them is to fix red eye. So I can just give it a click, and it just fixes it. It analyzes it very carefully, so it might take a minute. But, that's it, it fixed it, and now I'm just going to say save, so it saves the changes but in a separate file, s...
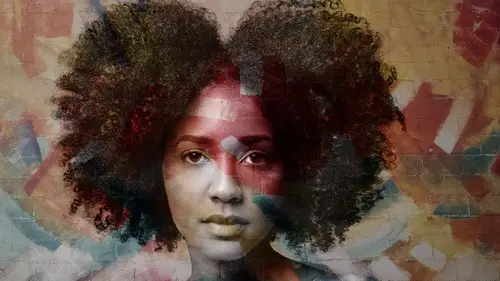
o it upends the file name, so we have the original file whatever that was called, and then it's going to add a dash edited to the end. So we're never losing our originals. You don't have to worry about that, and we'll say done. And if we click to go back to all of our media, we can see that this is an edited file right here, because of this little icon. Okay. Okay, let's move on to doing our some fun stuff with these palm trees, in our Quick Fix. So I'm going to select this picture of palm trees, wait, this one, right here. I've got this one selected, and I want to take this over to the editor. So with that file selected, I'll just click the editor button. And it's going to pop it open in the editor. We've got, again, the eLive sort of news page, if you want to keep up with current releases and industry stuff related to Photoshop elements, you can click there. But what I want to focus on are these different workspaces. So we have what's called an Expert Mode, which we'll get to, we have a Guided Mode which we'll get to, but right now we're going to work in Quick mode. So this is like a quick edit. So what that just means is it has really simple stuff you can do with basically a click of a button. So you're not worried about making selections, or do layer masks, or manipulating layers and all of those things, we're just going to click on stuff and see what fun we can have. So let's scroll through this list here. We've got some adjustments that we can make, so down here in the bottom right, we can adjust exposure and lighting and all these kinds of things. We can add some effects, if we wanted to. We have textures, which are really fun, so let's put a texture in here, maybe this one. That's really fun. And then we can click over on frames, and maybe we want to add a film strip. So you just click on it, and it applies the film strip. And then if we like this, we could save it. We could close it out. We could do any number of different things. That is right here in the Quick. So we could just come up to File and choose save. And you'll see here that it adds the name edited, and it chooses the appropriate file format, so I'm not even going to mess with it, I'll just be like sounds good Photoshop, sounds good Elements, hit save. That's it, and then we can close this, and move on to the next example. So that was the Quick Fix. This time I'm going to show you how to do a Guided Fix where we're going to remove the background from an image. So we're going to select the photo of this lovely lady right here. So I just click once to select it. You'll notice as I do all of this I'm working back from the Organizer. So the Organizer is for organizing our images and also it's just like a really great way to browse our files, and we can then add them to the editor from here. So I'm going to select this image, and down at the bottom right here, I'm going to tell it, I want to open the editor. It'll bring it over, and here we're in the Quick Fix workspace, where we left off a minute ago, but this task of removing a background is not a task for the Quick Fix workspace. We can do this in the Guided workspace, if we come to, let's see where is this one, Special Edits, we want this one. Special Edits, and it's the first option right here. So let me just explain kind of what this is, because it's a little busy. Within the Guided workspace, we have different categories of guided techniques and tasks that Photoshop will walk you through, that Elements will walk you through. So these are basically categories, and the removal of the background happens to be found under Special Edits. So we're in Guided Mode, in Special Edits, and it's called Replace Background. So I've already had this image selected, so now I'll just click to replace the background, and it knows that this is the image that I want to use. So by Guided it really means it's just going to tell me what to do, which is cool because I'm still doing it, but I have some help. And I still get a little bit of input here. So it says, right here, step one, use one of these selection tools to choose the primary subject of your photo. So we could try Auto, let's just click and see if it's going to figure it out. And then I just do a really messy selection here, so by clicking Auto, that means, it's not entirely auto, you still have to take one of these tools and draw a really rough shape. And wow, it actually nailed it, it did a really, a really good job. I don't know on her hair here. We can try and refine this in a minute, but that was pretty impressive. So let's see what happens if we click Refine Edge. Refine Edge is going to give us the ability to just tweak this and get something a little, with more finesse around her hair for example. We can do that by adjusting what's called the radius. So I'm going to take the slider here and just drag it to the right a little bit, and it's going to fine tune some of this. I don't know that it's doing a great job, because I can't really see represented with just these marching ants. So we're going to go ahead and click OK on there. And then, let's see if we can click this brush tool right here, and maybe we can refine this a little further manually. So I'm going to zoom in, I can get the zoom tool right here, and click to zoom in. And we'll go back to this brush tool, and if I just click with it, I'm expanding the selection. I can undo that by pressing Command or Control Z. What I want to do is actually subtract, because I don't trust it to a good job around this part of her hair, so I'm going to hold down the Alt or Option key, or you can come down here and switch from adding to the selection, click over here to subtract from the selection. So then I'm going to come in here with my brush, and just do what I can around her hair to try and clean that up a little bit. And then let's see if we click Refine Edge, maybe now we can refine it a little more, and click OK. Alright. So let's see how this worked out. Now it says step number two is to choose a new background. You can select from one of their presets, or we can import a photo. So I already know what photo what I want to use, and actually, before we do that, I can see a little mistake still on her shoulders here. She's going to have holes in her shoulders if I don't fix it. So I'm going to go back to Add, and just brush, brush that in. So I'm doing this using the Brush tool. So this allows me to paint, either to Add or Subtract to the selection. So this funny looking line that's marching around her, this is referred to as marching ants, and it represents the area of the image that is currently selected. So if I zoom in, on this area here we can see, oops, zoom out a little bit, we can see that this is now out of lines, and we have some sort of garbly gook on her jean jacket. So I'm going to hold down option to subtract this mess that I just made over here, and I'll let up on it, let up on Option to add in this area, and see if we get our hand tool. This view space can be a little bit buggy sometimes. And I'm just adding this in. For whatever reason, it gobbled up her jean jacket a little too much. OK, that looks better. Let's zoom out. And we need to add this area down here. Somehow we lost it. If we're using this brush tool, it's going to manually apply it, or if we click the Quick Selection brush, you can kind of do a really bad scribble job, and it will intelligently fix it for you. So I like that approach. Let's go ahead and import the background and see what kind of results we're going to get. Street, no we want this, the painted bricks, so we're going to move her out of the street portrait scene and move her in front of this colorful wall. So we'll hit Place, and hey look at that, it actually did a pretty good job. And that's really impressive considering she's got big, fun, curly hair, and that can be pretty difficult, and we didn't really have to do much. So it's amazing what you can do with this guided edit. And let's do another one. We'll go back to our Organizer, so to get back out of the editor, back to the Organizer, we just click the Organizer button down here at the bottom. And we're going to select another couple of images to work on, but before that I want to point out one thing. When we look up here in our Media catalog grid, I currently see this red line with a lock going through the photo of her. That means that I can't do anything to this image right now because it's locked for editing in the workspace. So the reason that it does that is to prevent you from editing it in one location, and simultaneously editing it in another. So that's a nice feature to have, but it does mean that I really should go back to the Editor. So I've closed this file, you can choose File Close or you can choose Command or Control W to wave goodbye to a file that you want to close. So now that's that closed, the red line and the lock no longer appears here in our catalog back in the Organizer. So next, we're going to create a Double Exposure using this image right here. And this is possibly my favorite example from this whole course, I just love it. So this is a guided edit, so I'm going to select her and then I'll choose the Editor down here to bring her over into the workspace. And we want to make sure we're in the Guided workspace, and this double exposure edit is found under Fun Edits. So we're going to click there and click Double Exposure. And because this image was selected, it automatically brings it in here, and we just follow through the steps. So it tells us we first have to crop the photo, which I don't really want to crop this, so I'll crop it, because somehow it wants me to, but I'm not going to actually cut anything. So I'm going to just crop it to the size that it already is. And when you draw your crop, to commit your crop, you have to either press Enter or you can click this little green check mark right here. So nothing really changes because I just cropped it the same way it already was. Then, it's going to tell us okay use one of these primary selection tools to select your object or your subject. So we tried Auto before, which is not as auto as you might think, so this time let's use the Quick Selection brush. And I'm going to zoom out so I can see all of the image, there we go. And I've got the Quick brush, so the way that this works is you just kind of like paint around in the image, and I'm just holding my mouse down and just dragging, not even carefully really around the image like this. And you can see that I've pretty much got her selected. So then I'm going to let go, and Elements is going to think for a second. And then maybe we can zoom in a little bit. And I can see it wasn't quite perfect. So, we have this area of her shoulder that did not get included, and the area of her hand here is not being included. So that's pretty easy to fix. I can just click on this again with this brush to just sort of smartly fix it. If I go too far, I can undo it by pressing Command or Control Z. And if we want to, we could switch over to the Auto tool, and give that a try, but I'm going to stick it out with the Quick Selection tool. And I think the key is to just sort of gently nudge this along until you add to it and get the selection you're looking for. Okay, so we've got her more or less selected here. This work space tends to be a little bit sticky, so you might experience some of that sometimes. Alright we've got that selected so we're going to call that good. We can refine the edge, to help sort of clean up the area around things like hair, or if you had a picture of a fuzzy pet or something. We're going to click refine edge, and adjusting this radius, just basically it's a way of telling Photoshop to pay attention and feel out these edges a little bit more carefully. So it'd kind of an automated thing still. We'll go ahead and click OK, and we're going to go to step three. Choose a photo to superimpose on top. You can scroll down here, there are some presets. So if we zoom in on her a little bit, and we could maybe apply a cloud photo if we wanted to. It's going to stick the cloud in there. That actually looks pretty cool. And we could adjust the intensity by just lowering the slider down. That just basically means like reducing the transparency, or the opacity I mean, of this cloud layer, so it's kind of more of a blend between her and the clouds. So we could do that, we could try the city photo, and lower that intensity too, and then maybe we want to reposition the image within. So maybe we click the Move Tool, because I don't really like that the buildings are right in her face, so I could move it over or move it this way, or whatever. But I want to use my own photo, so I'm going to click Import Photo, and we're going to use this stock image of these palm trees. So we'll go ahead and place that. This is just, I love it. We'll click the Move Tool here, slide this over, and I just love it because we can see part of her face, but also the palm trees like become her hair and it's awesome. And we can adjust the intensity, so we get sort of the shaded, almost like a water color effect from the sunset. I don't want any other special effects on here, so I would just go ahead and say Next. And it' going to ask me if I want to Save this. We'll say yes, and it adds the underscore edited extension. I wouldn't mess with any of this, and just hit Save.
Class Materials
Bonus Materials with Purchase