Clean-Up & Screen Storage
Lesson 12 from: Intro to Screen PrintingErin Dollar
Clean-Up & Screen Storage
Lesson 12 from: Intro to Screen PrintingErin Dollar
Lessons
Class Introduction
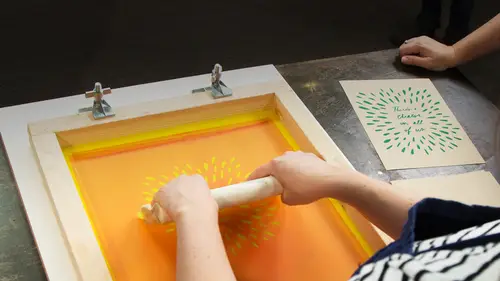
04:27 2Printing Process in Action
04:28 3Gather Materials & Setup Worktable
13:18 4Create Design with a Transparency
10:07 5Set up your darkroom
05:20 6Degrease your screen
07:26 7Coat the Screen with Emulsion
26:43 8Expose the Screen
09:13Lesson Info
Clean-Up & Screen Storage
Alright, let's dig in. So, essentially you wanna move quickly. Especially with the water basting. You wanna go ahead and start washing this out. Generally we would try and remove as much of the ink as possible. You can do this with a paper towel or with that cleanup card because we don't want the ink to dry on the screen while we're going between ending our printing session and starting the washout process. So, it looks like we've got most of the ink chunks off there. We wanna be careful not to send too much, like really big chunks of the ink down the drain. It's non toxic but we just want to be mindful of our water systems here. (spraying water) Okay, and now we're gonna turn around and do the back side. Generally, we would want to go ahead and remove these pieces of tape that we've used to cover the pinholes. 'Cause we don't want any paint to be trapped underneath those. We wanna wash all the ink off. Just leave those in our bucket for now. (spraying water) And if you're seeing the i...
nk is kind of being a little stubborn or not wanting to come off. You can use your fingertips. You can use a little scrubber, but don't press too hard at this stage you don't wanna disturb the emulsion too much. (spraying water) Okay, and I'm looking up close to make sure that there's no ink left in there. (spraying water) Okay, let's turn it back around. One way to do this is to kind of hold it up to the light and look for any ink that's still blocking the screen. This looks pretty good. You're gonna see a little bit of the ghost of the ink haunting you for a little while, and that's normal. Especially with darker color inks. (spraying water) Sometimes if you agitate it with your fingertips that will help it go away. But... That's fine. (spraying water) Okay, so that's looking pretty clean to me. At this point you would go ahead and remove the tape around the edges. Maybe do one last round of washing out. Making sure there's no residue of the ink on there at all. And then, you just store the screen. You would let it air dry. You can dry it out in the Sun, if you have a porch you wanna set this on. But, this is essentially ready to go into storage. Store it some where where the surface of the screen isn't going to be poked or prodded. Maybe in a drawer or leaning up against a wall in a garage, or some where where it won't be disturbed. But, basically this is good to go and use again, when you want to print more of this design. Or if you want to print it in a different color. This is basically ready to go for next time. So, we're gonna store this one, but we're also gonna show you how to reclaim a screen. We're gonna go ahead and use that screen that didn't wash out a hundred percent perfect. Because we want to put a different image on this for next time. So, once we reclaim this screen all the imagery will be gone, and we'll be back to square one. So, for this part we're gonna use emulsion stripper. And this is basically going to break down the photo emulsion that's suspended in the screen. So that we'll be able to wash it out. We're also gonna use another little red scrubby. Not the same one we used for the degreaser. We want to have a separate one for each chemical just so that there's no intermingling. We don't want to accidentally use emulsion stripper scrubby, when we're actually using the de-greaser. So, for this we're just gonna spray... Spray this emulsion stripper over the whole surface of the screen. On both sides. Be really generous at this point because you don't want to let this emulsion remover, or emulsion stripper dry at this point. Because at that point you're gonna have this stuck in your screen for good. We really wanna be mindful to keep this wet with the emulsion stripper, and not to do the spray and then walk away for some reason. You can see the emulsion is starting to degrade already. Just melting away and our imagery is gone. You can use the scrubby just to sort of start to agitate it a little bit, and make sure this process is coming along. You can see that there's some thicker areas that are coming out a little less than the areas that were thin. We have to spray a little bit more. Attack with the scrub brush again. And we can do that on both sides. Now, this may be something you wanna do wearing gloves. I'm not particularly concerned, we've chosen the most eco-friendly option for this. That's why I'm going ahead and doing this with my hands. I'll spray a little more on this side too. (scrubbing) Okay. Now, this is actually, not quite degraded as much as I would like. But, go attack it one more time. (scrubbing) Alright, and now we're gonna go ahead and try washing it out with water. The trick here is to use as high a pressure as you can possible get. We've got kind of a garden hose attachment here. If you have access to a power washer, this would be a great time to use it. There's no reason we need to do this particular process in a dark room setting. It's just where we have the tub set up. But, you could do this outside. Use a garden hose, use a power washer, and that's really gonna push whatever remaining emulsion we have in there out of the screen. (spraying water) Okay, and we see that there's still quite a bit that's left. So, we're gonna spray a little more. Go back to the other side. (scrubbing) Okay. (spraying) And you're just gonna have to repeat this process letting the emulsion sort of start to degrade, scrub a little more, let it degrade a little more, and kind of go back and forth until the emulsion completely falls away. (spraying water) Alright, so we're not getting an ideal washout, you can see that there's still a bit of emulsion in here. So, I need to kind of go back a few more times and repeat this process until this is completely clean. But, I think for our purposes we've illustrated that this is how you're gonna wash out the screen and get it back to that perfect clean screen. You're not gonna want to see any of this pink emulsion, if you're really having a lot of trouble getting it out, I would recommend at that point trying to use something with a little higher water pressure. Like that power hose or something that has a little bit higher water pressure than what we've been able to achieve with this little garden hose attachment. Just some food for thought.
Class Materials
Bonus Materials with Purchase
Free Downloads
Ratings and Reviews
Ariadny
Wow, that was a great course. Erin is clear, engaging and encouraging. I would loooove to see a follow up course with her that explores some of the more advanced silk screen printing techniques that she mentions in the last segment. Great job!
Marsha Law
Erin is such an outstanding instructor. She's just so confident with her topic and with her ability to communicate. This class helped me realize that I'm not ready yet to start screen printing, which in my opinion is just as important as recognizing when you are ready to try something.
Ana
Recently got my Creative Pass and I decided to explore the Creativelive library out of my usual fields of interest. Saw the title of the course and I said to myself - what is this? I literally had no idea about Screen Printing and that was actually the main reason I took the class. In just two hours I went from not having a clue to understanding the process and imagining me doing it :)) I'm not sure it will ever happen but I really enjoyed the class. Loved the style of teaching, very calm and confident, as well as the moderator's and students' questions which were filling up the gaps.
Student Work
Related Classes
Mixed Media Art