Create Design with a Transparency
Lesson 4 from: Intro to Screen PrintingErin Dollar
Create Design with a Transparency
Lesson 4 from: Intro to Screen PrintingErin Dollar
Lessons
Class Introduction
04:27 2Printing Process in Action
04:28 3Gather Materials & Setup Worktable
13:18 4Create Design with a Transparency
10:07 5Set up your darkroom
05:20 6Degrease your screen
07:26 7Coat the Screen with Emulsion
26:43 8Expose the Screen
09:13Lesson Info
Create Design with a Transparency
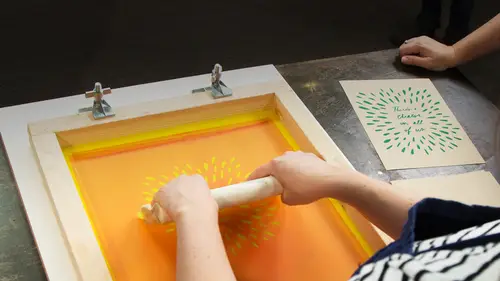
We want to sort of dive into creating our imagery for silk screen printing. And this is something that we want to think about at the outset, just so that we kind of set ourselves up for success by choosing imagery that's going to be really easy to create as a silkscreen print. And part of what I mean by that is when you're a beginner, there's definitely some troubleshooting that's going to happen with the process, but we can choose imagery that's really bold and has a really nice juicy line rather than very small tiny detail, and that's going to help us have a better chance for successful printing because we're not going to have as much room for error, thank you, we're not going to have as much room for error in terms of getting that fine detail to show up on the first round. And essentially the reason that fine detail is difficult to capture is partially because of the way that the screen processing is, and partially the way that there are so many little different intricacies in the p...
rinting process that can make it difficult to capture that. It's a little bit more of an advanced technique. We're minimizing some of that difficulty today by going ahead and printing in one color, so we don't have to worry as much about registering multiple colors, and we're also going to go ahead and focus on something that's a little bit bolder in terms of the line. This is the image that you're going to see us going ahead and printing later in the segment. So when we're creating imagery for silk screen, as you saw in the examples, you can really do pretty much anything. What I like to start with is either an image that I've created on paper, and you can scan that in, and create a transparency by printing it out on an inkjet printer, and there's definitely some information in the bonus materials that will tell you where to get these supplies, but this is something that you can do on your computer, this is something that you can do in your sketchbook and scan it in, using your just basic at home scanner, and buying 8.5 by 11 transparency film, you're able to print this using an inkjet printer, which is incredibly easy to do from home. You can also get this created at a copy shop. They'd be happy to print these larger scale transparencies for you, and this is an example of a transparency that I used in my work for my company Cotton and Flax. This is a really rich opaque line. Something this scale is actually really, really nice for silkscreen printing because the ink comes across in a really rich way. If you don't want to use the computer or don't want to do computer aided drawing, go ahead and move these out of the way, if you don't want to do computer aided drawing, you're welcome to use any opaque drawing material to create your own transparency. And the transparency essentially is going to be a film positive. You want to think about this as basically being a black and white version of the art that you want to appear on your finished piece. And when we're creating that art again, we want to think about using opaque materials, so we've got a china marker here, which has a nice sort of rougher quality, we have a film opaquer, which is essentially just a very rich, thick ink, and we draw on the transparency plastic. You can try drawing with a Sharpie. Sometimes permanent markers like this don't come out as opaque as we would hope, but we can definitely try with that. And something like an India ink or a Sumi ink can be a fun way to get more brush patterns. You just have to be very careful not to disturb it while it's drying, but that can be a really fun way to get those different brush looks and variations in texture and line. I'm going to go ahead and show you what that looks like. These are just essentially film acetates. You can buy this at most art supply stores. It's backed right now with a piece of, I guess tissue paper, just to keep it from sticking from the other one that I have down here, but that gets removed later down during the process. So why don't we go ahead by showing you what this film opaquer looks like? And this is something that's probably a little bit more specialized. You can look for opaque paint pens, which will basically accomplish the same thing. I'm just going to kind of do a little doodling on this plastic, in case you couldn't really see the individual plastic sheets. These just need to be cut around the same size as your screen, so same size as you want your imagery to be printed and same size as your screen or much smaller than the actual surface area of your screen. So these are, these film opaquers are nice, you can kind of get a nice medium thickness line or even fine lines if you buy one that's a little bit finer than this, or thicker if that's your preference. These are really nice just for direct drawing onto the transparency, you can really create any imagery that you'd like. You don't have to use a computer to create this imagery. I want you guys to feel like you're empowered to get started right away and you don't have to learn any new processes or tools or software to get started. So that's the film opaquer. And then we have this china marker which you may have used before on either ceramics or some other processes, and this gets this really nice almost like crayon texture, which is super fun. You could do cross-hatch shading like that if you wanted to get a more opaque look. You could build up surfaces like that if you wanted to do shapes, it doesn't have to just be line drawings. It could be a lot beyond that. I'm not really going to draw any imagery that we're actually going to print today, I just kinda want to give you a sense of all of the different sorts of lines and textures and tones that we can accomplish using these different drawing materials. This is the India ink, and with this we can get much more rich lines, and kind of wait until it's a little bit drier and get some more interesting texture like that. All of this area that we're drawing is what would print onto the paper, so essentially if you see a mark, that's what's going to print. So Erin, those finer brush marks that you're making, especially as the brush becomes a little drier, is all that detail captured in the screen as well? It can be, it's definitely the finer detail that you get, the more fine line, that's hardest to capture when you're a beginner. All of this is possible, the finer the line quality that you're trying to achieve, the higher count of the mesh, I told you before that we're going to be using 230 or mesh on our silkscreens, and that helps us to capture that finer detail. Essentially the more, the lower the number the mesh, the more space there is between the weaving of the material that's suspended in the screen. So the higher number, the more thread count, and basically the finer detail that we'd be able to capture. So when we're printing on paper, especially when we're capturing fine line detail on paper, we want to be looking at the higher mesh count so that we're able to capture that. As a beginner, I would suggest kind of sticking more with the medium to thicker line work. That can be a lot easier to achieve the quality of printing that you want. I think that we'll probably show one other example of how you can create, an even more simple way to create imagery for printmaking. It's just by basically taking cut paper and collaging it onto your transparency. You would stick this down with double-sided tape. And then that could be your image. You could have a clever arrangement of cut paper, and then essentially this would all print as bold shapes and line, just based on wherever you plan to lay those down. So there's a lot of different options. You can even get really creative and take physical objects and try to play around with that. That's a little bit harder to guess what the results are going to be than if it's completely flat like this. This has a much higher rate of success, but pretty much any area where you're using an opaque tool to block out light, that's going to leave an image on the screen that you can then reproduce onto paper. So now that we've gone through that, we can talk about making that transparency. We've talked about how to create them on the computer. I love that there's so many ways that you can do that, not only on a printer. Yeah, there's a lot of different ways. But, like you said for a beginner, just starting right out by drawing directly onto the transparency Yeah, yeah. That's kind of an amazing way to get going. Oh definitely, and there's a lot of things to consider here because essentially what you're looking for is just a really rich opaque quality to the transparency, because what this transparency is doing is acting as a barrier during the exposure process, so we want it to be really, really rich. If this were a lower quality transparency, you would be able to sort of see through the black marks here, and it would look a little more gray. You would be able to see my hand through it a little bit better. So this is the mark of a really high quality transparency, where the ink is really rich. You probably want to do this with an inkjet printer, rather than a laser printer. You're going to get a better chance of success. And if you're not able to see the results that you like from your home printing equipment, you're definitely welcome to go to a copy shop, ask them to print a transparency using very rich ink or ask them to really up the contrast on that so it's really, really dark. That will help you get a better quality transparency. And I also want to mention that transparency that Erin just showed us, that actually is available as one of our bonus materials, and it's a beautiful design that Erin has printed, so you'll be able to print it at home as well. Absolutely, yeah, I'm excited to see you guys develop your own imagery but we've got something ready for you if you just want to get started with the process. So you can just dive right in. And I may have misspoke, it's not the transparency that was made available, it's the design The imagery That's made available Exactly. So you'll be able to print that out and print it onto a transparency for use for making your screen.
Class Materials
Bonus Materials with Purchase
Free Downloads
Ratings and Reviews
Ariadny
Wow, that was a great course. Erin is clear, engaging and encouraging. I would loooove to see a follow up course with her that explores some of the more advanced silk screen printing techniques that she mentions in the last segment. Great job!
Marsha Law
Erin is such an outstanding instructor. She's just so confident with her topic and with her ability to communicate. This class helped me realize that I'm not ready yet to start screen printing, which in my opinion is just as important as recognizing when you are ready to try something.
Ana
Recently got my Creative Pass and I decided to explore the Creativelive library out of my usual fields of interest. Saw the title of the course and I said to myself - what is this? I literally had no idea about Screen Printing and that was actually the main reason I took the class. In just two hours I went from not having a clue to understanding the process and imagining me doing it :)) I'm not sure it will ever happen but I really enjoyed the class. Loved the style of teaching, very calm and confident, as well as the moderator's and students' questions which were filling up the gaps.
Student Work
Related Classes
Mixed Media Art