Lessons
Lesson Info
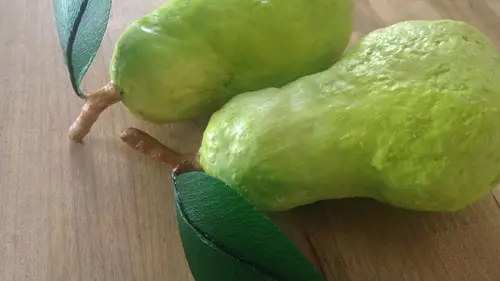
Paper Mache Fruit: Pulp Method
We are now going to be tackling some paper machete projects and there are two major schools of thought when it comes to paper machine construction but I first want to show you another pinterest page we're going to bring this up on the screen here much like the paper florals that we talked about interest is a great place to go for inspiration and so what they've pulled up here is my paper machine pinterest page if you want to go check it out you can see some of the amazing creations that people from around the globe are creating with this very versatile material and posting online so spend a little time with that it's a lot of fun but the very first type of paper machete were be going to be getting into today is the pulp method there are two primary types there's paper mache a pulp and there's paper misha strip method and that we're going to deal with in our next segment the paper mache a pulp method there are recipes that you confined easily online to create your own paper mushy pulp a...
nd it's not on similar to the pope that we created for our handmade paper making you would just be adding in the addition of some sort of glue or adhesive they do also sell it readily in the art supply store it comes it's almost fluffy looking it almost looks like maybe inspiration are insulation inspiration insulation or cotton batting something along those lines, but it does have ah, the added adhesive in its and that kind of helps it all clean together. This particular varieties called clay crete. It creates a surface that is quite hard and durable. It does take a while to dry, and we'll talk about that when we get to that step in the process. But it ends up with a quite durable andre results paper. Machete is another one of those craft traditions with a really long history, very popular in the sixteenth and seventeenth centuries because they were almost using it as a building material at the time. If you go back through certain furniture auctions, you can occasionally come across paper machine shares, and that just gives you an idea of how sturdy it can become as a structure. Most of them do have an armature underneath, which is something that they build, the paper machete up around and that's actually, something we're going to be doing in the course of creating this paper mache a fruit. So we're going to start with that. Now the armature or the mk et two different words for the under structure, they both mean the same thing. You can use many different things as an under structure for paper mache, eh? I'm simply using paper, especially for a small scale object like this it's very simple to dio I'm going to be using some unprintable newsprint you could just as easily use recycled newspaper from home or any other paper you might have at home. And you can see with the pear shape we obviously have a large ball, this area on the bottom and then almost like a little smaller ball on top, we're going to be able to create that entire shape with just two sheets of paper. In addition to the paper, we're going to be using another floral wire stem these air, just like the floral wire stands that we were using in our paper making session. This is just a much thicker gauge on dh it's going to be a little bit sturdier. It's going tio help not only keep the mckay together, but it's also going to form the stem of our pair some masking tape. So there's the three things that we really just need to get started, so just so our ladies in the audience know I'm going to go ahead and build the mckay today I'm going toe mix together the paper mache a pulp and put together the structure, which normally would take a couple of days to dry through the magic of video. Then you all have the lovely dried fruit on your table, and we're going to go from there as faras finishing techniques. So the first thing I typically do take a piece of paper wanted up into a ball. Now keep in mind with these paper machine is another one of those mediums where if you wanted, you really could sand it down to a fine, smooth finish and come up with a piece of fruit or whatever the object might be that looks really realistic. I kind of tend to embrace the almost rustic, uneven surfaces that the pulp lends themselves, too, which is kind of how you end up with a lot of these like crinkles and crevices, which I think are kind of charming. So again, I've just started with one piece of paper I've balled it up, I'm taking a second sheets I'm placing my bald a piece of paper in the center, wrapping this up around kind of pinching it together and I'm forming a second ball on tops you kind of see already we've got a little bit of a pear shape so what I'm gonna do is I'm just going to tear off a little strip of masking tape just to kind of help me with my basic structure mcats for the armatures do not have to be creepy because all of this is getting covered. You really just want them there to give support to the paper mache a if I would create this entire, I'll be in a small pair with just the paper machine pulp and have that dense all the way through. It would take a very, very, very long time to dry. Where is doing this? You save on some of the paper pulp and it speeds up the drying process because you've just gotta thinner layer on the exterior of your mcat. So what I'm going to do next is I'm going to take one of these eighteen inch cloth wired floral stems. You could also use a standard floral wire that comes on a spool. I just happen to like the thickness of this particular stem. I'm going to give it a little a bit of a hook and sliding it down over the center of my pair. I'm going to twist it around kind of bring it up along the sides here and then at the very top of the pair I'm just going to begin twisting it together and while this is obviously much longer than I want the stem for my pair to be until we get to our finishing stages, it's going to act as a little bit of a handle for me, which is a handy thing to be able to use when you're working with a wet medium so you can see very, very simple assed faras fruits concerned you could use this same method to create almost anything, obviously apples and pears and other sort of sphere apples and peaches and oranges. Other sorts of spirit, kal fruits would be really easy to put together in this method, so once you've got that constructed, we're simply going to go ahead and set that to the side, and we're going to start mixing our paper pulp. So with the paper pulp, you obviously just want to pay close attention to the instructions on the package they all read a little bit differently. I'm going to mix up a batch this this is almost two cups of the paper pulp because of the adhesive in it, you might end up with, like a little cloud of dust coming up from it, but not to worry it's a very small amount of water. In addition to the pope, the goal really is just to make damp you don't want it stopping wet, so we're just going to start. Drizzling a little bit over the top just going to use a wooden spoon at some point I'm just going to dig in with my hands because it'll be easier you can see him getting it's almost like a uh a cloud of flower when you're baking that comes up from this who all right all right so I think I've got plenty of water and there at this point and I can see that it is starting to clump up and when I squeeze that I definitely can feel the moisture so I'm just going to start working it in with my hands and this would be a zay had mentioned very similar to the paper pulp that we created for our handling paper and session one it just obviously we started with it dried squeeze it see if any excess water comes out no, I think we're good so you can see it's it's mushy it sticks together pretty well but it definitely can crumble if prompted so what I'm going to dio is bring my mcat over and we may end up mixing a little bit more of that if I feel like it's just not quite enough to cover up our pair so I'm taking a small amount I would say maybe golf ball size and kind of rolling it between my hands, patting it down almost into a patty just to sort of make it a little thinner and I'm really going to go for a thickness of maybe around a quarter of an inch surrounding this another way, a typically start when I'm doing these pieces that have a stem is have kind of formed a little hole in the center of my patty. I'm just going to slip my stem right through that so I can start forming it around the top of the pair. And you, I feel it's really it's moshi and it's malleable. You can kind of squish it down to cover a little bit more surface area. I'm going to pinch it up a little bit more so it's tighter surrounding the stem at the top. All right, I'm gonna do that again, and I'm going to start covering the sides again just sort of like working in between your hands a little bit. You want to make sure that all of the moisture is well incorporated into the paper pulp, which he saw as we started with was just powdery dry lay this down over the side just kind of start to motion in much like working with clay or even plato. It I can just be mushed around and kind of blended up into the upper portion, covering as much of the surface. Is I can she can see with just that little bit of managed to cover the top and about half of the bottom of the base so I've got this portion still remaining so we'll see if this little bit well still cover it if not we may end up mixing up just a little bit more just smooth it out into large patty there stick it over the edges and then start to work all of those pieces together they blend quite nicely I think we're good and again you do have some control over here I did talk about sort of embracing the rough surfaces but if you're working on a piece where you really want it to be a little bit smoother you can always kind of grab a little bowl of water wet your fingertips and just kind of start to smooth it down and it responds really well to that little extra bit of moisture you don't want to overly wet it obviously but it's going to kind of help you give it a little bit more finished look on the sides and this is your opportunity to of course to kind of play around with your shape if you feel like it's ending up looking a little bit too much like a bowling pin versus a pair you can you know change those proportions a little bit but you can see how quickly that comes together and so we've got this and typically, this will take about one to two days to dry if you, depending on the season and where you live, if you can set it out in the sunshine, that definitely will speed up the drying process. I also found in making some of the swap outs we're going to be working with today, that in the evenings they went in front of a fan and that definitely helped speed that up. But you know you'll just check on them on a daily basis and kind of see what progress they're making us faras drying up. So have any of you done this the paper pulp method of paper machine before, I've just use it in the candy mold to make a form? I love that I versus using plaster, completely versatile and that's a really genius idea, and I know that people do that, especially when building out. I've seen people not only doing and candy molds, but in some of the larger cake molds like for the holidays, you might see easter. Rabbits or snow men or that sort of thing plaster it is a nice alternative to plaster and I think it tends to be sometimes a little bit more manageable than plaster is because with plaster obviously you're pouring in that liquid with this you're able to sort of press it down into all of the crevices in the details of the mold I don't know when you did that I know you were dealing with a silicon mold did you have to use a releasing agent at all in order it's actually been titch mold and it was a deer head on amount without the quarantine but I just was collecting deer heads of the time and I saw this candy mold I go well I gotta have that so this is it what I hadn't worked with plaster but I wanted to try it with this and yes I did use the silicone spray so that is something to keep in mind as we've been talking about if you're going to be using this in conjunction with the mold on dh it's not a silicone modern silicone mold you may want to use a releasing agent otherwise it could have a tendency to stick especially if it's a vintage or older mold and you don't want that to happen so we're going to set this fella aside and we all now have at our work stations lovely little swap outs and you can see they're super lightweight it's got a little bit of have to it, but you tap it on the sides you kind of sounds a little hollow it definitely sounds solid there's nothing more she about it at this stage of the game and so what we're going to do is we're going to start working on ways of finishing it and when I was thinking about this project and kind of my love of all sorts of vintage craft traditions, I don't know if many of you are old enough to remember waxed fruit, but my grandmother used to have a bowl of it and it's the kind of thing where it was used for decorative purposes and this is just a little bit of a nod to that it's not an entirely waxed piece of fruit, obviously, but what we're going to do is we're going to paint thes and then we're going to dip them in some paraphernalia kind of give it this beautiful, waxy, silky finish and we're going to create a different style of leaf and what we had tackled in our paper making classes before these air almost a little bit more realistic they've got a beautiful chevron pattern and we're also going to be dipping those in the wax and it kind of gives it a nice preserved finish and very malleable as well when it's wet and kind of will hold just about any shape you'd like so I've got some standard acrylic craft pains at each of your tables, and I just sort of picked three citrusy green shades, and typically when I am painting something along these lines, I kind of keep it a little chunky and messy, which I think pairs well with sort of this rough exterior if you can see on these pieces of fruit, I really I did all of an undercoat in one of the shades, and then I sort of started to mix a couple of the shades together, and I did a couple of highlighted areas with the yellow just is if it were having the light shine on it from a certain direction, and we kind of talk about that as we work through, but if you want to go ahead, everyone's got paint palettes at their work stations and everybody there sealed, okay, they're fresh paints and it's nice with these six compartments paint palace, you can just pour the straight color in three of them and use the other ones for space to mix doesn't take a lot of pain for these obviously it's a small surface you can see what we're going up got going on here is more of a a citrusy shar true screen, sort of a buttery yellow, and then something that's, a little bit more of a celadon or a celery color here um for painting with fees because it's a broader area and just using an inexpensive craft brush that you can find it any craft supply store, this is where your stems or handles will come in handy if you just want to hold it by that, and then you can start giving it a nice paints and really painted it in any fashion you'd like. Like I said, I tend to just go over it once in a solid color and then go back and do a little bit of layering to kind of add some added dimension to it like this before this is all new for all of you, presumably, once you've got this method down, you could really make any type of fruit you want apple through ever object generously. Um, you'll see on my pinterest board. A former colleague of mine makes the most amazing pull toys for children, so she would use this method to create little squirrels or elephants or other types of animals that she would then mount on wooden platforms with wheels that could be pulled around by children. They're just adorable, eso there's lots of possibilities with this, you know, once you've got that basic technique down of, you've got in the back of your head that you need to build them a cat or some sort of under structure. Um and then you're just applying a relatively you know, thin coat of this wet paper pulp to the exterior the hardest part really is just having the patients while it dries it's not one of those immediate craft, so this is a project that you're probably going to do over the course of a few days um create a very stable structure I mean, still it's somewhat fragile but it's it's much stronger than perhaps people realize it really is it's pretty tough, you know, it's obviously not something you want to be throwing around, but if it were to drop on the floor, it would not shatter by any stretch. So what you can see is I've added a first undercoat of sort of a shark truce color I'm going back in with this sell it on and it kind of just sort of very messily brushing it along portions of it um again kind of embracing this chunky method of painting that I think pairs nicely with a really rough surface of the fruit, and then I'm going to go back in with just a little bit of this sort of buttery yellow color, almost as if we're adding a little bit of highlights to certain portions of the rounded sections of the fruit um again no right or wrong method to do this it is again all about experimentation um and if you end up, uh, once it's dry and you're not happy with the variation that you've created, you can simply paint over it. That's the lovely thing about this it's, not there's no mistake on there is no sort of step that you can't correct or go back and rework. So now you could simply just set this down on your work surface, and I think that's what the ladies here in the audience will be doing. If you do have a styrofoam block at home, you can simply press the stem down into it and gives it a place to dry for a few minutes. The acrylic craft paint really is a quick drying paints. It'll probably be dry within the course of the next ten minutes, which is fantastic, and we'll be able to move on with it. How we doing, everybody? They're looking lovely there, looking edible, very nice, fantastic, and it really does help to have that little stem toe hold onto while you're paying, especially with the three dimensional objects. Otherwise, you would end up with a lot more pain on your hands than we do today, which is great.
Class Materials
bonus material with purchase
Ratings and Reviews
user-2d17c2
Must say that this was a very interesting class, well-structured, clear, real-time for much of it, and oddly soothing. Good voice from the instructor, good-humored class, and information that's transferrable to all sorts of fun projects. Don't stop once you've got the hang of it - can't wait to see what I'll make next. Recommended.
Student Work
Related Classes
Paper Craft Ideas