Lessons
Lesson Info
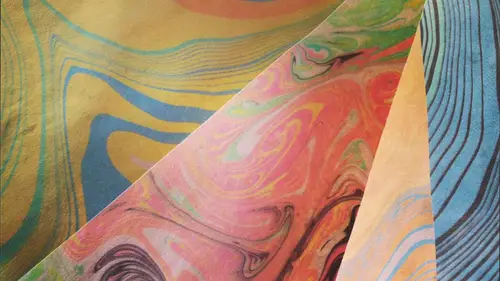
Manipulating the Ink with Straws
Our water bass I'll feel clean kind of got all that excess kink off of their perfect all right then so if you have two new colors or the same colors that you want to work with let's, go ahead and put those into our paint palette so they're ready to go I think I am going tio try a little bit of green this time around one, two, three, four, five again you really only need to do about five drops of this at a time ah little goes a long way and you'll find that thiss set will last you for a good long time if you don't, you know, put it an over abundance of it in your paint palette because you really don't need that much you use more than one color are more did the two colors or can know you certainly can you can I have seen people doing this where they've got multiple paintbrushes tucked between each of their fingers and they're kind of just alternating between them. One way you can do that a little bit simpler is by creating your design with your two rinsing out your brushes, adding anothe...
r two and then start building up the pattern in a different area of the water bath and then as you're manipulating it, you kind of gently start to swirl some of those designs together to incorporate all of those great colors so if we're ready to go on the second one, let's, go ahead and take our paint brushes that we've rinsed in our glass of water, and we're going to dip those into the to paint colors that you would like to use. What do I do when I think I'm going to do a green and an orange this time around? And, um, do exactly what you did the last time around and build up that pattern of concentric circles by lightly alternating your paintbrushes, tapping them on the surface, and you will see that some colors initially show up much more translucent than others like I'm working with the green and the orange right now, and you can barely see them on the surface of the water, but you know that they're there, and the more that you add incan build up those those concentric circles, it'll become more dense on the surface of the water in those rings will become more visible. I've gotten to the point where I feel like very little pinkus now coming off my bristles, so I'm going to go back to my paint palette and load them back up again. I'm again just holding it vertically into the ink and allowing it to soak up into the bristles on dh then I'm going to go back and continue to add more, okay. So once you have built up this little pattern on the surface of your water, another really simple way to manipulate the ink is with a straw, and all of you have got some bendy straws in your little caddies at your desk, and as I was saying, the banks are really sensitive to any sort of breezes in the room, which is why we've temporarily turned off the air conditioning in here, just to prevent any of that from, you know, swirling our pain around, but what you want to do is with the bendy straws, you can kind of gently get down to the surface of the water and very lightly blow through the straw, and what you're going to see happen is it's going to push the water forward and kind of spread it apart and create these wonderful little swirls so and you can in this way, almost chase the ink across the surface of the water, which is kind of cool, someone like this, so you just sort of push it further, and you can see in many instances, the integrity of those rings that we created in our initial application of the ink is still there. So all of those little swirly lines have just become finer, and are moving around the surface of the water now it is possible to overwork, the inks and it's nothing you necessarily need to be too concerned about, but I have found that if I spend too much time fussing with it and blowing on it and and moving it around, it can start to muddy up a little bit. But again, this is just a process of experimentation, and if it happened once and you don't like the results, you just won't do it again. So after you've used your straw to kind of move the ink around, go ahead and let's, apply our paper and try and capture that design. And again, we're just putting these on paper towels not unlike the handmade paper from our previous session, these air going toe warp a little bit because of the water during the drying process, and teo to sort of correct that you can simply stack he's under a pile of books and they will help flatten them out. They also, after they have dried completely, can be placed between two pieces of paper towel like are handmade paper and iron flats. Well, I like that one that's good, and you can see that the way that these colors are translating onto the particular paper we're working with today, it is somewhat different than how they look in the paint palette these my red looks very pink, my green looks almost aqua marine and again these are the results of thie amount of sizing in the paper and you'll find that if you were to do this exact same design with a different kind of paper you might get a different sort of tone ality or different hue eso it's really it's fun to experiment with all sorts of paperweights and types so go ahead and clean your water baths but before you move on to your next design hold off and we're going to do a little interim step but let's do take our scrap news print here and drag it across the surface now while uh using the newsprint to clean out the ink between passes is relatively effective you will find at a certain point like after you done maybe a couple of dozen thatyou most likely will want to empty out your water and start with a fresh tub all rights and actually before I move on to the next step I just kind of want to walk around for a second and see how the students designs have turned out and I love this is so great it's kind of very sort of ethereal feeling the way thie edges have been manipulated and it's interesting the way that the turn ality between the reds and the blues have become very sort of light it's almost blurred together and love it these air so great okay look at this great distinction between the red and the black I love that the red, obviously, as we've just spoken about, has come out a little bit more in the pink room, but this almost looks like courts. I just I love that really, really nice. Oh, yeah, yeah, come on, you guys, this is great, these air, beautiful. And really, I know that in most cases, the designs don't go all the way to the edge of the paper. You can see madeleine. She obviously added, she built a per pattern a little bit larger, maybe win a couple more times, so that continue to feel the surface of the water within the confines of the base and on doing something like that, you're more likely to get more paper coverage. But there's also something really lovely about the simplicity of these designs, where they just kind of organically grown across the page. So really, really nice.
Class Materials
bonus material with purchase
Ratings and Reviews
Deborah Willis
Instructor is very knowledgeable. Love that he has a very soothing voice. I LOVE his teaching style-he is very encouraging of his students to experiment, and I love that he comments on their creations during the session causing you to see elements of their creations that you might have otherwise missed.