Enhancing Your Scans With Photoshop
Lesson 16 from: Introduction to Black & White Film PhotographyDaniel Gregory
Enhancing Your Scans With Photoshop
Lesson 16 from: Introduction to Black & White Film PhotographyDaniel Gregory
Lessons
What Is Film
05:45 2Types Of Film
10:18 3The Film Scale
03:17 4Film Speed
06:46 5Film Cameras
03:50 6Loading Film Into The Camera
09:26 7Zone System Basics
15:46 8Metering For Black & White
15:04Camera Basics: ISO
12:11 10Safety In The Dark Room
07:22 11Film Development Process And Supplies
15:14 12The Film Developing Process Step-By-Step
32:31 13Storage And Organization Of Images
16:43 14Scanning 101
12:01 15Scanning Your Own Negatives Demo/Guidelines
19:29 16Enhancing Your Scans With Photoshop
25:46 17Dodge And Burn In Photoshop
07:05 18Using Photoshop Luminosity Masks To Work The Zone System
08:19 19Printing Options
05:10 20Printing Papers
05:28 21How Film Develops
06:41 22Film Density By Zone
05:58 23Film Pushing And Pulling
05:37 24Film Filters
13:11 25Reciprocity Failure
05:21 26Advanced Film Exposure
03:57 27Making The Analog Print
06:02 28Black And White Resources
04:14 29Alternative Processes
21:02Lesson Info
Enhancing Your Scans With Photoshop
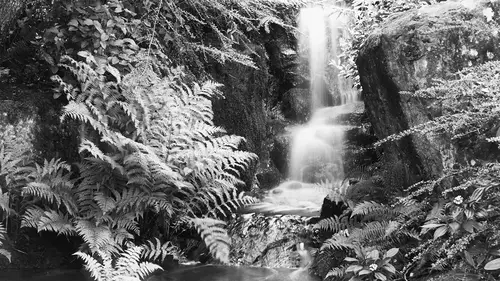
Okay so we get out of there, we're into Photoshop now. I'm going to go ahead and open an image, and let's see, let's do... Oh that's a nice one, tree's good, flowers good, let's do the waterfall. Okay, so the waterfall's gonna come in, it's scanned sideways, so the first thing I gotta do, 'cause I have to fix the most annoying thing first, and for me that is not the negative part, it's the orientation, so I gotta rotate, and then I have to do my classic clockwise, so rotate clockwise, and then on this negative, if I zoom in, you see how there's this little black edge? It's not everywhere, here at the bottom, that black edge is the film base, so when the scanner came in, that little boundary was drawn, and it said, pick up into the film base, which gave me that nice, pure black. Photoshop, now, is going to use part of that data as a reference point for the contrast ranges exist within my negative, so the first I gotta do is come in and crop that up. So I'm gonna come in, and just make s...
ure I've cropped out the black part of that frame, so now that black part of the frame is gone, so now I can start to work with what is truly the pure-- wrong button. Purely the contrast that exists within the image. Now I've got two ways I can use to convert. So this is where I start to split my I-always-do-everything-the-same-way workflow. The classic way in Photoshop, to invert something, is there's an adjustment layer called, "Invert." So I'm gonna come down and apply the Invert Adjustment Layer. And then I'm like, "Oh man, I do not know how to scan. "I have no idea how to scan, this is terrible." And then I go back to the scanner, and then I re-scan again, and then I come in and like, "It's the same." Okay? Now, the negative was pretty dark and exposed such that I ended up with a very bright negative as it read through. So what I gotta do next is basically set, just like in my digital workflow, one of my first things to do is set a white point and a black point. I guess that the dynamic range is available to me within the image. So I'm going to go into my levels adjustment, I'm gonna hold down the Alt key on a PC, the Option key on a Mac, I'm gonna grab that black slider and am gonna bring it to the right, and there I start to see a black point form on the right side of the frame. Okay, so I now have a black point, oh, now we're starting to get a little bit better. Now, the middle part of the image, now remember, we talked about black and white photography, we had the toe and we had the shoulder. That middle part of the line is the gamma, that's the range of the film and the contrast range of the film. The middle slider here is the gamma slider. And I'm gonna grab that, somewhere right around there, now I've got this beautiful silver in the water, I've started to pick what starts to look like the contrast range in the negative, and I'm starting to get a little bit more happy as a starting point. So in the straight-up conversion across now, I'm actually at a point where I'm happy to start. This is the crux of black and white photography printing. Right here, please only pay attention to what I'm about to tell you. A good negative is the starting point, not the end point. When we work a lot with color, we get it color correct, and we get the relative density right, and we're finished. Think back to the Ansel Adams photograph we looked at. We had the negative and then you saw how dark the sky was, that was all manipulation in the dark room. This whole notion of Photoshop manipulation, how that's bad, photography has been manipulated from day one. The point of the view, the angle of the camera, all those different things, and if you don't think a dark room photographer has gone in and manipulated a photograph, you haven't spent any time in a dark room. Even color people were like, "A little dodge and burn," you can't do too much, 'cause the weird color shifts, but there's still some dodging and burning happening. So with the black and white photograph, I just gotta get to the point where I'm ready to start. So the inversion and setting the contrast range is the starting point. If I'm in the analog dark room, I put the negative in, a larger, get my base time, I get my base print, and now I'm ready to start dodging and burning. I can count on one hand the number of times a perfect straight print has come out of the dark room. It just doesn't happen. So starting point. We're gonna talk about all the cool ways we can manipulate that here in a little bit. So that's one of the ways I can make that conversion. Now the other thing I kind of like to do is that .37 is probably about where I want my gamma, but I kind of like to bring down like, "How much do I have, "detail-wise, in the middle?" I just kind of looking a little bit at where is how far I can push the file before it starts to structurally fall down, 'cause that's probably closer to my imagination, but I gotta deal with this waterfall. It's still a little bright, I want a little more translucency there kind of thing, but I want to see do I even have the data there? If I don't the data at that point, I'll probably go back,'cause I'm not that far along, and probably hit the scan again, and see did I not set something right in the scan, if the scan was right, then I just know I don't have the sufficient detail there. So that's one way, inversion levels, so I'm gonna go ahead and take those two, and I'm gonna put that into a group, I'm gonna take my level layer here Command + J, I'm gonna duplicate my layer, and then I'm gonna turn off my background layer, my base layer. There's a plug-in called "Color Perfect." It comes from CF Systems out of Germany. Color Perfect. It's gonna do this weird thing it does sometimes. What it does is it's originally set for working with color negatives, so they've gone in and figured out all the color films, what their color responses are, what their characteristic curve responses are, and if this was a color image, and I had scanned, say, Portra 400, I could come in, and down here where it says, this menu down here, I've got black and white start, it would have film types and film companies, so I could use Kodak, Portra 400, and then it looks at the orange cast of the film base, looks at the characteristic color responses that were in all the dyes, and gives me almost a perfect rendition of what would've come out of the analog world. It is an amazing tool, that's what I have this tool. I got this tool 'cause of my color work, I'm scanning color slides, and I was fighting in Photoshop, trying to get the look of my Portra was different than my Portra 160 VC. But yet, that was a lot of work. This plug-in fixed that for me. Then I noticed they had this black and white start button, and I was like, "Huh, that's kind of interesting." So, for a black and white start-- Oh I think I know how to fix this. There. I read the help file last night, and it was true. This plug-in, if you're on a retina display on the Mac, it does the weird formatting thing, it'd cut the image off. Well one of the things they did, these German engineers, is they went and looked at, remember when I talked about in printing, we go from Grade 00 to Grade 5, and that sets the contrast, so one of the things I can do is come in here and look, if I had printed this under a different contrast grade filter, where would my starting point be in the dark room? So if I normally think, "Oh, I normally start with a Grade 2 filter," that's the starting point of a Grade 2 filter. So I'm able to now translate my knowledge of the analog dark room into a digital realm, and that's one of the struggles for people who are film people coming to digital, is they're like, "I know how to do this in the analog world, "I don't know how to do in the digital world." The reason why I like this tool, 'cause we're going the other way, a lot of us are coming back to film, is the help you're gonna get is probably from people who are film people, and if they say, "Oh, the problem is "that looks to contrast, you should've printed that "on a lower contrast paper." Well if I'm on a Grade 2, a lower contrast would be a Grade 1, or a Grade 1 1/2, so I can come in here and start to get myself in a position where I at least from a commonality of language, am able to better communicate with the people who could potentially be helping me. The other thing that happens with this plug-in is about half the time, it does a better translation of the black and white than the inversion of levels does in Photoshop. I run both and pick which one I like better. And it's an aesthetic choice and taste. Now I can come in here also and make all sorts adjustments, like I can adjust the black point and white point, I've got all sorts of adjustments I can make within this specific plug-in. But I like to use it to come and get these virtual pieces. When you first buy the plug-in, these are not here. So you have to go up to Color Perfect site and download the Virtual Black and White Paper Edition. You're just gonna click on this little Add button, and it's a little file that they add in, so it's just not there by default. But this tool is great, and if you're gonna scan at home, I cannot recommend this plug-in enough. That would be my decision point for there, but I'm gonna stay with this particular image and make that be my conversion point. And turn on the base layer. Now remember, I turned everything off when I came in from the scanner, so we're going to jump into some of the basic edits now on Photoshop. So when I jump into some of the edits with Photoshop, first thing I'm concerned about is capture sharpening. So the scanner itself is going to have softened my image a tiny bit, and even if I've done the wet mounting, which is gonna give me a really nice sharp image, there's a tiny little bit of sharpening I want to do. So the question becomes how do I go about doing that, because capture sharpening is about the impact on the edges. So I don't actually want to sharpen the water down in here, I don't want to sharpen some of those things, even from a capture standpoint. What I really want to impact are the edges. I want to sharpen the edges, 'cause that's our perception of how things appear sharp or not sharp, and how sharpening works is it takes the lighter side of a pixel and lightens it, and it takes the darker side of a pixel and darkens it. I know you're like, "A pixel is a pixel," and I'm like, "I don't know, it's math." So they work that lighter or darker side, but we want to stay on those very edges. The other thing we want to do is we've scanned in all the grain, and I want to have some level of control of how pronounced is the grain, because under the dark room, and I'm projecting through the enlargement, that grain will soften out just a little bit, and that paper I can choose can soften that out a little bit, so I've gotta deal with that as well. So what I need to build is an edge mask. So an edge mask is going to let me be able to deal with the edges and the surfaces, independent of one another. So this is one of the first things I do, and I build an action for this, because I'm lazy. I'm gonna show you some of the other actions I have later, but for this one, I just want to walk through the whole kit and caboodle for that. Now because this came in as a 16 bit gray channel, it's grayscale image, remember I chose to scan it 16-bit, so I don't have the three channels. If I have three channels, I'm gonna have the RGB composite, red, green, and blue and they're gonna be almost identical. To start the edge mask creation, I need to create a luminosity mask, and we're gonna talk about luminosity mask for editing in a second, but what I do is on that gray channel, or on the RGB channel, or on the red channel, I'm gonna hold down the Command key on a Mac, Control key on a PC, and I'm gonna click on the little picture window down there. Now I have the marching ants. The marching ants are only telling me one thing. They're telling me pixels and areas of pixels that are more than 50% selected. The things that don't have marching ants are less than 50% selected. The reason I bring this up is you're about to create the start of the edge mask, but everything is gonna show up as a grayscale image. So I'm gonna come down here now, click on create a new selection, so I want to turn that off, turn on the alpha channel, de-select and that kind of looks like the same thing, 'cause we've selected the top 50, the bottom 50, and it's a complete grayscale image. In a color image, we end up with a little bit different look there. Okay, now I've gotta label this, 'cause if I don't label that, I'm gonna come back in six months from now, and I'm gonna be like, "What was alpha one doing?" So call it an edge mask. Doesn't look like edges yet though. So I'm gonna come into the Filter menu, and I'm gonna come down here to Stylize, and I'm gonna chose Find Edges. This is the point too where people are like, "Whoa that's kind of cool, we should just stop there. "Let's print that." That is kind of cool, and if you're a lazy sketcher, eh. People are like, "Wow, you're really good with pen and ink," I'm like, "I know." Find Edges, Photoshop. The next I'm gonna after I've found the edges is I'm gonna come into the other menu, and I'm just gonna select Maximum, this is just gonna help reduce the width of the edges that it finds. So if I bring the radius down to one, it gets a little bit more aggressive, if I bring it up high, you'll see the edges start to blur out, so it's just about the refinement of that edge. I'm gonna leave that at one, and now if I zoom in, you can see these edges are pretty harsh. Pretty harsh to grab, so I'm gonna have to deal with that, I'm gonna need to soften that, so this is one of the things, it's weird, this is going to be a softening effect but I'm gonna do a Gaussian blur on this. But before I blur it, one of the things I want to do is you can see I kind of got what looks like a lot of mid-tone selected in this area. So I'm gonna come in here, and I'm just gonna do a levels adjustment, I'm just gonna bring that up 120, 125, adjust my gamma down a little bit, and really just try to hone in on just some of the edges. You can see now I've lost almost all the detail in the water, none of that's going to be sharpened. Okay, so now I've created my edges, Find Edges, did the maximum to set the range on that, and now I've used a levels adjustment, I could've used a curved adjustment, and I've refined the edge down. Now I'm gonna come in, and I need to blur it just a tiny bit, and I'm just gonna choose the Gaussian blur, in this case gonna do about a pixel blur. What that blur is gonna do is on those edges, it's just gonna soften them a little bit, so that when I apply the mask I don't end up with a really hard edge. I need the softness there so that the transition on the effect is not as rigid. Okay, so now I have the edge mask, but I don't. The edge mask is supposed to grab the edges. What do we know about masks? White reveals, black conceals, so the mask is set right now, would sharpen everything but the edges, so the last thing I want to do is invert the mask. So now I've created my edge mask, so now I can use this for a couple of things. One of the things I want to use it for is want to deal with that grain, I want to soften the effect of that grain a little bit, and make sure I get a really beautiful gradation and still hold some of the grain. That's one of the things that makes a black and white photograph feel like a black and white photograph, is for over 100 years, every black and white photograph we looked at had grain in it. We started printing digitally with no grain, and people were like, "Those don't look like black and white photographs." The tonal range is the same, the paper base is close, everything's close, and they're like, "Doesn't look right, doesn't look right." Pump a little grain in, and they're like, "Oh, it's starting to look better." It's 'cause we trained ourselves. I'm really fascinated in 50 years, when the dominant piece outside museums will be digital black and white, if people will react to grain in the opposite way, 'cause it's just the way we've built our literacy around communicating for photographs. So I do want to deal with that a little bit. So I'm gonna turn off my mask now, come back into my image. The reason I bring all that up is Uh oh, no cropping. Group one is the invert. One of the things that I've gotta do now is I'm gonna come in, and I'm going to do the sharpening. The grain effect though is similar to noise. When I do noise reduction, when I'm working with a digital file, I always want to reduce noise first and sharpen second. The reason for that is noise reduction is a blurring process. So if we blur and then sharpen, it's more effective than sharpening and then undoing what I just did with the sharpening. So, what I'm gonna do here is I'm gonna merge up my layers here. And then I'm gonna duplicate that layer, I'm gonna turn this one off, oh, I'm not gonna keep that yet. I cheated. And I'm gonna call this grain processing. So what I'm gonna do now is I've gotta come in and deal and process with that grain, so if we zoom in, you can actually see a little bit of that, if I get off the crop tool, get on that tool, there's a little bit of grain you can kind of see, up in this area, those little dots that kind of look like noise, that's the actual grain that's come in. So what I want to do now is I want to deal with that. So I can deal with that in a number of different ways. I could choose a noise reduction, I could choose a number of different tools. Like I said, I'm sort of lazy. I got a Noiseware plug-in here. This is a noise-reduction plug-in. This is one of the absolute coolest tools for noise reduction. But I'm gonna come in here, and I've got a bunch of presets that can come in, I can simulate grain effect in the reduction on a digital file, but in this case, I want a full pass, but it's not a very noisy image, so what this is gonna do is basically just smooth-out some of that grain, give it just a little bit of blur so that it still holds some of the structure of the grain, but smooths out any of the weird artifacting that may have happened on the edges of the grain caused by the scanner. So I'm gonna not click cancel, 'cause that means nothing happened. I'm gonna go ahead and apply that. So now, I've weakened the whole image through that blurring, but that's not what I want. I want to only affect the surfaces because that noise is on the edges and I want to sharpen the edges, smooth out those gradations. So under Select, I can do a Load Selection. Under Load Selection now I'm gonna choose edge mask. Now my edge mask as it is now is for the edges. I'm gonna go ahead and choose Invert and click OK, and then I want to load a mask. So if I zoom back out and look at my mask, black conceals, white reveals all of that noise reduction to help with the grain, is now showing through the parts of white and all the edges have been protected from that, so there is no blurring that's happened on the edges. Now what I need to do is I'm gonna come in and I'm gonna merge-up again, so now I've got the next layer up, and in this case, I'm gonna come in and apply a sharpening to this. Now Sharpening, I'm just go ahead and grab an un-sharp mask at this point, somewhere around 300% and a pixel 'cause there's some fine detail in there, 300-400%, pretty aggressive in the sharpening here. Now if I turn the preview on and off, you can kind of see in the background that pop. Click OK. I only want that effect at about 66%, so I'm gonna use the opacity of the layer to ultimately determine the strength. So I'm gonna be a little more aggressive with the sharpening, because if I use the opacity, I can move it to taste. I've got an option to come in after-the-fact and not have to come back and rebuild the entire sharpening layer. The goal of the workflow is a non-destructive workflow and a not-have-to-come-back-in-and-redo-the-work workflow. So if I come in and been like, "Oh it's 216% at .08, "threshold of one, apply at a 100%," and then I was like, "Eww, if it'd nice "if that'd been a little different. "I gotta go back and rebuild the whole layer," and then that could impact the layers above if I have had to merge up into a layer above. So in that regard, I really want to try and stay focused, I'm getting in there, and giving myself that flexibility, so overly aggressive in the tool, opacity to dial back. Now in that case, it's applied to everything, so I'm gonna come up here, load my selection, choose the edge mask, 'cause I only want the edges this time, and apply my edge. So now, I've smoothed and sharpened using that edge mask. So now I've got to come in, I'll grab these two pieces together, put those in a group, zoom in a little bit, and you can see there is a tiny bit of sharpening that comes in, but not a huge change to the file. So I've done all this work, I'm really proud of myself, things are really good. What did I tell you was the Damocles sword that hangs over your head? Dust. What have I done at this point? I've just sharpened the daylights out of every piece of dust in my image. Everything I've done, I've come in at this point, sharpened dust. If I'm gonna correct the dust, I've now gotta come in, I've made adjustments to contrast, I've made adjustments to luminosity, I've built masks completely based on those dust particles. This was done in a particular order because I wanted to make sure that you got the experience of the headache. The first thing in your workflow, after you bring that image in and make the inversion, is your dust clean up. If you don't go clean the image, you're gonna do your workflow, and then you're gonna come in, and you're gonna see, you guys can't see it, there is four or five big pieces of dust in the waterfall, there is a piece of dust right here, there's dust here, I then have to go redo all that work again. This was my second hardest thing to learn with scanning. I was so excited to process the file, I didn't think about the cleanup. So what I'm gonna do is open up another file. We're gonna come back and finish this one, but I'm gonna open up another file, we open up the trees, I run a quick invert, run a quick levels adjustment, now somewhere right around there, and then I'm gonna zoom in, see a little black dot right there? That's dust. That was dust that came in, so the scanner can't see through it. You'll get white spots, you'll get black spots, it depends if the dust is in the original processing of the negative that created the spot, or if it's in the scan. So, you're gonna go through that process, and get that cleaned up, so what you're gonna do is just take, after you've make that base inversion, get yourself a blank adjustment layer, and whichever tool's appropriate, Stamp tool, Content Aware tool, whatever it is, and you're gonna go clean every piece of dust. Now this is why wet-mounting is nice, this is why getting things cleaned up this era processing artifacts, so I gotta get those smoothed-out. I've got a negative that has probably 5,000 of these. I've had to go touch all those points to clean it up. You'd ask, "Why don't you go re-scan it?" I can't find the original negative. See, all the advice I give you, is 'cause it's stuff that I've learned the hard way, but you're gonna go through and clean this up, and you're just gonna go through and touch anywhere you find a little dust spot, you'll just make a little correction, if you need to make the Stamp tool, so you're gonna go through and make that piece, get all that cleaned up. Once that's done, now you're ready to take the next steps. All that work I did on the edge finding, all that work to create the mask, and you saw, that's a lot of steps to go through. If I didn't, I've got dust here, and if you sharpen dust, it becomes even more pronounced. So you gotta cleaned up early. In my workflow, once I have the dust cleaned up, I actually save this file off as the master, and then I work off a duplicate, so if I ever need to go back to the original scan, I have an original, cleaned-up scan. But dust always gets cleaned up, don't get yourself 12 steps into the workflow, and then realize you have to start doing dust cleanup. Same thing with color. It's even worse with color if you miss the dust, because you've started to make color corrections, and then you start coming in to make the adjustment, and you'll end up in worse space.
Class Materials
Bonus Materials with Purchase
Ratings and Reviews
LEO DE BOCK
I am really fond of Daniel Gregory as a teacher. He does a great job. To me, his enthousiasm, his passion for and his dedication to film photography are infectuous. It's great that CreativeLive makes place for film photography and for such a pro teaching it. It can never do so enough for me. Thanks. I am a fan.
Texas Beauty Photography
Great class!! It's jam packed with usable information for anyone wanting to shoot, process, and print black and white images. There is so much detail presented in this class, I can practically guarantee you'll come back to it again and again. I successfully used this class to capture b/w photographs, process the negatives, capture them digitally, and finally, produce beautiful prints that I'm proud to show my friends and clients. This may well be one of the best classes on all of CreativeLive. Highly recommended!
user-661816
This is an excellent course and Daniel is a great teacher! I'm coming back to shooting film and darkroom work after 20 years away. I have some wonderful film cameras sitting in my cabinet and I decided I wanted to use them--so I have decided to shoot BW with film, and shoot color with my digital cameras. I will develop the BW film myself and scan and print digitally. This class is perfect for me!