Lessons
What Is Film
05:45 2Types Of Film
10:18 3The Film Scale
03:17 4Film Speed
06:46 5Film Cameras
03:50 6Loading Film Into The Camera
09:26 7Zone System Basics
15:46 8Metering For Black & White
15:04Camera Basics: ISO
12:11 10Safety In The Dark Room
07:22 11Film Development Process And Supplies
15:14 12The Film Developing Process Step-By-Step
32:31 13Storage And Organization Of Images
16:43 14Scanning 101
12:01 15Scanning Your Own Negatives Demo/Guidelines
19:29 16Enhancing Your Scans With Photoshop
25:46 17Dodge And Burn In Photoshop
07:05 18Using Photoshop Luminosity Masks To Work The Zone System
08:19 19Printing Options
05:10 20Printing Papers
05:28 21How Film Develops
06:41 22Film Density By Zone
05:58 23Film Pushing And Pulling
05:37 24Film Filters
13:11 25Reciprocity Failure
05:21 26Advanced Film Exposure
03:57 27Making The Analog Print
06:02 28Black And White Resources
04:14 29Alternative Processes
21:02Lesson Info
Film Filters
Uh kind of another topic, in the black and white world, we talked about a little of this this morning, things look the same. Panchromatic film sees the visible color spectrum but it's all in tones. So if I take a red apple, and I take a green apple, I sit them side by side. We look at them and we're like, 'Red apple, green apple. Red and green, completely different.' To black and white film, red and green are identical. If the tonal value is the same, and the exposure value is the same, it's like, 'cool, here's two gray apples'. You come home, and you develop (mumbles) very careful, take the lid off. Woohoo, hang and then you're like, 'wait a minute, where are my apples?' Okay. It's because we don't see the way the film does. So filters are gonna help us with that. This is one of the things we can do, is we can apply filters for a number of different things. We have contrast filters, neutral density filters, and polarizing filters, are kind of the three big we use for black and white. ...
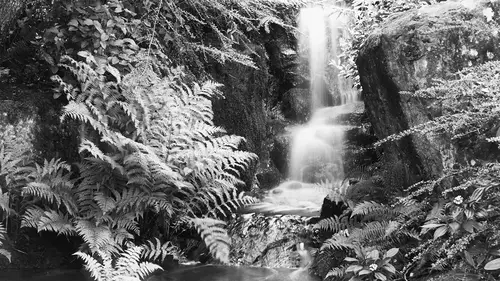
There are color correction filters where you use with color film. Particularly slide film, we don't care about those. So, as a black and white photographer, when I'm doing black and white film, I could care less about color stuff. Studio shooting with black and white film is epic. Cause I go in there, and they're like, 'Uh, what's the color temperature of the lights?' I'm like, 'Pfsh, is it in the visible spectrum? What do I care, I want brightness. Brightness and darkness.' So I don't worry about the color temperature of the light. Meanwhile the slide people are like, 'Oh, it's a 5,430, so I need a one quarter cut magenta.' Me (Multiple clunk sounds) cause you heard my camera, it's loud. So we're firing that off that way. I don't have to worry about that. So, color correction filters, no need to worry. So, first what I want to talk about though is neutral density filters. Cause this is one of my favorite filters. Time is one of the elements of photography that makes it unique. We think about what actually truly makes photography unique as an art. One of its key components is time. It has the ability to reflect a moment of time as a slice or an extension of time. But time is always a critical element of the photograph. Now it doesn't matter what process you're looking at, time is always the element. The neutral density filter gives us the ability to manipulate that time in a way beyond what the camera does out of default. Neutral density filters are filters that have no color shift and no impact to the image other than basically blocking up light. And they come in stops. You get a one stop, two stop, three stop, four stop, up to I think they have a fifteen stop I saw recently. Ten stop is a really common one, they call it the 'big stopper'. Basically what that does is block up a value of light. So if I'm out in nature, and there's a stream and a waterfall and I want to photograph, but it's the middle of the day. I like the light contrast, I like the harder light, but I want smooth water. And I meter, and I place my shadow, and then I do my little math and I'm like, 'Wow, so at F22, it's still a 125th of a second.' Water's gonna be frozen at 125th of a second. So what do I do? I can put a neutral density filter in front of that and I can go, 'oh, I'm gonna put a five stop neutral density filter in there.' So I go 125th, 16th, 30th, 15th, 8th of a second. Now I've got some blurred water on the stream. So an 8th of a second with a five stop ND filter, I get the benefit of the extension of time. The other thing about ND filters is they're stackable. So I can take one ND filter and another ND filter and I add them together, and I get the effect of a stronger ND filter because they don't interact with one another, in a way that would cause a problem with the exposure. So I can stack a three stop, a four stop, and a five stop and have a 12 stop ND filter. I know, everybody's like, 'you did the math!' I know. Three basic numbers, who knew? Okay, so I have 12 stops there of light that I can change. If you go out into a major metropolitan area and set it during the middle of the day with a freeway, 12, 13 stops, traffic will disappear. Unless you're in LA, and then it's like, 'oh look those cars have not moved in 33 minutes.' So, the neutral density filters are a really good thing for the black and white photographer because a lot of the motion, movement we want to capture is there. Now people ask me like, 'well, that's great because you know, landscape, cityscape.' Portraiture is kind of interesting too though cause with an ND filter I can add a flash, I can actually pop and have you move, and pop you again and have you move, and pop you again and get three, four different positions in one frame with the ND filter. I could set the camera on bulb, but then I might have too much light coming in. So, I can use the ND filter to help me offset the amount of volume coming in, so there's a bunch of ways to kind of play creatively with an ND filter. The other piece about all filters and I'll mention it again cause it drives me a little crazy, is some filters when you purchase them will be listed by the number of stops, some are listed by the filter factor, and then some are listed as a variation of a different filter factor. So there's a point three, is one stop, point six is two stops, anything that's a multiple of point three is a stop, and a filter factor of two is one stop. So, we always just need to translate your filter factor into the amount of stops cause a filter factor of point three isn't a third of a stop, it's a full stop. So when you're calculating your exposure, you just need to account for that. Okay the next one is a polarizing filter. So polarizing filters are actually really cool, they're great for color but they're really great for black and white for two reasons. First, a polarizing filter works because there are basically two screens in there, and as they move they affect the rays of light and the angle that the lights are coming into the lens. So all of the light is kind of randomly bouncing in (mumbles) to the lens, and the polarizer helps them all come in the same angles of incident and reflection, something like that. Some fancy physics word, but they all come in at the straight line. They all come in at the straight line, then the image is able to polarize and we're able to pull a glare out, ray will emphasize and create more saturation, there's some great things that happen with that. Reduction of glare is the big one for black and white photography because if you wanna put a reflection in or take a reflection out, if you're photographing a waterfall, and you spin the polarizer, you can put a rainbow into the waterfall. So there's all sorts of little elements in play with the light you can with the polarizer. The way a polarizer works though is at the, it's strongest at it's 90 degree mark from the source of the light, which is usually the sun. So the way you figure that out, is you take your finger, and you point it at the sun, and then you stick your thumb up, and that's 90 degrees, and that arc is your strongest polarizing effect. As you spin the polarizer it will partially polarize to fully polarize and then move itself back off polarization. So that spinning element like that becomes really really important if you want to get the full effect. If you turn this way you're gonna get a partial effect. The other reason I like to have a polarizer filter in my bag, is a fully stopped ND filter, even if that's the sun, and I point that way so I'm getting basically no polarization. If I turn the filter so it's at its darkest, a polarizer is about a two and a half stop ND filter. Free ND filter. Free is my favorite photographic word because they always take my money. So, free, really good. Polarizer filter also worth having in the bag. Okay, the next one is the contrast filters. Contrast filters are your, probably the most, if you're gonna buy filters they're probably the most important filters you can buy. What they are, or they look like color filters. I had them in my bag, I don't know where my bag is, but basically they will be red, green, blue, orange and yellow. The colors of the spectrum. And the way the filter works, is it lightens its own color, and darkens the opposite color. So if we look at that scene and we have the red apple and the green apple, and I put a red filter in front of it, the red filter is gonna lighten the red apple and darken the green apple. So what was two gray apples to the film, now becomes darker and lighter. I can start to separate those tones. I have to do that before capture. Now one of the things in the digital world, we capture, photo comes in, and then when most people get to black and white they're like, 'this looks terrible in color, let's see what it looks like in black and white.' They're like, 'oh, definitely looks better in black and white.' And then they start working on it. Okay, and they do that by moving those little sliders. Okay, and they're like, 'oh if I make the green lighter or the green darker, okay that's basically what the filter's doing.' If you go into Photoshop and run the photo filter, lighten and darkening because it looks at what's green in the scene, what was red in the scene, what was blue in the scene, what was yellow in the scene. So they're gonna work in the opposites. They also come in a variety of strengths, so you have a yellow number 11, you have a yellow 15, you have a tri-yellow, you have a tri-red, you have a red 29, you have all these different strengths of the filter that will make the effect more or less. So in a filter kit usually what you end up with is about four to six different color looking filters, but they're black and white contrast filters. I recommend that you get a yellow, green in number 11, variation there of that number. That is a, it's a pretty light green looking filter, and what it does is if you're dealing with anything with foliage, it's just gonna help the foliage separate. Cause the dominant color in foliage is actually a yellow. When grass is off in color photographs, it's cause there's too much yellow in it. So there's a lot of yellow in foliage. So we use that one. The other thing that the yellow filter does, is it lightens yellow but darkens blue. Shadows tend to have little bit of blue there, so it creates also a little bit of contrast with that. A red filter, usually there's a red or a tri-red's my favorite, it's a really deep red. Red's opposite is cyan, so we often times think of it as blue. So what a red filter will do is give you really deep, dark skies. So if you think about Ansel Adam's photographs, if you think about Weston's photographs, Cunningham's photographs, they all had this really deep black sky, it's cause they used a red filter. Cyan is a principal color and the way it exists in the environment, we think of the sky we think of it being blue, but the actual dominant color in there is cyan, and the higher altitude you are the more cyan that sits within the photograph. So if you are color correcting a color photograph and you're at say 5,000 feet of elevation, there'll be more cyan in the image than blue. So when you're looking at the color correction, it's a cyan problem. The benefit of a red filter, is it's pure opposite in the color wheel is cyan. Because of that, we end up with a really deep rich red, or a really deep, rich, dark sky. So even if the sky meter is bright, the red filter is gonna block off that light and allow you to have a darker sky. I also recommend that you get a deep green filter. So it's basically a red, a yellow, and a green. And then after that it's a little bit of kicker on the color. So orange is a great filter, because its between blue or, red and yellow. Orange affects a little bit of blue, a little bit of a magenta in there, so, but it's just it's opposite in the color wheel. They all have filter factors as well. So if you get a tri-red, it's called a tri-red cause it's a three stop filter. So it's also a great benefit if you need a little neutral density and want the contrast, a three stop red filter, or a three stop yellow filter, or a three stop green filter will give you that contrast boost. The other piece about it is they're not so strong, they're based on purity of color for their strength. So, my shirt may look blue, so if we put a blue filter on, my shirt is gonna get a light, light gray. But it's not a pure blue. And so I don't wanna sell it like, 'oh if you go buy these filters you can take this red apple and make it ghost white.' If you have a perfectly pure red apple you can get that. But it is, there's enough colors that exist, but it's just gonna help with the separation and then dodging and burning, some of the techniques we've talked about before, can help it get to that point. Exposure, some of those things that go into play, but that's really kinda the piece for that. So, getting those contrast filters is a big piece. There is, Lee makes a kit called the black and white foundation kit. It has little polyester filters, they're those little plastic gels. You can hold in front of the lens, they make a little holder that goes in front of there with a rubber band. It's a nice little foundation kit, kinda getter started piece, so that's another piece to look at from a filter standpoint.
Class Materials
Bonus Materials with Purchase
Ratings and Reviews
LEO DE BOCK
I am really fond of Daniel Gregory as a teacher. He does a great job. To me, his enthousiasm, his passion for and his dedication to film photography are infectuous. It's great that CreativeLive makes place for film photography and for such a pro teaching it. It can never do so enough for me. Thanks. I am a fan.
Texas Beauty Photography
Great class!! It's jam packed with usable information for anyone wanting to shoot, process, and print black and white images. There is so much detail presented in this class, I can practically guarantee you'll come back to it again and again. I successfully used this class to capture b/w photographs, process the negatives, capture them digitally, and finally, produce beautiful prints that I'm proud to show my friends and clients. This may well be one of the best classes on all of CreativeLive. Highly recommended!
user-661816
This is an excellent course and Daniel is a great teacher! I'm coming back to shooting film and darkroom work after 20 years away. I have some wonderful film cameras sitting in my cabinet and I decided I wanted to use them--so I have decided to shoot BW with film, and shoot color with my digital cameras. I will develop the BW film myself and scan and print digitally. This class is perfect for me!