Lesson Info
7. Painting Wet Rain on Costuming
Lessons
Introduction
00:59 2Lighting and Concept
02:07 3Cropping
02:38 4Bringing in the New Background
02:44 5Masking
32:02 6Creating Depth
07:27 7Painting Wet Rain on Costuming
28:45 8Creating Rain Drops
15:06Lesson Info
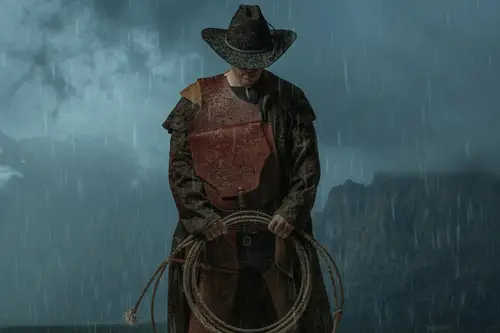
Painting Wet Rain on Costuming
Now we want to panel the raindrops on. So this is where the environment is going to be interacting with our subject. So this is like a thing in composites where, you know, you put a subject, and it's like raining or snowing or whatever, but there's no snow or rain actually interacting with your subject, and it kind of takes the viewer out of the story. So what I want to do here now is I want to create that. Now, we're gonna do this in a few stages. We're going to do this in the hat here. That's gonna be one of the stages, saddlebags. Another one saddlebags gonna take a little bit of work because of all of the, um, very obvious points of contact that are in it. Uh, then we're gonna do this little bit of yellow here, and then the outfit itself and the last su last. So this is gonna take some time, and that's okay. Uh, so first things first, we are going to create a new blank layer, and we are going to call these raindrops hat so we'll just start at the top and work our way down. No, the ...
blending mode of this we want to put on, We're gonna put this on to multiply and the brush that we want to use. And I picked brushes that come with Photoshop. Uh, and it's right down here at the bottom. It's called Rough Round bristle. So try saying that 10 times fast. And this is also where our brush settings, which are F five on your keyboard. I'm gonna come in handy. So I want to play with the size that are and the angle jitter and the roundness jitter. The reason for that is because all these drops are going to have their going to impact the material at a different size. Like when you go out in the rain isn't just like one size of rain drop that's hitting you. It's gonna be a whole bunch of them. So we're going to do that now. We have our perfectly good mask here. Where is going to control Click? We're gonna get our dancing ants. Let's get rid of that. Now I want to make sure that I'm selected on my subject for this one, so I'm gonna go control shift. I now control shift ice or switching your selection of dancing ants. Control I or command. I, um, is to invert your mask or to invert your subject control shift I or command shift. I is to invert your dancing ants. So right now, if I wanted to paint on here, let's just select the color of the hat and just brush. So now we can see that it's affecting only the hat. Now, before we had inverted our selection, if I had painted this, it would only be on the outside of him, which I don't want. So I'm going to control shift I or command shift I. And now we are just going to basically start dotting whole bunch. And there's a lot of stuff here that you kind of want you to pay attention to when you're working on this. Don't worry about if you get stuff on his face or whatever else will just messed that up. Not a big deal. But I want to make sure that I am paying attention to this little shiny part here on the band of the hat that is going to absorb water and material differently. Then, um, then the actual felt hat. So I'm gonna put this up to 100 as well, and see what that looks like because we can always play with the opacity and we can always mess this down. So making sure that I'm getting the brim of the hat and again doesn't matter if we wind up getting any on his face because we will just wash that off. Wash that off. We will mask that off. So the tops obviously are going to get a little bit more treatment. Now, of course, one of things that always want you to pay attention to basking on textures. See, right here this texture here goes over the edge where the edge of the hat is versus, um, the brim of the hat. So this is the dead giveaway that a texture has been added onto a subject onto an image. So I always want to make sure that I am mindful of those. So in this case, I'm just gonna grab my eraser tool. And I just have this weird texture selected for my eraser tool and you doesn't matter. You can use whatever texture you want on this, but you stay here. Capacities. 13 flow. We're just going to turn this up and I want to just really, really, really be mindful of those kind of edges, because if they're supposed to be a thing in real life Oh, my God. Um then those textures wouldn't exist that way. So takes a little bit of puts it around to get it right. And if I find that some of these spots here, they're a little bit too sharp, we have our trusty smudge tool. No smudge tool is always easier to use on a small scale than a large scale. And in this case here with the smudge tool, because some of these like droplets, I guess, or whatever would have been on the hat for longer and therefore they would have, like, a softer appearance because they would have soaked into the fabric further, Not too worried about what's going on the shadows. They're already pretty soft as it is, but you can kind of just like randomize this a little bit. I'm gonna go back to my eraser tool here, though, and just clean up this band because this material would just get shiny. I wouldn't necessarily get a whole lot darker, and I just want to make sure that it looks like again that we didn't just, like, paint a texture onto this because these are, like the little detailed pieces that really make a big difference in these kinds of composites. So I'm gonna let that part there stay shiny. I mean, if anything like these types of materials would get shiny er, because they would get wet and glistening. So let's take a look back at that. Obviously, we need to get rid of all that stuff off of his face. That is not flattering City. Very soon. Capacity all the way. I don't like working with with opacity. It kind of makes me nuts. Um, so the difference between flow and capacity if you've ever painted with acrylic or anything in your life opacity is kind of like painting with acrylic or you take us. You make us paint site and it drives. You make another paints like that. It dries, whereas flows like working with airbrush. So it builds up more slowly over time. No. See here we have missed a spot here in the back of the hat, so I wanna make sure I get that and we can build this up over time so we don't have to get this all like right now. Um, but I definitely want to start laying down the foundation of how dark do we want this to be? Um, you know, where do I want all of these pieces to hang out? So again, Just going over that area just quickly. And we have these little shiny parts here. I want to make sure that they stay shiny because it's the little details that will sell your composite. Okay, so let's say the hat is at least started. We're going to create a new layer. We're gonna call this saddlebag. Same thing. We're gonna put this on to multiply, and we're gonna use the same brush. And we are going to go over this and over this and over this and this one definitely takes the most time. Uh, we're gonna sample the color of the material, and I'm going to turn off the hat just for now. Also because I want to see if I accidentally paint over the hat itself. So the rain is going to be built up a little bit more on the more obvious parts of the bag. Again we can totally turn this down as well. So the randomizing brushes is really, really, really helpful here. Um, I'm going to quickly bring this across here, and this is going to be too strong. And I know that do that here as well. But I can start bringing this down. And what we're gonna do is we're gonna paint a little bit too much, and then we're gonna bring it back. I want to make sure that these like horizontal lines, they get bled out a little bit. I don't want them to be super obvious. So that's looking pretty good there. And now what I'm gonna do is in this case, I'm gonna take a layer mask and I'm going to reverse like I'm just gonna mask back some of this stuff just to break this up a tiny, tiny, little bit because now you can see that there's these, like, different parts here. We're like, Okay, there's some dry spots like some of these areas here. I just really want us to look, we have to clean up that line there, of course, but I really want this to look like he's just been stuck out in the rain. I want to quickly grab my eraser tool here, which I realize is destructive. But I just want to clean up this edge tiny little bit. And then I will bleed this stuff out a little bit more. So mhm. Just so we have that and then I'm gonna go back to my brush tool, and then I'm gonna go to my mask. So basically, I'm just like, alternating back and forth here, just like breaking some of this up. So this stuff gets a little bit tedious because, basically, it's it's painting. It's not super exciting. Uh, let's see here. Let's get rid of some of these, get that stuff on his face again, and then clean all of this up off of the rest of his output. Yeah, I don't need it on the yellow yet because, of course, the yellow when that's what makes a different color, then the actual saddlebag itself, because it is clearly a different material. So it's kind of a yellow canvas. Yeah, there was a question of like, you know, why would I do this in Photoshop? Why wouldn't I just do this for real? Well, because lots of costuming especially if I'm borrowing it. I don't want to damage it. And of course, this stuff can and has been wet over the years. It's not really a big deal, but at the same time, I'm just not very comfortable borrowing, renting whatever and then, you know, damaging it or just getting it wet or whatever. It's just a thing with me. Um, I always kind of worry about that stuff. No. So this part here now with the saddlebag, I have a little bit too much mask out. So I'm just going to go to my eraser tool because these little guys here, they don't need to exist. I don't need to worry about masking them. They can just disappear forever. Little spot there along the neckline that can go away. All right, So this is how our saddlebag is looking right now. I'm basically looking at this and looking for patterns that I don't like. There's this little bit of stuff going on down here. I'm not a huge fan of, so I'm just grab my brush tool. Mm hmm. That's too strong. Let's turn the flow down. Just make it a little bit less. Now. Here, there would be a little bit less where the hat is. Just a tiny bit. I mean, assuming he's been sitting here for a while, right? Like he's got heavy stuff on his mind. Uh, we're going to pretend he's been sitting here for a minute. Um, yeah. So that's looking not too bad. I like these kind of like Napoli spots here. Um, it definitely makes it look like it wasn't just like this downpour of water, I might add. Just like a tiny little bit down here. So just going back to our there, and I'm going to select a different color, actually, Yeah. It's like two different color. Uh, I'm gonna make it a bigger brush and just make a couple of spots. Nothing too gnarly. I'll just go to our mask. Actually, that was at, like, 12% wasn't it? Yeah, that's a bit low. Let's go back. Okay. Make sure we are on our layer, okay. And then this is looking like I was saying a little bit sharp, so I'm just going to go to the smudge tool, which is right here on the left. And we are just going to make this a little bit more soft. I'm just going up and down and just kind of like wiggling. I'm gonna go to my brush and remove some of these points so I don't need I don't need tons there, right? You just need, like, a little tiny bit. And again, I'm definitely making sure that I don't have any patterns going over edges because it's weird. So I'm just going to get rid of any of those guys that look like they're sitting on the edge. Uh, because I don't want those marks. So that covers pretty much the saddlebag. Mostly I might come back to it. We'll see next one. We're just gonna call this yellow jacket. There's just one tiny little spot here going back to our rough round bristles sampling the yellow. Put the blending mode on multiply. There we go. And again, I'm trying to like, make sure that the pattern kind of matches what's going on with the other material. So I'm just using the eraser of Russia again. Yeah, I could mask it, but also yeah, sometimes it's just quicker to erase this stuff. Nobody is going to be like no one's gonna change their mind to be like, Oh, I wish we had those yellow marks in the sky like it's not gonna happen. So, um, I did get a little bit of, like, the color bleed over here onto the saddle bag itself, but I don't actually mind it. It's very subtle. Um, it's not super super noticeable. I will go in and use the smudge tool. Just teeny tiny, little bit just to give it like, some movement. And just to clean up that mask edge there to make sure it was good. I can actually see. They missed a little bit there on these edges, so we'll just push them down to Okay, So back to the yellow jacket. Here we go. So if we turn on the hat, hat might be a little bit strong. What if you turn it down? Yeah, There we go. So this is the reason why I like putting everything on individual layers, because then I can kind of adjust each layer independently, because all of the fabric is going to behave differently. Now we're going to create another new layer. We're gonna call this jacket. Rain. Some Americans. Pellerin properly multiply recipe. Uh huh. Every brush um I'm gonna put the I'm gonna make a selection here. Uh, it's like this guy, which I guess I could have been doing earlier, But I forgot. So, Control, click and then control shift I And then I have definitely got yellow selected right now, so I'm just gonna select I'm not gonna select a dark brown because it's gonna be too dark, especially if we put it on a blending mode and multiply. So I'm gonna grab a lighter shade of brown. And I'm not too fast If I want it going over stuff again, like, we'll just mess it out. Uh, we definitely wanna make sure that we don't get anything on his hands because that doesn't look like rain at all. Uh, see here, And I'm going to do the rope separately as well. Yeah, there would be a little bit there on the shops as well, but this is where, especially with all these different materials here, we're gonna go in, and we're gonna use the eraser tool or the masking tool, Um, like, surgically. And make sure that we don't have any patterns going over these edges because it looks weird. It looks weird. So make some of those bigger and again we'll mask this stuff out. Okay, so I just got my eraser tool. Get all that office saddlebag. Actually, this part here is looking weird because technically would be in shadow, so I'm just going to get rid of that. That looks better. Okay, back to the jacket. Rain layer. Make sure it's off of his hands for sure. Yeah, that pattern going over the rope, which is no good. And the reason why I'm not letting the rain texture go over the rope itself is because the rope is going to be a different colour altogether. So we're gonna do it separately. So we're just going to quickly go through here. Nuke these off. Right Here is a good example of, like, one of those patterns that's going over these edges that I don't want. All right, I'm staying with right here. Looks weird. Can also mask that as well. So I'm just gonna brush tool. Just remove some of those spots. Well, we're here. I'll just continue on masking, even though this means that if I decided to add anything back in, I'm gonna have to re remove it from Mhm. Mm hmm. Mhm. Okay. So, again, here's that little spot. It's like a little spot here where the pattern is going over the edge and again here. It's really small. Thanks for crazy. Yeah. Yeah, These folks a little bit on the hand there. Oh, this spot there. Make that nice and big. Let's try to break that up a little bit. Mhm. A pattern there. That's okay. That's okay. That's okay. That's okay already. Yeah. No, let's grab our smudge tool. And I think some of this here, I might actually just get rid of all together. Oh, that's the mask. There we go again. Obviously, if you use a big brush, it takes longer to render. My computer has a fit, so we'll stick to small brushes. And I'm going to remove some of this from here because we're not really that area is not going to get a ton of water on it. So So that's before and after. So I'm just clicking, dragging on the eyeballs to compare this. Now let's create the lawsuit. Sane. Yeah, and we can totally come back and change our minds on this like whenever we want. That's totally cool. I'm gonna go select, and then I'm gonna invert my selection again. Put this blending mode on to multiply, and I've selected the yellow from the area. So the reason how I do that if you're not sure how to make a selection of color, just hold salt and that brings it with an eyedropper or you can use the eyedropper tool. But I find that it just takes too much time. So if you just hold out and then you can just select your color and we are going to smudge the ever living crap out of it in there because that part is very, very soft. And here and here Nope, that's too big student like that. Okay, so now we got to go through again. I'm just gonna quickly as the eraser tool because it's quick section. All of the non destructive re teachers out there are cringing, and it's fine. It's fine. Mhm done this a bunch because, like, not too like isn't a super specific area like, yeah, I care about textures and everything, like going over and stuff like that. But at the same time, this isn't, like, really, really, really hardcore, super specific stuff, right? Watching these repeating patterns here, making sure that it's only going on certain areas where I wanted to. No, this is gonna be full. Yeah. Yeah. And someone will be like, Why didn't you just make a selection of the lawsuit? Like because it takes forever. And I realize I'm doing work twice here. But if I was, like, changing the, like, the color of the outfit or something like that, then yeah, for sure. I probably would mask out to the last two itself, but I'm not, So it's much tool. Where are you a friendly friend? Let's make this nice and stuff. This looks really Dalmatian. Um, so that looks like garbage. So we're gonna make this soft and definitely like working here with a smudge brush. Um, makes that a lot softer, so I'm just gonna turn that on and off. It's just subtle. Doesn't have to be super obvious. This area here is like a little bit too much. So I just created a layer mask again. Go back to our brush. Let's try to break that up a little bit, because they just don't need tons and tons and tons of this like this. This lawsuit doesn't have to look like it's a dimension. Let's see. Is that a funny pattern? That's for a previous layer? How about you already? Let's look at the jacket. So that's too strong down there. And now that I'm looking at it, so let's go to a mask, make sure that we are selected. Invert. So I'll click control shift. I Let's get a little bit less down there. It just doesn't have to be that much. So we might hop back into this in later layers. If once we look at this and we add all the other atmospheric stuff and decide like, maybe there should be a little bit more, maybe there shouldn't, um but for now, we're looking not too bad. Not too bad. It's like a selection here. I'm on the mask. Yeah, get that off of there. It's much tool. So it blends a little bit better already so quickly, Quickly. That's how we were starting before. This is after. And this is how it looks like with all of our rain stuff. So we're gonna stick all this into a group. So we're just gonna go, um, click on our raindrops hat and then hold shift and click. I'm going to put all these into a group. We're gonna go control or command G. That's gonna go a group. I call this man jobs on costume. You know, these guys here we can put them in a group as well. Shift control, G because, of course, naming your groups and layers of super handy rocks, and I say we're off to a good start.
Class Materials
Bonus Materials with Purchase
Ratings and Reviews
Steve Vick
Great hands-on course. I love Renee's straight forward approach. This is the tool, this is what we are going doing with it and here's how to use it. For me it is the fastest and most practical way to learn. No fluff, no long-winded stories... just doing! In some of the other courses I viewed, I find myself skipping ahead waiting for them to get to the point. But this course has a great pace. I will certainly look for more from this teacher. Thank you.
Lukas Ujma
Greater, nice work! Semply and clever.
a Creativelive Student
I've been compositing for a few years, but masking a subject always presents its challenges. Renée gave a series of tips that were very helpful, including information about how to use the "burn" tool to enhance a mask. That's something I'd never done before. Can't wait to try it! The part of the lesson that explained how to make the subject look as though his clothes had been in the rain was also an eye-opener. The method is simple, but the results are outstanding. I had tried making my subjects look as though they had been rained on, but it never looked real. Now I know how to fix that!