Lesson Info
6. Blending Background Elements
Lessons
Lesson Info
Blending Background Elements
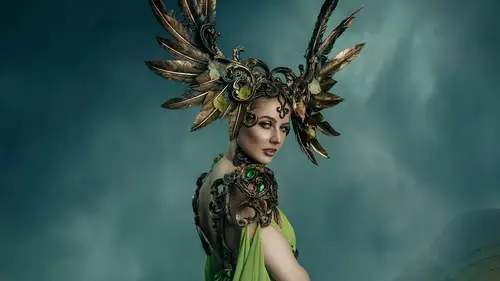
1 Our mask is done, awesome. (laughs) 2 So, now what we're gonna do 3 is we're gonna start blending together the sky 4 that we're gonna bring in and the environment, 5 the landscape photo that we're using. 6 So let's hop to it. 7 First thing we wanna do 8 is I am going to use the warp tool on this background, 9 'cause right now with a wide angle lens, 10 it's really bowing out and stretching out, 11 so I wanna compress and crunch that back in a little bit 12 just to create the little bit of illusion 13 that it wasn't shot with as wide a angle lens that it was. 14 So I'm gonna go controller, command T, 15 gonna right click, and I'm gonna go to warp. 16 And so basically, what I'm doing 17 is that I'm just crunching these back in a little bit. 18 Basically, just pulling these 19 and just pushing the pixels in just a little bit more. 20 Now I don't wanna push it in too far, 21 like here I pushed it a bit far, 22 and I'm creating this bowed effect. 23 Let's see here, maybe like that, 24 p...
ush that in a little bit. 25 So I'm not really worried 26 about what reality is with this shot. 27 I mean, this is a very famous location in Scotland. 28 It's called the Fairy Pools. It's gorgeous. 29 If you ever get the chance to go, 30 I highly recommend the hike. 31 It's very deceptive, the hike up to the Fairy Pools. 32 It looks just like a general gradient, 33 sort of a little bit up the whole time, 34 and it takes it outta your knees for sure, (laughs) 35 but it's an amazing spot, amazing part of the world. 36 So, now that I figure roughly how I want this to look, 37 I'm just gonna compare some before and after, 38 and it's definitely looking a little bit more crunched, 39 which is exactly what I was looking for, 40 but I'm not really sure I want it that high. 41 I really want this landscape to just be 42 like an afterthought to the location. 43 So, we'll do that, 44 and then I'm just gonna grab my brush tool here, 45 and I'm still on the textured brush. 46 So right now, this is a time 47 where a softer, round brush is super handy 48 when I am blending in sky parts. 49 So, I'm just gonna make that nice and soft 50 and reduce the opacity of this just a little bit. 51 There we go, all right, now let's bring over these clouds, 52 control A, control C, control shift V, 53 and I'm just going to drag this down. 54 So I'm not holding alt this time, 55 I'm just dragging the mask down, 56 because I'm gonna delete this stretched out layer 57 that we used when we were making the mask. 58 I'm gonna go control T 59 and just expand this guy just a little bit. 60 And there's some sensor dust on my clouds, awesome. 61 We're gonna get rid of that. 62 So I'm just gonna use a, on my keyboard, it's J, 63 just to get to the patch tool and just nuke that stuff. 64 I don't think there's anything else. 65 If it was a super big deal, 66 then I would do it on its own layer, 67 but it's sensor dust, so it does not need its own layer. 68 Now, I'm just gonna grab my brush tool again, 69 and I'm gonna blend this here. 70 So this is looking pretty good here. 71 Now, one thing that sometimes I do just for my sanity 72 is I will grab this. 73 I'm just grabbing the marquee tool 74 with the letter M on the keyboard, 75 and I'm just gonna stretch this out to the side here. 76 This is literally just for my own sanity, 77 control T, stretch that out. 78 Now, the pixels here are super damaged 79 and distorted and everything else, 80 since I don't want them visible, but it just helps me see 81 what this looks like a little bit more clearly 82 without these horizontal lines here. 83 So like this, we were getting these vertical lines 84 with this, it is technically a gray layer behind everything, 85 but also, it just helps me smooth things out 86 in my head a little bit more. 87 So let's see here, I want to add a little bit 88 of these clouds back down here, 89 but I don't want it going over the model's skin. 90 So what I'm gonna do is I'm going to hit control 91 on this mask here, and I've clicked on this layer, 92 and here, I'm just gonna bring this down a tiny little bit. 93 Now, I did choose this background 94 because it is very non-directional light. 95 It was a super overcast day when I was shooting. 96 And so changing the sky into something slightly more dynamic 97 really isn't that far of a stretch. 98 These like really nice, pretty, 99 white clouds popping around here. 100 Now let's reduce the flow on that a little bit, 101 and let's blend this a tiny little bit out. 102 Oh my god, make the selection, (laughs) 103 and then blend it a tiny little bit out, there we go. 104 Deselect, that's looking a little bit better. 105 So I have this little halo here. Let's problem solve that. 106 Let's figure out where this is coming from. 107 So that is definitely coming from here. 108 So, let's try our smudge tool and see if that will fix us, 109 and if it won't, there we go, it does. 110 So I'm just using the smudge tool on the mask itself, 111 and I'm bringing it out a little bit further than I need to. 112 And I'm basically just like, I mean smudging the mask. 113 I'm making it a little bit softer. 114 Grab my brush tool, make this nice and small, 115 and let's make the flow about 5%. 116 Nope, that's not gonna work, 117 because this is a gradient right here. 118 So yeah, we are back to the smudge tool. (laughs) 119 Let's see what we can do about this. 120 Just changing the size of this. 121 Still a bit strong though. 122 Well, I guess it could be kind of lazy. 123 Whoops, make the selection. That's a smudge brush. 124 Oh my god, (laughs) sorry, computer, 125 definitely meant to hit the B 126 before hitting the smudge tool there, 127 so once my computer is done freaking out, 128 there we go, control Z, make that nice and small 129 and go to my brush tool, B, 130 hit this selection here. 131 And what if we just made that a little bit darker 132 instead of a little bit lighter? 133 Oh, go away, okay. 134 Let's turn this on. 135 Oh my god, I'm painting right on the layer, awesome. 136 So again, if you're ever doing any of these things, 137 that's okay, I clearly do them all the time. 138 I make mistakes in post-processing. 139 Sometimes it just happens, man, 140 we just make stupid mistakes, and it's okay. 141 Yeah, so that highlight there 142 is a little bit less difficult. 143 Sometimes I always ask myself, is it harder to fix it? 144 That's not selected, cool, cool 145 Select, there we go. 146 I often will ask myself when I'm fixing a mask, 147 "Is it easier to just fix the contrasting color behind it, 148 "or is it easier to fix the mask?" 149 And in this case, I think fixing the contrasting color 150 behind it is a little bit easier. 151 Oops, select again, fresh tool, 152 and let's bring this in a little bit. 153 There we go, okay, that's too much. 154 But things that are further away from us have less contrast 155 and less saturation and less detail. 156 So sometimes, these cloud layers here 157 can really add a really nice little bit of depth to it. 158 Now, here we can see that my cloud layer 159 is not quite large enough for the job, 160 so let's make sure these are unlinked, 161 transform, and let's pull, whoops, 162 I'm on the mask layer, cool, cool. 163 Control T, and let's just pull this down 164 just a little bit more. 165 Just put it over the whole image. 166 So this is obviously a little too much here 167 on the foreground, I think. 168 I'd like to have some detail there. There we go. 169 But I also wanna be able to pull her into the image, 170 so that's one thing that right now I have to work on 171 is she still looks like she's just stuck 172 in front of this image 173 and I wanna make her a part of this image. 174 So, I have another layer of clouds. 175 I have actually a couple layers of clouds. 176 This is far too saturated, 177 so I'm just reducing the saturation of the layer, 178 gonna reduce the clar, oops, not the haze, 179 reduce the clarity a little bit. 180 And drop the vibrance bit, open. 181 And whenever you're working on stuff like this, 182 it's always good to consider 183 where you're going to be displaying it. 184 So if you are making stuff that's purely for Instagram 185 or social media, you can be pretty forgiving 186 with a lot of these things. 187 If you're making stuff that's gonna go into print, 188 maybe don't stretch your files 189 as much as we're stretching them here today. 190 Okay, so let's try putting this 191 on blending mode soft light, so that's really pretty. 192 It's obviously flattening her out a little bit too much, 193 but oh, I'm kind of paying attention to what it's doing, 194 that's not gonna work, behind her, so let's see here. 195 If we alt, click and drag this mask up here, 196 so now she is very clearly separated from everything. 197 Let's go to this layer, get nice and soft, 198 and let's see if we can pull her in a little bit more. 199 So I'm just gonna wrap some of those colors around, 200 so it's gonna start affecting her skin tones. 201 Let's wrap some of this in around her headdress 202 just a little bit. 203 And then turn it down a tiny bit. 204 Now what's going on with her face? 205 Maybe soft light's gonna look a little bit better. 206 It's gonna be not quite as saturated. 207 Overlay has a way of really pushing contrast and saturation, 208 so I'm not super keen on it, 209 especially when it's gonna be affecting the face. 210 I'm gonna make another selection here. 211 I'm gonna invert it, because I want to remove 212 some of this on her face. 213 My computer's having a fit. (laughs) 214 Oh my god, come on, relax. 215 Okay, so let's go in here 216 and just pull this around her cheek just a tiny little bit. 217 It's looking pretty good. 218 Okay, that's where the issue is. 219 So, tiny bit. I'll just push that in little tiny bit there. 220 There we go, okay, so that's looking pretty good. 221 She's still a little bit too yellow for the environment. 222 I'm basically paying attention to the yellows on her face 223 versus the yellows here. 224 Things often closer to us are warmer. 225 Things that are further from us are cooler with less detail, 226 but I still want her to look like she belongs. 227 So what I might do is if I stick a curves layer down here... 228 No, that's way too much. 229 Okay, green. 230 So basically what I've done is I've put a curves layer 231 underneath the entire image. 232 So if I put this on top, 233 it would affect everything in the shot. 234 Here, I'm just wanting it to affect her 235 and the skin work and everything that we've done so far, 236 so I'm just playing with that right now. 237 I'm also noticing some more sensor dust 238 that is on this layer here, there we go. 239 So that's starting to pull together really nicely. 240 I like how this is all looking. 241 I am enjoying the elements here, 242 how the fog is pulling through the mountains. 243 I do like the effect of multiple stacked clouds. 244 I think it's quite pretty. 245 I think it's visually effective for the style of image 246 that I'm looking to make anyways in this case. 247 So yeah, so I think this is pretty much gonna handle 248 what we have for the environment pieces going forward, 249 and next we're gonna jump into is color grading.
Class Materials
Bonus Materials with Purchase
Ratings and Reviews
a Creativelive Student
An excellent workthrough of Renee's compositing process. Thoroughly recommended, with lots of really specific, pragmatic and useful tips, along with pointers on style and considerations for working with artists, models and the whole team - Great!
Alvin Lipscomb
She is awesome, This is a great lesson using Photoshop. Seeing the different brushes she used on her mask was an eye-opener and will definitely use for working on a mask's layer. Right there is a reason to watch this lesson. 🔥 Do yourself a favor and watch this lesson.
pat cash
love her I got all her workshops - she is intense and inspiring