Lesson Info
10. BONUS: Premiere Live Kickoff
Lessons
Lesson Info
BONUS: Premiere Live Kickoff
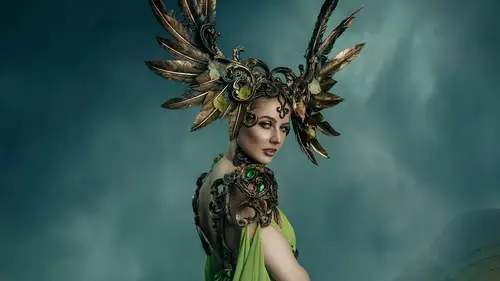
1 Hello everyone and welcome to CreativeLive. 2 Welcome back to CreativeLive. 3 I'm your host, Kenna Klosterman, and today, 4 we are kicking off a brand new class with Renee Robyn. 5 So before we go into introducing her, 6 bringing her onscreen, 7 what I'm gonna do is tell you a little bit about 8 how this is going to go, 9 and of course, do a call for shout outs. 10 As you know, 11 we have a global community here on CreativeLive. 12 So if you are watching on the 13 class page right now on creativelive.com, 14 you can click in the chat icon. 15 We wanna hear from you, 16 we wanna know where it is 17 that you are tuning in from, from all over the world. 18 And also, if you're watching on social media, 19 let us know as well so we can start doing those shout outs. 20 This is gonna be a about 30 minute session 21 and we've got, like I said, Renee live, 22 and then we're going to premiere her 23 "Introduction to Fantasy Compositing" course. 24 And that is gonna play for you for 24 hours.
25 It's a two-hour course, and that is, again, our free watch. 26 Everybody has access. 27 And of course, 28 then if you want to be able to 29 utilize the course later to be able to pause, stop, rewind, 30 you can always purchase the course. 31 We're gonna talk about some of the bonus materials 32 that are included when you do have that course 33 or you're a Creator Pass subscriber. 34 So that's what's gonna happen today and we are excited. 35 All right, without further ado, 36 as I go check on where people 37 are tuning in from for a second. 38 Ah, we've got Lisa Carney, who says, 39 "My girl. 40 I love Renee and Kenna." 41 We have Jermaine in Dallas, we have Didier in Belgium, 42 we have Peace, oh, what a great name, 43 Peace in Menifee, California, 44 Simon in Houston, Barbara in Colorado, we've got France, 45 so they're coming in from everywhere, Renee. 46 Let's bring on Renee Robyn. 47 She is a photographer 48 and creates fantasy worlds with her work 49 and you know her for her style 50 and we're so excited to have her on to teach a new class on 51 how to create those worlds. 52 So, Renee Robyn, welcome. 53 Hello. 54 Good morning. 55 My main question today is, 56 are we gonna see kitty come through? 57 So the cat does photo bomb a little bit. 58 There's like little bits of ears. 59 She was watching like just outta frame 60 and I kept having to like move her head 61 to see like the toolbar and stuff. 62 So yeah, you'll see like little, 63 little like pokey things appearing here and there. 64 Awesome. 65 I love it. 66 Again, we have, again, more people coming in from Leon, 67 from Cincinnati, UK, Texas, Alberta. 68 Where are you joining us? 69 Where are you joining us from? 70 I don't know if everybody knows in general. 71 You're a Canadian, right? 72 Yeah, I'm a Canadian, yeah. 73 I'm in Edmonton, Alberta right now. 74 Nice, nice. 75 It's winter up here. 76 Darcy in New Zealand. 77 Awesome, everybody. 78 So what's gonna happen, again, if you are just tuning in, 79 is this is our live kickoff with Renee. 80 This is a chance for you to ask her questions, 81 but we're also gonna tee up what it is that you're going 82 to learn in the class. 83 And of course, we're in COVID times, 84 and so Renee prerecorded the class, 85 but we still wanted to give you access to her 86 with this live kickoff. 87 So that's gonna start at about 9:30 PST, 88 the class itself where you are. 89 Let's talk about what you are going to learn. 90 Actually, 91 before we talk about the specifics of 92 what you're gonna learn, Renee, 93 you are known for creating these fantasy worlds 94 and let's talk about how you came up with 95 how do you come up with fantasy worlds, 96 but then also about for the specific class. 97 Because you are going to walk people through how to 98 composite this particular image in this course. 99 Right. 100 So which one would you like me to start with? 101 Start with in general, 102 where do you come up with your ideas for creating worlds? 103 I mean, that is a super complicated question. 104 I'm gonna cut it down as much as I can because, I mean, 105 some of the ideas come from like dreaming 106 and some of the ideas come from, you know, 107 seeing other great artwork and being inspired by it. 108 And a lot of the times, 109 the work gets inspired the most by 110 what I see in front of me. 111 So if I look at someone or I'm at a certain location, 112 there might be like a little piece there where I'm like, oh, 113 that'd be really nice to make something with that. 114 I'm not sure what it would be yet, 115 but I'm gonna keep that earmarked 116 and I'll keep coming back to it and keep coming back to it, 117 and eventually, like more puzzle pieces fall into place. 118 And then all of a sudden, I'm like, 119 oh, I have all the pieces. 120 Now I can put them together in post. 121 That's pretty common. 122 I love though that if some of these come 123 to you in dreams or, you know, just, again, 124 it's like there's inspiration everywhere 125 and then there's, you know, 126 taking that and actually making it into something. 127 I wanna ask the people online to participate. 128 Like where is it that you guys get your inspiration 129 when you are kind of coming up with fantasy compositing 130 or just compositing in general when you're thinking like, 131 I'm gonna take this image in a studio, 132 a portrait of a person, and then put them in some new world. 133 So let us know, again, what you are seeing. 134 And if you're on the course page, just try refreshing again. 135 I'm just seeing as people are commenting coming in. 136 And we've got Kate there in the chat room. 137 Let's see. 138 Yeah, refresh the page, chat with Kate, 139 and we'll go from there. 140 Okay, so, 141 let's talk about the particular image that, again, 142 in this course people are going to be able to work through. 143 So let's, before we show it, 144 let's talk about how you came up with a concept for it. 145 Yeah, so this is an image, I mean, obviously, 146 it's COVID and we were in lockdowns when I filmed this, 147 so like there was very limited help on this. 148 But this is an image 149 that I'd photographed in the Netherlands with a model 150 and designer, her name is Fairy Toss, 151 and her work is incredible. 152 I mean, 153 every single piece of costuming that she makes is 154 a work of art and I love 155 how she sculpts her costuming with the thoughts in mind of 156 how her subject is going to feel wearing the costuming, 157 which I thought that was so profound for me. 158 I'd never considered that before. 159 And I love that. 160 I love that thought. 161 And so I thought about it with this shot and, you know, 162 I have so many good ones of her from that session. 163 It was actually from a workshop in the Netherlands, 164 but it was an image that we didn't use 165 and I was just like, 166 I looked at it and I just loved her pose and her expression 167 and the way the costume and the fabric draped 168 and then this incredible headdress kind of created this like 169 other worldly creature. 170 And I was like, oh man, 171 like what would I do with that if I could? 172 And so, in this case, 173 I wanted to make an environment, you know, 174 knowing that I was making an intro class, 175 I wanted to make an environment that didn't fight 176 with the costuming, right? 177 I really wanted like her 178 and the costuming to be the main feature, right? 179 Sometimes when you're creating these kinds of images, 180 you know, 181 the subject can be quite small 182 and it's the environment that is the 183 personality in the shot. 184 But with her, in her case, 185 the costuming is so strong and so beautiful, 186 it's like I didn't wanna have tons 187 and tons and tons of detail kind of like fighting 188 for the viewer's attention. 189 So it kind of went for like a slightly more minimalist 190 design with a composite, 191 something that's like a little bit obviously easier 192 to like mash everything together, 193 but I just wanted it to be kind of like, you know, 194 when you're cooking and you just 195 like add a little bit of salt, 196 that's kind of what I wanted this to look like. 197 Because she was like the whole meal showing up. 198 She just like looks incredible. 199 It's impossible to take a bad photo of her in that outfit. 200 So I just wanted the environment 201 to just be like this really nice aftertaste. 202 Well, I love that you just, 203 how you talked about her creating things 204 for how the model to feel. 205 I mean, that's really cool. 206 And just the concept of putting feeling into images 207 and, you know, obviously, the composites and everything. 208 If we haven't already, 209 let's take a look at the before and after. 210 Again, 211 what this course is going to be is you guys are going 212 to be able to recreate what Renee is doing 213 and do a follow along. 214 Again, 215 if you own the course 216 or are a Creator Pass subscriber here on CreativeLive, 217 you're gonna be able to download some bonus images. 218 So, first, 219 let's take a look at that before and after 220 and we will be able to take a look at what it is 221 that you are going to create. 222 And then we're gonna talk through, again, 223 some of the bonus materials. 224 And then what we're gonna do is actually see kind of 225 a fast forward of all the things you're gonna learn. 226 So talk to me about the images that you utilized, 227 the layers that you utilized 228 to composite this together and, again, 229 showing a bit of what those bonus materials are 230 that people are going to be able to access. 231 Yeah, so the background pieces, 232 one of them is from the ferry pools in Scotland. 233 I was there a few years ago with some friends 234 and it's such a beautiful location. 235 And it's one of the few times in a composite 236 where I've used a wide angle shot on a compressed portrait. 237 I don't normally do that 238 and so I kind of like show you, 239 like walk you through how to like correct for that. 240 But, I mean, 241 being at the ferry pools is such an inspiring 242 and beautiful place. 243 And then the clouds and the texture images in this, 244 in the download are just storms from here in Alberta. 245 I mean, 246 we get such incredible storm 247 and cloud texture here in the prairies being on the other 248 side of the mountains. 249 You know, all summer long, 250 I just go out and photograph cloud texture 251 and I use it all the time. 252 So I included like, you know, 253 the images in that that I used for this, 254 plus the image of of Fairy Tass as well. 255 So you get to follow along 256 and mask out that crazy headdress. 257 I mean, 258 what is the hardest part about 259 choosing what background images 260 you're going to use for composites? 261 Like, okay, 262 if you're out there and you're taking lots of images 263 of these beautiful places and what have you, 264 like how do you go about choosing what you're gonna use? 265 When I was making this class, 266 I went through a lot of background images. 267 I went through so many 268 and I couldn't really figure out what I wanted to use. 269 I mean, 270 the biggest thing was 271 because this is an intro class, 272 I didn't wanna pick anything with like huge trees, right? 273 Of like, hey, let's mask out leaves now. 274 No. 275 That takes me too long. 276 So, you know, it's kind of funny. 277 I listened to a lecture once of a sculpture talking, 278 sculpture artist, 279 and he works with stone and they said, 280 "Well, how do you decide what the stone is gonna be?" 281 And he said, "Well, 282 I work on it until the stone tells me what it wants to be." 283 And I was like, oh, that's really good. 284 'Cause that's kind of like, 285 I do the hack and slash version of that. 286 I mean, 287 I'm not saying that I'm equal to a sculptor 288 'cause that's just not true, 289 but, you know, that the whole thing of like, 290 you're working on it and you're working on it 291 and then finally like this flow happens, right? 292 I mean obviously the best is always 293 to like shoot your composite, the studio piece, 294 after you already have your background piece. 295 That's ideal. 296 That's your perfect scenario. 297 But nine outta 10 times, 298 I don't usually work that way unless it's client work. 299 So, you know, personal work or stuff like this, 300 I'm just like, well, let's see what happens. 301 And I go like skipping through files and hard drives, 302 kind of just seeing what's gonna show up. 303 Yeah, I mean, that's kind of what I was thinking, 304 was how much of it is trial and error. 305 But I love the concept of, like you said, 306 it's kinda like, yeah, once you see it, then you know. 307 But you don't always know beforehand, 308 which is why you have to, you know, 309 not be afraid to just go 310 through and try a bunch of different things. 311 Fail often. 312 It's fine. 313 I actually recorded this once 314 before with a different background 315 and by the time I finished, I was like, well, this sucks. 316 I didn't like the image at all 317 and I was like, delete everything, start over. 318 So there you go. 319 I mean, again, trial and error. 320 Totally. 321 All right, so I wanna give a couple of shout outs. 322 People have been, again, 323 this is our live session if you're just tuning in. 324 And then we're going to roll into the class itself, 325 the full two-hour course, in about 15 minutes for everybody. 326 And that's gonna loop for 24 hours. 327 So, you know, mark your calendar, 328 block off some two hours for you. 329 And then, of course, if you want to own the course, 330 be able to use the downloadable tools, 331 those images in the back to follow along, 332 which of course is the best way to learn. 333 It's really awesome that Renee has 334 provided the exact elements of what she's teaching you 335 to do in those two hours because then you can literally 336 follow along when you do own the course 337 or you are a Creator Pass subscriber. 338 So you wanna be able to do that now as you watch the class. 339 So, again, go ahead and purchase. 340 It's on sale right now. 341 Or if you're a Creator Pass subscriber, 342 which gives you access to over 1,500 classes in the catalog, 343 you can go ahead and start downloading those right away. 344 If you have any questions about that, 345 let us know in the chat room. 346 Okay, so here's Renee. 347 Before we go into watching a bit of what it is 348 that people are going to learn as a little preview, 349 here's what people are saying 350 about how they come up with their, 351 you know, fantasy ideas and such. 352 Susanna says, 353 "I guess from books and film and series, 354 I'll get mixed what I want to express 355 and the images form in my head." 356 Phil as well. 357 "Inspiration from film and TVs. 358 I love cinematic photography." 359 Again, your looks is very cinematic. 360 Tara gets, 361 "I get my inspiration from stories, fantasy novels, 362 and tarot cards." 363 Awesome. Nice. 364 So lots of places for everybody 365 to think about where they can get inspiration. 366 But Renee, why don't you set up for us, 367 we are going to now watch about 368 a five minute video that shows you sort 369 of at the end of everything that you are going to learn 370 so you get kind of a preview of what she is going 371 to break down in more detail. 372 So tell us about what sort of who this class is for, 373 and in general, 374 what are some of the tools 375 and things that they're gonna be able 376 to learn by the end of it? 377 Right. 378 So this class is for anyone who's a beginner 379 and intermediate composite artist 380 or people who are interested in 381 getting into fantasy compositing in general. 382 This is, it's not super advanced. 383 Like I definitely avoided that for this one 384 because I've had mentions in the past of like, oh yeah, 385 it's really great, but like I didn't understand most of it. 386 So I was like, okay, we'll dial this back. 387 The prerequisite you need 388 to know going into this is masking. 389 Everything else, I basically walk you through it. 390 So if you understand masking, then you're in good shape. 391 If you don't understand masking, 392 I go through a quick explanation. 393 There's tons of CreativeLive videos 394 to watch how to work with masking. 395 But yeah, and then from there, 396 it's the first time I've ever talked about 397 my skin retouching process. 398 So I go through that first because it's my intro. 399 So like what do I do to every single image? 400 Well, I retouch the skin first, 401 and then we go into masking, 402 and then replacing the background and blending it together, 403 and then color grading. 404 So that's kind of it. 405 And then like a little touch of saving on the end. 406 Awesome, awesome. 407 All right, well let's roll that video for you guys. 408 Again, 409 join into the chat and you can 410 put some questions in as you go through along. 411 And we're gonna, after about this five minute video, 412 we're gonna come back live with Renee, but here it is, 413 everything that you're gonna learn in this class. 414 Let's roll the video. 415 All righty. 416 So this is our first image. 417 This is what we showed up with. 418 Now, we did a frequency separation and we did a clone stamp. 419 So first thing we did was we got rid 420 of all the excess hair on the back of her neck, 421 which was just from, 422 she has a very tight bun 423 and some of the hair just fell out of it. 424 And then we did frequency separation just 425 to gently clean up some of the texture on the skin 426 and a little bit of the tone unevenness. 427 I mean, she's got perfect skin, it's ridiculous. 428 One thing that does happen a lot though is foundation, 429 especially if there's a lot of smiling or, you know, 430 expressions or, I mean, sweating or anything like that, 431 it can really add creasing into the 432 face that is more severe than normal. 433 So always keep that in mind if you're, 434 especially working in the fantasy realm where there's a lot 435 of heavy makeup going on, 436 it can cause like these really deep creases in the face, 437 like around the eyes and the mouth 438 that maybe aren't normally there. 439 So from here, we handled the contrast. 440 So we just quickly made an adjustment to the eye color, 441 just a really quick hue saturation adjustment. 442 We did the dodging, 443 which was the curves there 444 where we did the overexposure 445 and then we brought it in with the soft brushes. 446 We added a little bit of the shadow back into the neck 447 and then we did the burning on the rest of the image. 448 Again, not very much. 449 I'm pretty light on that kind of work. 450 Whoops. 451 Let's see here. 452 And then this curves layer makes sense 453 because we added it later, so I'll turn that off. 454 Then we added in our elements. 455 So I merged my model up here and created the masks. 456 So that's where we sat looking at this forever. 457 So if you wanna see what the mask looks like, 458 hold Alt, click, 459 and you can see exactly what your silhouette looks like. 460 This is actually like a super great habit to get into. 461 So if you're making, 462 if you're working in character design 463 and you're wanting to make like a really cool shape, 464 study the silhouette of the mask. 465 Because this silhouette, 466 like this shape can really tell so much. 467 You can tell so much of a story with like a really, really, 468 really great pose. 469 And so getting in the habit 470 of when you make your masks, 471 look at the silhouette and start being like, oh, 472 is there something about this silhouette that kind 473 of bothers me or is there not? 474 And can you change that imposing 475 in the future for future concepts? 476 Or is it something that maybe a little bit liquefy 477 or puppet warping can kind of help you with? 478 So it's a super, 479 super nice habit to get into when you're working 480 with character design like this. 481 Then we added the ground here 482 and we had reduced the clarity 483 of the ground a little bit. 484 So I'm not really a big fan of 485 using Gaussian blur on backgrounds. 486 I don't really like how it looks. 487 So if I can avoid it, I will. 488 Then we added the first sky layer here, 489 which then we kind of like added more distance between 490 the background here. 491 So we painted with a soft round brush here. 492 And then this one here is just to add a little bit 493 of texture to the entire image, 494 kind of like this rippling color effect going on. 495 We did a curves adjustment just to kind 496 of cool everything down, 497 to kinda like pull everything together a little bit, 498 a slight hue saturation adjustment 499 just to gently turn it down a little bit 500 because I knew I was gonna go into Adobe Camera Raw 501 and like push these colors all different kinds of places. 502 Like I said, I just really, really like how it looks. 503 I think it's very pleasing to me. 504 A gentle hue saturation adjustment on the eyes and teeth. 505 Again, 506 if you're posting this only to Instagram or social media, 507 those details aren't really gonna matter. 508 Those details matter if you're really planning 509 on going into printing. 510 And then this is the liquefy, 511 which I didn't call it anything. 512 Liquefy. 513 Name your layers. 514 It'll save you tons of time being like, 515 what was this layer again? 516 And then here is the color layer. 517 So that's kind of how I pull these composites together, 518 especially for like a more introductory level composite. 519 You know, the background pieces are not super complicated. 520 The mask was super complicated, 521 but, you know, this is definitely like my 101, 522 like the most basic version of a composite that I like 523 to make is one to two pieces, skin retouching, 524 and color grading and just like smashing it together 525 and being like, ta-da, here's a composite. 526 (intense orchestra music) 527 All right, everyone. 528 Well, what do you think? 529 I am excited that, again, 530 this was, Joseph, you're just tuning in, 531 this was a summary of the class, 532 showing you what you're going to get throughout it 533 and showing you what you're going to be able to learn. 534 So I love that people are already commenting Renee 535 as to what some of the things that they're excited about. 536 Maureen is saying, "Study the silhouette of the mask." 537 That's a super important point. 538 Somebody else said, "Oh yes, right. 539 Name your layers." 540 Yes. 541 Helps tremendously. 542 So I did have a question come in 543 from James Nelson Smith who said, 544 "Are you using the latest iteration, 545 I can't speak this morning, "of Photoshop? 546 And what are the earliest versions of Photoshop 547 that you'd be able to utilize for this course?" 548 You can basically use every version 549 of Photoshop for this class. 550 I did this on 2019. 551 I didn't use this on 2021. 552 It kept crashing and I was just like, 553 nope, not dealing with it. 554 So the previous version that I had on my system was 2019. 555 There is a small difference in one 556 of the brushes when I get to it. 557 It's called the splatter brush. 558 They've hidden it in 2021 559 somewhere under lash brush or something like that. 560 I just discovered this last night. 561 So FYI, if you're using 2021, 562 there's one thing with the brush panel 563 that's a little bit different, but everyone else, 564 the brushes are going to be easier to find 2017 and older. 565 And then 2018 to 2020, 566 they're hidden where they are in this tutorial. 567 So that's the only difference. 568 Okay, good to know. 569 So thanks everybody for clarifying. 570 Of course, 571 if you are on the course page there on CreativeLive, 572 you can always scroll down in the description 573 and see what version of software 574 that folks are using in their courses. 575 So we've talked about, again, what you're gonna learn. 576 We have talked about that you can get the bonus materials 577 when you do purchase or own the class so 578 that you can literally just follow along step by step. 579 When you do own the class, you can pause, stop, rewind, 580 you know, as you go through those steps. 581 We did have a question come through from 582 Rev Aldo Photographico, who's in Columbia, who says, 583 "Do you use blend modes to compose?" 584 I didn't in this tutorial, no. 585 Yeah, so this is all done manually. 586 There's no blending modes in this. 587 Well, there's one layer that's blending mode, 588 but the rest of it is not. 589 So, mostly no. 590 Mostly no. 591 Awesome. 592 Let's see. 593 I am going to continue to, 594 we've got funny comments coming in. 595 "Photoshop 2021 crashes if you breathe wrong." 596 It's true, man. 597 It's unstable. 598 It's a problem. 599 It reminds me of high school. 600 We're keeping it real here, everybody. 601 Of course, they continue to improve, so no worries. 602 But again, as you go back, you know, 603 you'll be able to, like Renee said, 604 utilize this course with a number of the different 605 versions of Photoshop. 606 100% 607 Yeah, I tried keeping it as user friendly as possible. 608 Awesome. 609 Was there anything that you sort of learned, 610 like when you're kind of focused on, okay, 611 I'm gonna create this class, 612 are there things that like 613 you discover while you're doing it? 614 I mean, I discovered, 615 I wondered if everyone was gonna be 616 that excited about masking out that headdress 617 'cause it's super complicated and massive 618 and there's no fast way to do it. 619 But, I mean, it's the same thing as always. 620 You get this kind of like excitement when you're working on 621 an image that's coming together. 622 I really hope that other people 623 will get a similar experience either, 624 you know, working on this, working on this along, 625 or, you know, doing their own work afterwards. 626 That's kind of the best that I can hope for, 627 I think anyways. 628 Get excited about your own work, please. 629 That would be great. 630 I love it, I love it. 631 Any final questions, everybody? 632 We don't have too much time left because we wanna dig in 633 and get you into the course itself, 634 but any final questions for Renee? 635 We would love to take those from you. 636 Renee, 637 what is sort of the next thing that you have going on? 638 I mean, we are in and outta lockdown, so who knows. 639 "Vikings" is on TV. 640 The season is ending, I think, eventually. 641 So, waiting for that. 642 Well, 643 it's a perfect time everybody to sit down 644 and get to work and learn some new skills of what you, 645 you know, 646 those things that you've been wanting 647 to learn for some time. 648 So, Renee, we are, again, 649 not too much time left to head into the course itself. 650 We are so happy to have you create a new course here 651 on CreativeLive. 652 We have tons and tons of fans here that are coming in 653 and interacting, which is always great. 654 Where can everybody find you, follow you, stay tuned, 655 follow everything new that you are doing? 656 Well, my website URL has changed. 657 It's shorter now. 658 Easy to remember. 659 It's reneerobyn.com. 660 My Instagram is Renee Robyn Photography 661 and then everything else is some version of 662 Renee Robyn and Renee Robyn Photo. 663 If you search it on the platforms, it'll probably pop up. 664 Perfect. 665 Awesome. 666 All right, everybody. 667 Well, thank you again to Renee for being live. 668 And again, if you are on social media right now, 669 what you're gonna wanna do is head over to the class page 670 for the free premiere of the course. 671 That's gonna be running for 24 hours, a little bit less now. 672 And again, if you want to own the course, 673 have access to the bonus materials 674 to be able to follow along, 675 you can purchase it, you can be a Creator Pass subscriber. 676 And thank you again to Renee Robyn for being here. 677 Thank you so much. 678 Thank you.
Class Materials
Bonus Materials with Purchase
Ratings and Reviews
a Creativelive Student
An excellent workthrough of Renee's compositing process. Thoroughly recommended, with lots of really specific, pragmatic and useful tips, along with pointers on style and considerations for working with artists, models and the whole team - Great!
Alvin Lipscomb
She is awesome, This is a great lesson using Photoshop. Seeing the different brushes she used on her mask was an eye-opener and will definitely use for working on a mask's layer. Right there is a reason to watch this lesson. 🔥 Do yourself a favor and watch this lesson.
pat cash
love her I got all her workshops - she is intense and inspiring