Lesson Info
9. Wrap Up
Lessons
Lesson Info
Wrap Up
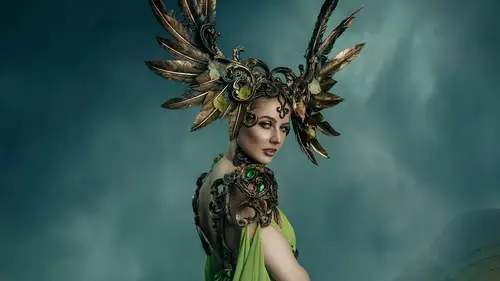
1 So to tie everything up here, 2 I am gonna walk you through what we did 3 and let's see here. 4 Do, do, do, do, do. 5 All righty. 6 So this is our first image. 7 This is what we showed up with. 8 Now, we did a frequency separation and we did a clone stamp. 9 So first thing we did was we got rid of all the excess hair 10 on the back of her neck, 11 which was just from, she has a very tight bun 12 and some of the hair just fell out of it. 13 And then we did frequency separation, 14 just to gently clean up some of the texture on the skin 15 and a little bit of the tone, unevenness, 16 I mean, she's got perfect skin. 17 It's ridiculous. 18 One thing that does happen a lot though is foundation, 19 especially if there's a lot of smiling 20 or you know, expressions or I mean sweating 21 or anything like that, it can really add creasing 22 into the face that is more severe than normal. 23 So always keep that in mind if you're especially working 24 in the fantasy realm where there's a lot 2...
5 of heavy makeup going on. 26 It can cause like these really deep creases in the face, 27 like around the eyes and the mouth 28 that maybe aren't normally there. 29 So be mindful when you are removing the texture, 30 how much texture of the face your subject wants 31 to have there, or that you want to have there. 32 Sometimes having more lines is better, 33 especially if you're creating this like crusty awesome, 34 like gritty character. 35 Like the deep creases are awesome 36 and you wanna leave those in or maybe even accentuate them. 37 But in a case like this, 38 I always try to make them just a little bit lighter 39 and a little bit less obvious 40 because, you know, this is supposed to be someone, 41 in my opinion anyways, who is kind of, you know, 42 they are an immortal, right? 43 So there's someone that who is transcended time. 44 So from here we handle the contrast. 45 So we just quickly made an adjustment to the eye color. 46 Just a really quick hue saturation adjustment. 47 We did the dodging, which was the curves layer 48 where we did the over exposure 49 and then we brought it in with the soft brushes. 50 We added a little bit of the shadow back into the neck, 51 and then we did the burning on the rest of the image. 52 Again, not very much. 53 I'm pretty light on that kind of work. 54 Whoops. 55 Let's see here. 56 And then this curves layer makes sense 57 because we added it later, so I'll turn that off. 58 Then we added in our elements. 59 So I merged my model up here and created the mask. 60 So that's where we sat looking at this forever. 61 So if you wanna see what the mask looks like, 62 hold alt, click, and you can see exactly 63 what your silhouette looks like. 64 This is actually like a super great habit to get into. 65 So if you're making, if you're working in character design 66 and you're wanting to make like a really cool shape, 67 study the silhouette of the mask 68 because the silhouette like this shape 69 can really tell so much. 70 You can tell so much of a story with like 71 a really, really, really great pose. 72 And so getting in the habit 73 of when you make your masks look at the silhouette 74 and start being like, oh, is there something about this 75 silhouette that kind of bothers me? 76 Or is there not? 77 And can you change that imposing in the future 78 for future concepts? 79 Or is it something that maybe a little bit liquefy 80 or puppet warping can kind of help you with? 81 So it's a super, super nice habit 82 to get into when you're working with 83 character design like this. 84 Then we added the ground here 85 and we had reduced the clarity of the ground a little bit. 86 So I'm not really a big fan of using 87 glossy and blur on backgrounds. 88 I don't really like how it looks, 89 so if I can avoid it, I will. 90 Then we added the first sky layer here, 91 which then we kind of like added more distance between 92 the background here. 93 So we painted a soft round brush here, 94 and then this one here is just to add 95 a little bit of texture to the entire image, 96 kind of like this rippling color effect going on. 97 We did a curves adjustment 98 just to kind of cool everything down, 99 to kinda like pull everything together a little bit. 100 A slight hue saturation adjustment. 101 just to gently turn it down a little bit 102 because I knew I was gonna go into Adobe Camera Raw 103 and like push these colors all different kinds of places. 104 Like I said, I just really, really like how it looks. 105 I think it's very pleasing to me. 106 A gentle hue saturation adjustment on the eyes and teeth. 107 Again, if you're posting this only to Instagram 108 or social media, those details aren't really gonna matter. 109 Those details matter if you're really planning 110 on going into printing. 111 And then this is the liquefy, 112 which I didn't call it anything. 113 Liquefy. 114 Name your layers. 115 It'll save you tons of time being like, 116 what was this layer again? 117 And then here is the color layer. 118 So that's kind of how I pull these 119 composites together, 120 especially for like a more introductory level composite. 121 You know, the background pieces are not super complicated. 122 The mask was super complicated, 123 but you know, this is definitely like my 101, 124 like the most basic version of a composite 125 that I like to make is one to two pieces, 126 skin retouching and color grading, 127 and just like smashing it together and being like, ta-da. 128 Here's a composite. 129 Thanks so much for checking out this video. 130 I hope you found it informative and helpful. 131 If you have any questions about this class 132 or anything else, reach out to me 133 through the contact form on my website 134 @reneerobyn.com 135 or through Instagram @reneerobynphotography.
Class Materials
Bonus Materials with Purchase
Ratings and Reviews
a Creativelive Student
An excellent workthrough of Renee's compositing process. Thoroughly recommended, with lots of really specific, pragmatic and useful tips, along with pointers on style and considerations for working with artists, models and the whole team - Great!
Alvin Lipscomb
She is awesome, This is a great lesson using Photoshop. Seeing the different brushes she used on her mask was an eye-opener and will definitely use for working on a mask's layer. Right there is a reason to watch this lesson. 🔥 Do yourself a favor and watch this lesson.
pat cash
love her I got all her workshops - she is intense and inspiring