Lessons
Class Introduction
05:10 2What Defines a Dramatic Portrait?
06:07 3Camera Settings
09:24 4Lighting Equipment & Styles
24:24 5Lighting For Dramatic Shots
09:04 6Shoot: With Light On-Axis
14:53 7Shoot: With Butterfly Lighting
06:20 8Shoot: With Beauty Dish
17:31Lesson Info
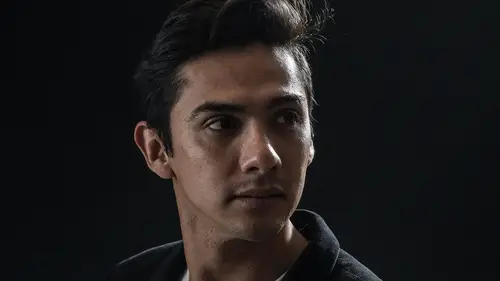
Shoot: With Beauty Dish
First thing we did right before the break was I wanted to show you the kind of proximity issues to the background and now we're just gonna use that as part of our overall flow. As we see things are too bright, we're gonna move farther away, or we're gonna change up the lighting so that we eliminate lighting from the backdrop. I've got at least five or six more sets that I wanna show you using different tools, so we'll just get right to it. This next one that I'm gonna use is a beauty dish. I'm gonna show you a couple of different looks for a beauty dish. The traditional way that you use a beauty dish is right in front of the subject. In fact I'll probably show that as maybe the first one but then I wanna show you an alternative use of the beauty dish which will be behind the subject so we'll kind of use a rim light scenario with some reflectors up front. So lighting from the back and then a reflector in the front but before we do that, before we break the rule, I wanna teach you the ru...
le. So I'm gonna show you the proper way to use a beauty dish and then we'll deviate. So Jeff come on forward again, thank you for your good nature and your willingness to be our model for today. No problem. Appreciate it greatly. And for this one we're just gonna have you kinda point this way a little bit more. How's that? Good? Excellent! And I'm gonna move the stool a tiny bit this way. Right like that, all right you comfy? You bet. You bet, okay, good. Traditional way to use a beauty dish, and again this is not actually a beauty dish but it produces pretty much the same effect. This is the Phottix Ra-Ha 65 (chuckles). It's just fun to say. I've got it on a boom arm and the reason why a lot of times we use a boom arm in the studio is because you don't have to fight the light stands. Notice the first segment, I was always fighting that light stand. It's kind of smack dab in the middle and so this, see it puts the lights stand off to the side and now I can work and I'm unfettered and I'm free. One thing that I encourage you to always do is to use a sandbag whenever you're using a boom arm. This is seriously about ready to fall right onto his head. So with your permission, I'm gonna grab a sand bag (chuckles). You don't have to spend a lot of money on sand bags but they're worth their, they're not worth their weight in gold (chuckles) but if they were, we'd all be buying lots of sand bags. We just put it on the opposite leg here to kind of weight the thing down. Especially important if you are outside and it's a little bit windy. So alright let me talk through mentally what I'm thinking here. My goal is to produce a nice catch light in his eyes. We're all about the dramatic look. So I want a lot of shadowing, a lot of texture on his face from the shadow information and I want the background to be as dark as possible. So I'm gonna set up my light here so that the light doesn't really spill onto that background. So I'm gonna rotate this down ever so slightly. Just like that to kind of prevent the light from hitting the background, control as much as I can. I'm gonna take a look here at my flash power and see where I'm at. I'm currently at 1/8 power which I'm okay with and I'll move it slightly in closer to him right there and safety first, I always just kind of feel it and make sure it isn't going to fall into my model and it looks like we're not going to tip over. I'm happy with all of that. Grab my camera (clears throat) and I think we're still tethered. Yep, all the tethering looks like it's working and I can already see I'm off a little bit on my beauty dish but that's okay. I'll make a mistake first and then fix it in a second. Here we go, F5-6, a 200th of a second, ISO and one quick test of the light. Everything's working. Okay, here we go. Look right into the camera. Bring your chin down a little bit and actually let's bring this shoulder towards me. Just rotate around. There we go. Yeah, nice. (camera clicks) Cool. And this was my exposure, my exposure check. So I gotta quickly go into Light Room. Remember earlier today I was talking about how we can use Light Room to judge the brightness of that background. A lot of times your screens, your computer screens, lie to you. For example, the screen that we have here in the studio tends to show us a brighter photo than normally really exists. So you're like, is that really gray or is it darker than it actually is? So what I do is I go over here to my histogram and I take my mouse and I just move that mouse around in the screen and then what I'm looking for here is I'm looking for these RGB values between zero and and if they're close to zero, that means I've done a really good job of making my black black. Anything less than five, anything less than 10, will eventually get you to the point where you can have solid black, especially after you finish post-processing it inside of Light Room. So that's pretty good. It'd be nice to be a little bit darker and I'll show you in just a second how I make that a little bit darker. Alright, let's look closely on his eyes. Let's check that catch light. Great. Looking good overall. Don't you love having everyone stare (laughs), yeah, it's painful, I know. I feel your pain. Yeah, that's a good look overall. Now let's talk about, let me put this thing back onto my clamp so that I can work efficiently. Let's talk about positioning, fine tuning the position of that beauty dish. If I go higher, if I go higher, what do you think's gonna happen? Well, I'm gonna create more deep shadows underneath his eyes and that might be a look that I'm after. Sometimes for (chuckles), sometimes for men it's okay. For women, nah, not so much. So let me just show you what this looks like when he's looking straight at the camera. It's almost like a shower head and light coming down from on high. Okay, it's not gonna fall. Good. I'm gonna have you take one look right at the camera and then after that I'm gonna have you kind of look up into the light, okay? Alright and just get this position just perfect. Working with these beauty dishes, the positioning of the light is critical in order to get the look you're after 'cause if you miss it by a few inches, well then the light's off, off of the subject. Okay so this one you're looking right at the camera. Good. (camera clicks) No fire. Houston, we have no fire. Okay, we'll try that again. (camera clicks) Did it go? Okay, good. Okay, this one's right above him. There we go, move that off. Let's go to full frame. Okay, so now you can see we've got these dark shadows underneath his eyes. So that's not necessarily a great look. Sometimes we want that look though. You know, sometimes we really want a sinister look. Imagine someone in a hoodie and their face is mostly shadowed with deep dark shadows underneath their eyes, their eye sockets. You can see how we're starting to get to that feel overall. For him, specifically, in this scenario, it's probably not the greatest look overall but let's say I still like the higher light position, I can work with that a little bit by having him look up. So just move your nose up a little bit more. I'm gonna stand, eh, I'll get my apple box. Multiple apple boxes. Yeah, about right there. Okay, good. Now I'm breaking another rule that I talked about earlier but, hey, we're photographers. We love breaking rules. (camera clicks) Good. Why would I do this? Well, by biasing the light more downwards, I'm preventing light from hitting the background and I can work with that by having him kind of look up into the photo while still getting these catch lights and not getting these deep sockets under the eyes. So the real reason I'm showing you all this is because I know a lot of you are shooting in a spare bedroom, a lot of you are shooting in a living room, in those types of scenarios. You can get around these tight space constraints just by how you're positioning lights overall. I'm gonna bring this back down and I'm gonna bring a reflector in, again showing kind of the proper use of a beauty dish. You're very trusting of me moving this up and down. Thank you. There we go and I'm gonna rotate this about there. That feel about centered on ya? Yeah, pretty good. Yeah, pretty close. Okay, yeah, it needs to come forward about like that. Okay, great. And now I'm gonna use a white reflector. At one of the breaks we were talking with some of the students in the live audience here and we were talking about the difference between the silver reflector and the white reflector. If I use a white reflector down low, the reflection's gonna look pretty normal whereas if I use a silver reflector down low, it's gonna look a little bit more, oh, I don't know what the right word is, Alfred Hitchcock-y. You know, with the light coming from the bottom and that's an okay look if you want it but I'm not after that today. Okay, so I just don't wanna whack him in the face when I lower this down. There we go. Okay, I'm just gonna move this in close to you about there. Great. Go ahead and lean forward a little bit. Right there. Cool. And I'm realizing here I want it to actually probably be a little bit higher and a little bit more angled to him. So raise this up a tiny bit and lower this down, okay. Yeah, that's cool. Go ahead and bring that hand back right there. Let's see how that looks. Okay, one, two, three. (camera clicks) Nice. So now we're gonna get a little more shadow, fill in the shadows underneath his face. A little bit less dramatic look overall. We're loading. There we go. So we'll compare those two: one without the reflector underneath and, come on. These are big files. Isn't that pixilated image beautiful? (laughs) How about we let that load and we'll come back to it in a second? There we go. Oh, there we go! So you can underneath his neck what we've done. We've added in some shadow. Maybe you want it, maybe you don't. What I was mostly after was underneath his eyes and I think I got too much underneath, oops, sorry, audio people. I got too much underneath his neck so I need to be careful about that. So maybe rather than clamshell lighting which this is, this is clamshell lighting, a light source from up high and then a reflector down low, maybe we don't do that. Maybe we go more towards side reflection so we can actually manipulate those shadows but before I go toward more of that side look, I wanna show you with the beauty dish in the back and the reflector up front. So this is a non-traditional use of the beauty dish. Okay, we're good. Everybody's good and this, one of the reasons I love using wireless flash transmitters is that I don't have to worry about cables on my lighting equipment. Ideally, I'd also be tethered wirelessly to my computer. That would help things out a lot but that's never as reliable. Okay, so I'm gonna pull this over here. So if we're thinking through what the plan is visually, my goal is to get a nice rim light off of his shoulder and if I don't reflect light back onto him, his face will be in deep silhouette. Let's just see what that looks like. Let me show you what that looks like with no reflector first and then we're gonna build the photo step by step. It's a real common approach that I use as a photographer just to get the impact of the key light and then start seeing what the other stuff looks like when I add it in. Okay, here we go. (camera clicks) And as you'll see here, the light's just gonna be over his shoulder. Hmm, to be honest, it's not a bad look. It's kind of an interesting look and it goes to your question earlier. If that's what you're after, if you're after the International Man of Mystery, well you got it right there, right? 'Cause you can't really even see his face. Well, he's a little too mysterious. You're making me nervous. So, we are gonna add some reflector action into that. Okay. This is a reflector arm. You can buy these, most camera stores have them, and it just makes it a lot easier. If you're doing a one woman show or a one man show, you don't have an assistant in the studio, it makes it a lot easier to move. You don't have to call someone up to hold it for you or have it balanced on a chair. Okay. There we go. We'll do that right there. So you can see I've got the light from up high and then I've got the reflector down a little bit lower. We'll see what this looks like. It might be a little bit too much light from below on the reflection so I might end up going a little higher. We'll see. Here we go. One, two, three. (camera clicks) You kind of have the blue steel. It's like your look. The one look. Yeah. Okay, that did not add a whole lot of light back into the scene because I'm using white, right? I'm using white. So how can I get more light? Well, let's try the silver. It's all good, all fun and games, and some of these decisions I'm making on the fly, I'm doing it on purpose just to show how they work and other times I'm making mistakes but I'm not letting you know when I actually make mistakes but that's part of photography and even pros, as long as I've been doing this, I kind of know the general effect that I'm after but I very rarely get it on my first try, very rarely. If you do get it on your first try, it's always skill. That's what I tell everybody. Okay, great. Here we go. One, two, three. (camera clicks) And one more. (camera clicks) Okay and I already know what I'm gonna do next. So I've got a little more light onto his face but it's not quite bright enough. So what's one way I can get more light onto his face? I can shine more from the flash itself. What's that gonna do? Well, it's gonna blow off the top of his head. (chuckles) So this one I'm gonna show you what it looks like. To add more light onto his face, I have to actually reflect it that way and back again but to use, well, you can handle it, he's somewhat follic-ly challenged and so that's just the way it is and if he had a full head of hair, this would not blow off the top of his head but we have to worry about the skin there. Okay, here we go, back up there. Okay, and I increased the brightness of my flash by one stop so now I'm around 1/4 power and here we go. Nice job. We're gonna get more light on his face but as you'll see we've probably lost any semblance of detail in his hair and on the top of his head. Eh, not horrible, not bad but I have lost detail on the very top of his head. So this is back lighting just so you know and now you've seen it in real world practice. Real quick, let's get some feedback. What do you think? Do you like this look overall? Do you not like the look? Thumbs up, thumbs, I see a lot of no's. No. Okay, great. We do have a nice catch light in his eye though. That's a bonus. Okay, well let's move towards more side lighting.
Class Materials
Bonus Materials with Purchase
Ratings and Reviews
user-182390
Another great course learned a lot about flash and the different modifiers. Very informative and easy to understand looking forward to the next one.
a Creativelive Student
Student Work
Related Classes
Lighting