Lessons
Class Introduction
05:10 2What Defines a Dramatic Portrait?
06:07 3Camera Settings
09:24 4Lighting Equipment & Styles
24:24 5Lighting For Dramatic Shots
09:04 6Shoot: With Light On-Axis
14:53 7Shoot: With Butterfly Lighting
06:20 8Shoot: With Beauty Dish
17:31Lesson Info
Shoot: With Light On-Axis
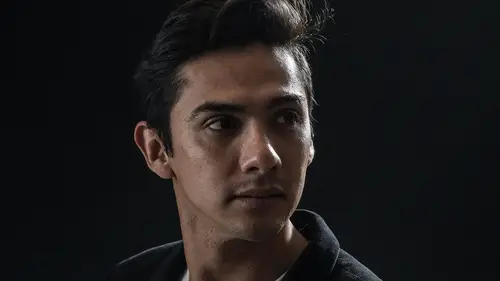
It is time to take some photos. So I think we're going with Jeff, yeah everybody welcome Jeff to the set. (Audience applauds) Thank you for filling in. Appreciate it. Okay stand up here real quick with me I just wanna talk about a few things. So Jeff is wearing jeans, he's wearing black shoes, and he's wearing a black shirt. And I say all these things because I want to register mentally what I'm working with here. Typically, Jeff and I would have worked together before this to set a wardrobe, fortunately Jeff came prepared today because he knew this was all about dramatic porterage so he's wearing black. One of the things I also noticed, turn towards the camera a little bit, we have a red strip coming down here, okay it's just there I just need to recognize that. If it was a white strip, well then I'd have to think about exposure and not blowing that out. But overall what's going through my mind now is okay I know he's wearing black, and I know we've got black backdrops. Sp I'm gon...
na have to work today to try and separate him visually from that backdrop. Otherwise, literally this whole portion of his body just gets absorbed into the background and his head pokes out and that never quite looks right. So lets see what else. He's wearing jeans, he's got pretty groovy jeans, I like his jeans. he always comes well prepared with your jeans so good job today. And I may or may not want to include those in our photos. We're gonna do a full length photo later on, but they're gonna work out just fine. The next thing I'm looking at is his hair and his face. Nice hair today, good job. I do a contrast with the black shirt. Yeah good job, excellent. So I'm just seeing if I need to worry about that from a lighting perspective right? Do I need to separate his hair from the background? If he was a Blondie then I won't have to work so hard at it. But since his hair is pretty dark I may have to do something with his hair so. I think we're ready. Alright. Alright cool grab a seat, on the stool there. you want the apple box? Sure. Okay so this apple box, these are really great for studio work, if you ever get the inclination to buy a set of them I encourage it highly. They can be positioned in three different ways, and as you can see it just makes things a lot more comfortable for your model. If the apple box isn't there than his feet have to be on the floor and kinda cuts off circulation in the back of his legs so. We're gonna use the apple box today, and now what I'm doing is I'm positioning him from a distant perspective. I wanna position him, the first shots we're going to take are actually very close to the background and then we're gonna move him a little bit farther away and then really far away, just so you all can see what it looks like, how we can kinda manage the light. Let's see, to do this first one I think what I'll do is I'll use an umbrella, because that's kinda the most ubiquitous lighting modifier we have out there. And I'll use my big honking umbrella. My favorite one. Okay, and just to show this off, I think what I'll do is just a little bit more side lighting, so that you can see what's gonna happen here is light from this side of the umbrella here is going to shine onto him, and light from the other side is gonna kinda stream across the backdrop. So we're gonna get a lot of spillage, a lot of light spillage here. And I see my gray backdrop is coming down so I'm gonna raise that up. Let me talk about this backdrop stand, I don't necessarily anticipate that you watching at home, are gonna go buy one of these triple backdrop seamless gear driven stands. I just have it here today because it makes things a lot easier to teach and to move quickly inside the studio. Okay I'm gonna have you actually move back as close as we can get to the background. Alright excellent. Okay. Start my tethered session on the computer. Go into light room and I go into file, tether capture, turn my camera, start tether capture and we're gonna change the name here to dramatic images. And all of this is going good, we're at creative live and we're in Seattle and it's called dramatic and I hit okay. There we go, looks like my camera is connected you can see on this little bar here, this toolbar it's telling you what my shutter speed, what my F stop is, and what my ISO is set at. So I'm currently at a 1.25th of a second, so I said earlier let's go to two-hundredths, so we'll do that, we'll go to two- hundredths. Oops wrong dial, there we go two-hundredths of a second. And then we're gonna start it about F5 six. There's the seven one six three, there's F5 six. Great, and ISO two hundred, and them my white balance is set for flash white balance. Now what I'm going to do is I'm gonna turn on my transceiver here, power it up, that little fo tics It says it's set for channel one group A and I hit my flash test button. I'm gonna fire the flash so close your eyes. Okay it didn't fire, which means I've gotta turn on my flash. It's why we test things out. Okay. And let me, let me connect here so I can go hands free in just a second. This cool thing that I use, I love these, they're made by Spider Holster. I think they make some of the coolest studio gear. I love using it cause the camera just hangs in there. Nice and solid. Okay now, I'll turn this so you guys can all see what I'm doing. I'm gonna turn on my flash, great. And now I'm checking to make sure it's all on the right channel and group. So it says channel one group A and then I'll do a quick little test, so I push here my little test button and it fired, that makes me happy. Next is I gotta think about power, I said earlier that I'm anywhere from a quarter power to thirty second. I'm just gonna start at a one eighth power. I don't know if that's gonna be good or bad, but it's a good starting point one eighth power. And now I'm going to set this up like this. And my first shot here in addition to checking against the background. My first shot here is an exposure test. I just wanna see if I've got my exposure in the ballpark. Okay here we go. (camera clicks) Okay great, and we're also checking to make sure it come across in side of light room. Ha, class is over see you later, have a nice day. (class laughs) That's great, it actually turned out really well. Hey, all of those setting I gave you earlier, on that camera set up and flash settings page, they work. It's proven, right here. It's just, if you guys ever do checklists I like doing checklists, this can be like your preflight checklist for the dramatic luck, those setting that I gave you. It's actually pretty good overall, the brightness on his the left side of the screen looks great. We've got a nice dramatic shadow on that side. And the catch light in the eye looks pretty good. So we're just gonna go with that, everything worked. So let's talk about the gray on the background. So that's a black backdrop right? But look we've got gray showing up and that's cool. That's a technic, that's a skill that you need to master and understand. I can make a black backdrop turn gray, by how close I place my key light. So here you can see that you're like what, a foot away, a little bit less than a foot. And the flash is actually almost, the umbrella is almost touching it. Cool, I've created an effect. I've done my job. Well let's do our job and say that we want to have less gray or darker gray, so I'm gonna move this forward about to there. And then I'm gonna have you come forward. And the ideas about three feet away, approximately. Okay. That looks good. Here we go, nose down a little bit, great. (camera clicks) So we moved him about three feet away, everything else is the same, same flash power, same energy overall. Okay so the background is getting a little bit darker, excellent. And now we're gonna move quite a far distance away. Okay that looks good. Notice I'm keeping the flash about the same distance from him all the time. If I change this up then I have to my meter value I have to change my aperture, my ISO something like that or my flash power. So just try to keep that distance about the same overall. Okay, and now the idea is we hope that background goes almost pure black. (camera clicks) okay, good, I'm gonna zoom in just a tiny bit. So we are getting a lot of spillover, go to E, and let's crop that just a tiny bit here, just to get rid of the distracting elements on the sides. Just so you can see the photo alone. Back there, okay. Why is the background not completely black yet? Well, like I said earlier, an umbrella tends to send the light everywhere, you don't have a lot of control over where all that light goes and in the studio here today where we're at, the ceiling and the walls are all white as well. So we've got light reflecting and bouncing all around this room. So that's good, it's very instructing for us to see that and understand it so that now when we choose our other lighting options today, maybe we go with more of a soft box, or something with the egg crate inside of it to really direct that light and to prevent it from spilling over. So my question, this would not be a good example of my question, but when I'm trying to do dramatic porterage I find that I struggle with not being able to evaluate what I have achieved is dark and moody, or just under exposed, Uh-huh. And I'm wondering like what would an editor look for to know that this is properly exposed and dark and moody? Great question, and let me answer your question by taking a photo okay? So without saying much of anything I'm just gonna, well I'm gonna change the brightness of the flash. I'm gonna bring that up to half power, same distance away from the subject, okay all that's the same. And now I just take the photo. (camera clicks) and then I'm gonna take one more, and I'm gonna change the power and drop it way down. It's an excellent question by the way. Okay, here we go. (camera clicks) Super. Let's now go to grid here, and I will select picture one to picture three. And actually, come on brain. Grid, question one, what's the one setting light room that let's you show multiple photos side by side? Having a hard time remembering. Oh there it is, sorry, cut you off but I got it. So let's look at those three images, photo on the left is properly exposed. Would you agree? Ish? Just say yes. Yes Okay good, and the photo on the right I would say is over exposed, and the photo on the bottom is under exposed. Okay now I use those terms, not to indicate the quality of the image or the correctness of the image. Rather I use those terms just to say that's fact. The photo on the left is a middle exposure, the photo on the right is an over exposure, it's over middle. And the photo on the bottom is under middle. Which one is correct though? Well that's up to you to decide. So I understand your question and I know I'm kinda beating around the bush a little bit here, but maybe, maybe what you want is everything overall to be dark and moody like some fantasy movie you know I'm imaging orcs running through, the landscape with battle axes. And maybe you want that look, in that case that's a pretty good look because you've achieved your goal. What's that gonna look like when you print it? Well it's gonna be really dark. And I'm not saying that this is a bad photo, it's just a certain look. The answer to your question is, if it achieves the look that you're after than that's the right exposure. This is a correct exposure overall, on his face. I'd say that's about right, maybe it needs to be ever so slightly brighter. Maybe like a quarter of a stop, a third of a stop brighter for his face. And that's what we're looking at, you're always judging off of the persons face. I would say that's blown out, that's incorrect. You know we're not gonna be able to do a whole lot with that, maybe we convert it to black and white. To get some special fancy effect, but for a color photo I've lost all the color detail and data there. So maybe on that side of things I would say, watch those highlights, make sure you don't blow out the highlights. But everything less than that is all fair game. And it all comes back to your vision, what's your vision for the photo? If you want everything dark and heavy, including the background than that bottom one is the winner.
Class Materials
Bonus Materials with Purchase
Ratings and Reviews
user-182390
Another great course learned a lot about flash and the different modifiers. Very informative and easy to understand looking forward to the next one.
a Creativelive Student
Student Work
Related Classes
Lighting