Lessons
Class Introduction
05:10 2What Defines a Dramatic Portrait?
06:07 3Camera Settings
09:24 4Lighting Equipment & Styles
24:24 5Lighting For Dramatic Shots
09:04 6Shoot: With Light On-Axis
14:53 7Shoot: With Butterfly Lighting
06:20 8Shoot: With Beauty Dish
17:31Lesson Info
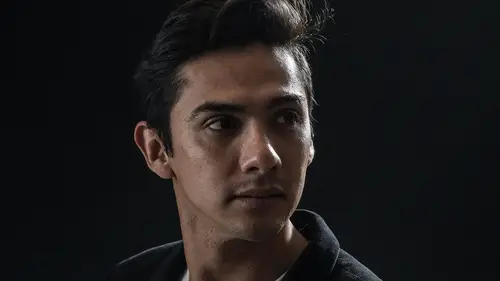
Shoot: With Side Light
And now we're gonna really produce this really dramatic look. So we'll use a soft box for this okay? And you can see again I've got him about six feet away from the background so that background's gonna be nice and black. I'm gonna pull away our beauty dish and I'm gonna bring out the soft box. Oh yeah. (grunting) Sorry for grunting but that's heavy. And pull my flash out. Try not to knock anything over. (laughing) It's a dance! I love the soft box for this. So we're gonna do nice side lighting here. And actually just I'm talking through what I'm doing out loud so everyone knows what's up. I'm pulling out that little diffusion panel there so that light spreads all around on the inside of my soft box. Put it here on my speed light speed ring. I'm at a quarter power. I'm gonna, ehh I'll just stay at a quarter power see what that looks like. And from the lighting position now I'm gonna drop it down so it kinda covers most of his torso. About like that. Okay right there. Let's take that ph...
oto. It's a little bit back. A little bit too far back. Right there. Okay this'll be one of the starkest, the most dramatic shots of the day. 'Cause we've got really we've got no light coming in from that side. Alright one two three. And I think I might have overexposed it, I've just got a feeling that I did. Oh yeah. Definitely overexposed it. So that was at a quarter power. I'm gonna drop that down to probably drop at least a stop. So I'll drop it down to eigth. Maybe let's go down to 1/16. Two stops. So I took two stops out. Great. Nice. So this is true side lighting. You can see actually there's a little bit of light, no there isn't. There's no light shining on this side of his face. Okay that's nice and dark. I'm gonna hit my tab button here so I can go and see my tool panels. As I move my mouse around the screen you can see the background is all around one percent brightness. Cool I've got nice solid black there in the background. How about his face? The dark side of his face? See the brightness levels there are five to 7%. So there's a little bit of texture and a little bit of detail. But it is really dark. And then this side of the face, ah well we're in the 50% range and for a Caucasian typically somewhere in the 50 to 60% percent range for luminance is about the right answer. So you asked the question earlier about how bright should the face be? For Caucasian folks about 50 to 60%. For Latino or really tan folks maybe around 50%. And then for darker skin maybe around 40 45%, somewhere in that range. So that's a good if you're a Lightroom user those are good marking points data points for you. Cool so that looks nice and dramatic and it's nice soft light over this side of his body. Now we need to think about do we want to fill in any of the shadows. And again it goes back to what your overall mission and purpose for the photo. You know do I want international man of mystery? Well then we've probably accomplished it. Do I want to fill in some shadow information. Yeah I think I actually do. Just a little more detail. Plus that side of the face looks a little too dark for my tastes. So just gonna be really subtle with this and bring in the reflector. The white side in this case. And I'm just gonna go oppose so I'm just gonna go straight oppositional. True split light just like that. Alright cool. And I'm gonna mix things up a little bit. I'm gonna have you move your foot forward up to here just so we can get a little more turn on your torso. Yeah. Turn on the torso whatever that means. Alright. Here we go. One two three. Sweet. So picture number one with the reflector. Okay good I like that. It's a little bit less stark. If I want it to be even darker I'm just doing this next step to illustrate a point. The solution if I want it to be even darker is to pull it farther away. So that first one was about eight inches from his face and now we're gonna take this next one which is about three feet away from his face just so you can see the effect of that. Nice good job. Again pointing out that we're doing all of this with one flash and we're making all of our minor adjustments with those reflectors. Reflector positions. Super. Yeah I'm liking that. Let's go to full screen so we can look at it. And on my computer monitor which is somewhat calibrated for actual viewing the blacks look nice and solid black. Here in this case in the studio it looks a little bit bright but trust me I think that background is solid black. Love it! Love it nice serious look. And then here's the previous one with the reflector closer to his face. And I kinda like that one too because we're getting a little bit of catch light on the dark side so shows a little bit of life. I don't want you to appear dead. Death is never really that good so. Life is good. So that's using a soft box in a side lit scenario. And I just want to show you positioning here. For the sake of this next tutorial. I'm gonna pull away this light. I'm sorry this reflector. And what I want you to do Jeff is I want you to just kinda rotate your body around a little bit. So yeah one we're gonna rotate into the light. That's good yeah. Let's bring this over this way just so it's a little more comfy. The purpose of doing this is to show you that with the light in the same position you can create different looks just by moving the body around. Okay so here we go. Nice. Now go ahead and go straight towards me. We'll just make kind of bigger moves. Good. Excellent. And then let's turn even more that way. And for the sake of this photo let's go even farther. Okay. Yeah right there good. And now because of the way the lights are set up we're not gonna get any real catch light in his eye. So this is gonna be the darkest kind of most mysterious of all. Nice. So light position matters. And subject to light arrangement matters. One of those things I'm always thinking through is the subject doesn't always have to be facing you necessarily you can get a lot of different looks just by changing things around a little bit with their position to the light equipment. So that was the last photo we took. Here's the one where it's true split lighting like we did before. And then here's one where his torso is faced more into the light. And we can even you know we can even get more fancy with the positioning. If you have a bigger backdrop well then I can have him just turn his body this way with his face towards me here we get more lighting. And just by moving around like this with the light staying in the same position we get a lot of different looks. It's exciting. I'm excited. I don't know about you buy I love it. So flexibility. Knowing your tools and understanding the position of light really helps you create the drama that you're after.
Class Materials
Bonus Materials with Purchase
Ratings and Reviews
user-182390
Another great course learned a lot about flash and the different modifiers. Very informative and easy to understand looking forward to the next one.
a Creativelive Student
Student Work
Related Classes
Lighting