What Defines a Dramatic Portrait?
Lesson 2 from: Introduction to Flash for Dramatic ImagesMike Hagen
What Defines a Dramatic Portrait?
Lesson 2 from: Introduction to Flash for Dramatic ImagesMike Hagen
Lessons
Class Introduction
05:10 2What Defines a Dramatic Portrait?
06:07 3Camera Settings
09:24 4Lighting Equipment & Styles
24:24 5Lighting For Dramatic Shots
09:04 6Shoot: With Light On-Axis
14:53 7Shoot: With Butterfly Lighting
06:20 8Shoot: With Beauty Dish
17:31Lesson Info
What Defines a Dramatic Portrait?
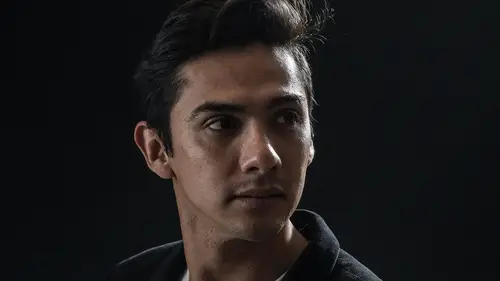
Let's define what it means to produce a dramatic portrait. In my mind, and a lot of this is my definition, you'll find other photographers that have a slightly different definition, but it's my class, so I get to tell you what's on my mind today. A dramatic photo is all about shadows. Managing the shadows. You know, the light defines the sha ... And the shadows kind of create this impressive look, this dark look. And so, managing the shadows to create the dramatic photos is paramount. We're always thinking about where the shadow's falling. Do you want, if I'm looking at you guys this way, ya know, do you want the shadow on this side of the face? Or do you want the shadow on this side of the face towards the camera? And there's no ever, never one right answer. It always starts within your mind. What's the affect that you're after? What's the look that you're trying to produce? Maybe the client, and I use the client really loosely here, the client might be your daughter, (laughs) it migh...
t be your neighbor kid, or it may be a paying customer. Maybe they have a look that they're after, so it's incumbent upon you then to help create that look by working with those shadows. We're gonna do a lot of shadow work today, okay? Mood. That's the second bullet point there. What's the mood that you want to evoke? Serious? Mad? Angry? Ya know? A little bit more chill? Ya know, what's that mood that you're after? And then you create your lighting to help produce that mood. So, if you're after a sinister look with a furrowed brow, ya know, you might want to do something more like direct side lighting. More like a, ya know, a western, ya know, or a off on guard type of look. It's just very dark on one side, very bright on the other. Whereas, if you want a little more pensive and, ya know, a thought-provoking look, maybe the light's a little bit more in front, so you see more of the face. The point I'm making is you're light style can help drive the mood in a photograph. And then emotion. Mood and emotion, those are kind of the same thing, ya know. Today, we're not about jubilant, we're not about excited. Ya know, you won't see a lot of my photos today where the subject is like really smiling big. 'Cause that's not really what we're after. We're after something a little bit more serious today. In dramatic photography, producing these dramatic photos, the light can be harsh, or hard, or it can be soft. And both of them work. And you'll see today, I'm gonna produce a variety of images, some with no diffusion on the light, so in other words, just straight flash, and you'll see that hard shadow coming right off the nose. And that's an okay look. At the same time, you may throw a gigantic umbrella or softbox on it so the light wraps around the face a little bit more. And again, it's all around the effect or the look that you're finally after, so don't limit yourself to hard light or soft light only. Feel free to experiment with the different light sources in this case. And that's different than maybe something like, ya know, another class we taught was beauty lighting, and beauty lighting, there really, you don't want a lot of shadows and you want the light overall to be a little bit softer. In this case for dramatic lighting, you can go with either soft or hard. This is, this slide is one of the more important slides, so I want you to read what's up there and then I'll talk about it. So, the more off-axis the light, the more drama you create. What do I mean by off-axis? Well, if I'm looking at you, if I'm looking in the camera here, right? This is on-axis, this is what we talked about being on-axis, okay? And then if, as I move that light over to the side, that becomes off-axis. And the more, the more the light goes to the side, the more dramatic the shadows are on the opposite side, right? So, the more drama, the more off-axis you put the light. And then to say it a different way, the more on-axis you put the light, the less drama, okay? So, we're gonna be really fine-tuning that direction of light today along with our reflection, our reflector on the other side. Ya know, with no reflector, we get really stark lighting and then you bring a little reflector and you can add some shadow detail. This works, this little sub-bullet item, side to side or vertical in that, what I mean by that is side to side, if your light goes, like, way over here to the edge, this is side to side and you create a lot of drama that way, but also top to bottom. So, if you move your light way up high, you can also create a lot of drama by reducing any catchlights in the eye and getting deep, dark shadows under the face and deep, dark shadows under the chin. So, the more extreme you are with positioning lights, the more drama you produce. Short lighting. So, short lighting is when the shadow side of the face is to the camera. I was talking about that a little bit earlier. So, maybe you guys are taking a picture of me and we put the light kind of over here, so this side of my face is lit up and then towards the camera is dark. That's called short lighting. So, what the camera then sees is maybe just a strip of light over on my face here. That short lighting's a very dramatic look, it's also a very thinning look for your customer. So, if you have a customer who's concerned about their weight or their profile, go with short lighting because all of this goes into shadow versus broad lighting. Broad lighting is when the light is on this side of the face and the other small side is in shadows. So, broad lighting, kind of, if they have a strong chin or something that you want to show off, that's okay to do, but if they're worried about their weight or their profile, go with short lighting. We'll experiment a little bit with that today.
Class Materials
Bonus Materials with Purchase
Ratings and Reviews
user-182390
Another great course learned a lot about flash and the different modifiers. Very informative and easy to understand looking forward to the next one.
a Creativelive Student
Student Work
Related Classes
Lighting