Lessons
Class Introduction
02:51 2Gear: Camera, Flash, and Triggers
27:05 3Gear: Modifiers
11:03 4Camera and Flash Settings
20:12 5Building Exposure For Outdoor Photography
22:12 6Shooting in Direct Sun
23:32 7Shooting on an Overcast Day
18:28 8On-Camera Flash
15:23Lesson Info
Portraits in the Field
Now that we've seen high-speed sync, we've seen neutral density filters, we've seen gels, we've talked about building your exposure, starting with the ambient and then bringing in the flash, talked about all the techy stuff, ISO, shutter speed, aperture, flash power. Now it's time to put it all together and just take photos out in the field. Now in the class, we're all about learning, right? So we've spent a number of hours already just learning, but once you get the stuff dialed in, it's not gonna take you that long in the real world to put together a nice looking portrait. And so that's what this segment is, is a real-world portrait shoot, just kinda putting everything that we've learned so far together. We've talked about the camera settings, we've talked about white balance and gels, we talked about the equipment. Let's bring it all together and put together a portrait. The scenario around this portrait, I've got two good buddies, they're parkour buddies, they hang out together, th...
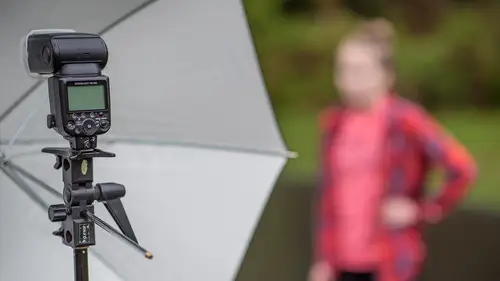
ey do a lot of outdoor sports together, and we just wanna show kind of a manly shot of the two guys. Let me talk through the settings that I have on the camera first and then I'll talk through the posing that I've got set up over here. All right, so back to the camera. Remember we're building the exposure, right? So I want a very narrow depth of field so that the city scene behind them is all blurry, so I've got f/2.8, I'm at about 1/1000 of a second, so again, I'm using that high-speed sync, and I'm at ISO 100. My white balance is set for flash white balance, and as I think through that, you know remember I've been adding a gel to my flash, and so my white balance is actually a little bit different than flash. That's okay because I want the gel to influence the photo, so I think I'll just leave it at flash white balance for this image. The other option that I would choose could be maybe daylight or sunny white balance, but that's so close to flash that I'm not gonna worry about it. Okay. I've got the half cut CTO gel up there, and you can see now I've got this set up, I've moved the soft box horizontal, it's horizontal so it covers a wider area for the subjects that I'm shooting, got two people in there. So if I was shooting an individual, I might go vertical, but now that I've got two, I'm going horizontal. All right, let's talk through the posing. So a lot of times when you're posing people it's really awkward to just, let me get out of the way of this soft box. It's really awkward to just kinda stand there, in fact I was watching these guys as the day goes on, it's like, "Well what do I do with my hands?" That's why a lot of times it's nice to use a prop like the fence here. You know a fence just allows you to feel comfortable, I mean you feel comfortable, right? Yeah, comfy. And crossing your arms, that's a very natural thing for guys to do. Typically though, it looks funny if you cross your arms and you keep your hands kinda behind you. You look kind of all closed up, not approachable, so I like to encourage at least one hand being out. It's a manly look, but it's a little bit more approachable. Next is, I've got them very close together, and we were talking about this just a second ago, they're like, "This feels really awkward, "why are we so close together? "Normally people don't stand this close together." Well in the photograph, as you'll see when we take it here in a second, it makes a lot of sense because if he was standing, let's say, yeah, go ahead and, if he was standing this far away, that's how far you would be when you talk, but when you take the photo, it's like he's not even, it doesn't look like he's supposed to be in the image. So come on in nice and close. The next thing that I've got is because I'm shooting f/2.8, I have a very narrow depth of field to work with so I have to make sure their eyes are actually the same distance away from my camera. Now you're actually about three inches back, so when I take this image, he's gonna be a little blurry, so I'm gonna have you come a little bit closer to me. Back one inch, yeah. And this matters, it really matters that I get the distance from the camera to be almost exactly the same. K, you guys ready for this? Ready. Here we go. All right, I'm gonna have you take your head off of the back a little bit, yep, perfect. And you tilt your head in just so slightly. Yep, great. Here we go, test shot, one two three. (shutter click) Let's take a look. It looks actually very good. So here's what's going through my mind as I'm looking at this image. I'm checking to see the elbows, did I chop off any of the elbows? We got the fingers in there, got the top of the head in there. Now I'm gonna check critical focus on their eyes. Looks pretty good. And that looks pretty good. One of the things I don't have though is I don't really have catch lights, and the reason why is because the flash is a little bit high, so I'm gonna drop down the soft box, drop it down a few inches. There we go, about there, and I'm actually gonna pull it over so it's a little bit more in line with my camera. All the same settings again, here we go, one two three. (shutter click) And another one, one two three. (shutter click) All right, so he's smiling and you're serious, so let's say you guys actually like each other, you like hanging out together, so we'll do two smiles, both of you smiling, and then we'll do another one where you're both serious. So starting off smiling, good. (shutter click) Nice job, boys. (shutter click) Great. All right, clear that smile away. Serious shot, you guys are serious athletes. One two three. (shutter click) Cool. (shutter click) Let me just take a peak. Oh yeah, I like it. Now I got a building poking out of your ear, and it looks a little funny, so I'm gonna change my position ever so slightly so it looks a little more natural. Here we go, one two three. (shutter click) And last one, one two three. (shutter click) Cool. Great looking shot, the colors look great, it's warm, the city in the background's out of focus and blurry. I'm happy, nice job. So there we put together everything. We used the gel, we used the horizontal soft box, you know, we used that kinda speed like speed ring idea. I was thinking through the shutter speed, I was thinking through the aperture, what limited depth of field. And f/2.8, this is something that a lot of, this isn't necessarily a flash thing, this is just a photography thing, but f/2.8 is really difficult to shoot at and if any of you here own like a 50 millimeter f/1. or a 50 millimeter f/ or maybe you own like an 85 f/1.8 or an 85 1.4, man, the depth of field of those apertures is literally razor thin. You know, we're talking millimeters, and so the faces have to be exactly on plane for something like that to work, so that photo, although it's fairly simple to put together, actually takes a lot of skill and a lot of thought, but I can tell you this, you guys now have all the skills that you need to build or produce something like that. Today is not about posing necessarily, it's not about how to stand and those things, CreativeLive has tons of classes there and I would encourage you all, if you wanna talk about posing, there's a few great artists that have done posing workshops here, but today's really more about the tech side of things. But that said, I just wanna say a couple things. With guys, typically I like the guys to look a little bit tougher, a little bit stronger, a little bit more aggressive, especially these guys, they're outdoor urban athletes, so we kinda want that gritty look. A lot of times with women, I want a little bit more of a curve look, I want more flow to their look, but I would say the biggest thing here is finding something that the person can interact with. A fence, a bench, a dog, a hillside that they can lean against, or something that the person can interact with, 'cause standing out in the middle of nowhere with nothing around you, that's a really tough thing to do, especially for someone who's not a model. You probably saw earlier in the day one of our athletes basically just started the day off standing like this, and so that's a whole 'nother aspect to portrait photography that you'll need to work on. Let me go through a couple of these slides and then we'll close out this segment with questions. So portraits in the field, two or more people, anytime you have two or more people, anytime you have families and groups, we need to think a lot about lighting, a lot about the positioning of the light, so if you only have one flash, you have to make sure that the flash is at an angle such that it's equally landing on this person and equally landing on that person, and that gets even harder with groups of four, five, six, seven, so that's why you'll see a lot of outdoor portrait photographers and wedding photographers, they'll have multiple lights. Having two or more can help you even out the lighting. You saw I actually changed the position of the light to get better coverage over both of those guys, I moved it more on axis and I made sure that the light hit the guy on the left and the guy on the right in equal amounts. And then for posing, just one of the easiest, quickest things to learn, I learned this from a really great photographer. I think she's taught at CreativeLive too, Bambi Cantrell, she's taught here. I read one of her books a long time ago and it helped me so much. She said, "Pose people in diamonds and triangles, "make their heads in triangle shapes and in diamond shapes." In other words, head head head you know for the triangle, or diamonds. That made all the difference in the world for me. Such a simple approach, and yet it's very powerful. Let's see, here's the processed photo. So this was 1/1000 of a second, so I used high-speed sync obviously, I was at f/2.8, the soft box was horizontal, and so to process this image, basically I brought down the highlights a little bit in Lightroom, I added a little bit of clarity and then a little bit of vibrance, but other than that it's pretty much as shot, so it's not maybe the greatest photo on planet Earth, but it's pretty good. And if the purpose is to show these guys tough, urban athletes in the environment with the gritty scene, well, you got it. Got the city skyline, you got the fence and all that good stuff, so that's putting it all together. I had several people asking about using flash outdoors for large groups, and so I'm not sure how to pose that as a particular question, you just kind of talked to it that you might need multiple flashes, but can you do group photos with just one flash? Yeah, so that's a great question and it's a big issue, so let's say you're the MWC, you're the mom with camera and you go to the family reunion this summer and everyone's like, "Oh, you've got "the Canon EOS 5D Mark IV, look at that lit, "oh, you know what you're doing, "here, take our family portrait," and you got 25 people there, and so now you wanna get this big family portrait and you're looking at the light, and you go, "Oh, if I only had flash." Yes you can do it, you can do it with one flash, the key is to keep the flash, in general, on axis with the main camera. In other words, you don't want the flash to be way off to one side. The reason why is because the person on the left side will be blasted out with flash, and the people on the right side will get no flash, so you gotta kinda keep it on axis. I like bringing it pretty high above the camera, maybe three or four feet, and then you just have to make sure you can get the angle of coverage for everybody and so you can shoot bare bulb, wide angle. One of the things I haven't really talked about today was your flashes all have a zoom button on them. Of course this one I grabbed, it's not labeled zoom, but it's function button number one is zoom, and so you would zoom it to the widest angle possible so it does cover everybody. So that's the way you do it with one flash. If you have a couple of flashes, I like to set them up on stands, one on the left side, one on the right side. I dunno if this is gonna make sense, but about the 2/3 point for this side of the group and about the 2/3 point for that side of the group with my camera in the middle, and keep 'em high so the people, and the reason why I say keep it high is because the flash is gonna hit the people in the front and it also has to hit the people in the back, and you don't wanna blow out the people in the front, so a higher angle means that the light's kind of raining down over everyone equally. So if you have more flashes, then start using umbrellas. I think umbrellas are better, I kind of refer to umbrellas as light grenades, 'cause it just sends light out over everything, where soft boxes are very directional, so soft boxes aren't always the best thing to use for big group photos, I like umbrellas for big groups.
Class Materials
Bonus Materials with Purchase
Ratings and Reviews
SunSoBright
Mike Hagen has become one of favorite instructors. His instruction and question answers are clear and concise and he has a real world approach. He has a friendly and approachable personality. Best of all during this course he works by himself which makes you feel you too can accomplish the shoot on your own. Mike demonstrates a practical approach with affordable equipment as he is aware many photographers starting off do not have a huge budget. In his other course on using your first flash he also had several gear set suggestions based on budget which was so thoughtful and helpful. I hope Mike does some more advanced courses as well and I will keep watch for his name on the course schedule. A definite thumbs up for photographers starting off using flash.
Brandon Couch
This is the second class I've taken with Mike and it was amazing! So easy to understand even when you get into the "tech" side of how flashes work but especially when using them outside and how easy it is. I would totally recommend this class to anyone wanting to take amazing images outside with one flash. He even makes bare bulb flash look awesome. Such a great course!
Laura K.
I have watched a couple of Mike Hagen's classes, and hope Creative Live will bring him back to teach more. He is a fantastic, thorough, easy-to-understand instructor. He doesn't assume viewers already know certain things. He is humble and diligent and truly wants students to understand and learn the things he is teaching. He breaks things down and explains things better than most, and he doesn't hold back on details. Mike also provides helpful handouts/written materials to supplement his videos. I really like his classes and teaching style, and hope to be seeing more from him in the future.