Dipping & Rinsing the Cloth - Kumo
Lesson 5 from: Introduction to Shibori Indigo DyeingKaari Meng, French General
Dipping & Rinsing the Cloth - Kumo
Lesson 5 from: Introduction to Shibori Indigo DyeingKaari Meng, French General
Lessons
Introduction
01:44 2Creating the Dye Vats
03:39 3Kumo Overview & Fabric Preparation
06:06 4Testing the Dye Vats
03:10 5Dipping & Rinsing the Cloth - Kumo
07:36 6Unwrapping the Cloth - Kumo
06:01 7Itajime Overview & Fabric Preparation
08:00 8Dipping & Rinsing the Cloth - Itajime
12:30Lesson Info
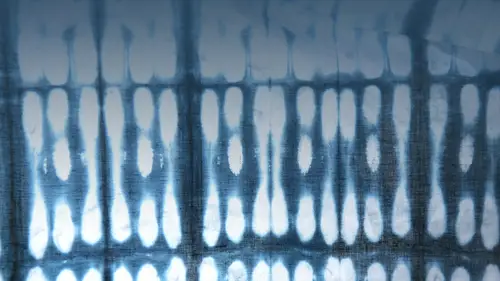
Dipping & Rinsing the Cloth - Kumo
Our first piece is our co mo silk scarf so I'm going to wring it out back into the water bucket and make sure you take out any excess water because we don't want to add any additional water to the vat because that will just create more oxygen so here's our coup mo scarf that we did with the glass pebbles and we're going to slowly dip it into the vat so as not to create more oxygen and then once it's in the that we really we want to hold on to it we don't want to let it settle on the bottom because there could be sediment that has settled so we want to make sure we hold onto our peace and we're massaging the indigo into our silk I usually hold it in the vat for three to four minutes and then when I'm ready to take it out I tried to ring out the excess die under the water first and then I'm bringing it up and slowly ringing out any excess die and as you can see it'll go from the yellow sea to the green and then quickly turn to our first layer of blue so you can see there are sections in ...
there that the light hasn't hit on yet and that it all needs to completely oxidize before you put that back into the vat so we're gonna go ahead and hang this piece on our little drier and let that fully oxidize before we put that in and a big part of what we're doing here it with the pieces and the dive that is we're going to be building up the color so in order to prevent cracking on your fabric, we're gonna want to dip these at least three to four times the japanese tend to dip their into go up to thirty times and that's how they developed that really midnight midnight blue color, but I think today will be safe to do it three or four times just to give you an idea of how to build up the color on your fiber. But you can see the silk just takes to the color immediately and it's nice and even and it's a really great way to start into go dying because silken indigo are just such a perfect match. So in order to prevent cracking, which is almost like a marbling effect on the fabric, we're going to read ip this so once it's completely blue, which it looks like it is we're going to go ahead and read ip are silk scarf back into the indigo that and again we're not gonna let it sit on the bottom we're going to simply massage it underneath the surface you never want to let your fabric float up to the top of the surface or you'll risk getting air bubbles on it so all of this work with your fiber is done under the surface of the indigo bat okay I'm gonna ring out the die again and squeeze out any excess liquid and then we will hang it again you can see why doing this outside in your garage or outside in your backyard would be ideal so that you don't have to worry about getting into go on any of your countertops their floor because once you do get this into go it's very difficult to get it out so you want to make sure you're wearing clothing you know you've got your gloves and your apron on and really kind of take care with what this is dripping on so that it doesn't end abstaining anything inside your house so again we've let it oxidize and you can see that it's it's building up its color and that's our second layer of indigo I think will do a third layer it's nice and dark now so let's go for a third layer and remember the more dips the more time you put into actually dipping your pieces the better the color the richer the more dense more saturated your color is going to be and if you want to try to fool around with different shades of indigo it's better to put less indigo pigment into your vat and to control it that way rather than by dipping it less so it's really important to always always do multiple dips to build up your color but you can fool around with the color of your that by putting less less pigment into the vat ok so now we've dipped this three times and it's looking great it's looking really nice and solid and I think it's got a really good consistent color so I think for silk that's probably enough we can leave it at that and now what we'll do is we're going to completely let it dry and then once it dries then we'll go ahead and we will cut out the uh resist which are the rubber bands so that we can see our chivalry work now that we've dipped our coup mo silk scarf three times into the indigo that we are going to rinse it so for rinsing I usually put on a clean pair of gloves and I filled up a smaller bucket with clean water and this bucket you'll probably have to replace your water every once in a while because there is a lot of runoff with this indigo so we're going to try to go ahead and take off a layer of any additional pigment so that when it dries it doesn't have that pigment setting into the fibers so some people like to dio a really thorough rinse and then they actually put it into another bucket and they'll take they'll cut off a bit of ivory soap and give it a good hand wash but what I normally do is I rinse it really well, tow the water runs fairly clear. I dry it, cut out my shit, boeri resist. And then I we'll put this in the washing machine with some blue jeans, and that tends to be a really good wash to take out any excess pigment. So now it's been rinsed, and I can go ahead, and we will leave it to dry before we cut out our our glass marble pebbles.
Class Materials
Bonus with Purchase
Ratings and Reviews
user-458bc3
Kaari is such a great teacher! She outlines the basic process and steps in the indigo dye process, and encourages experimentation. I enjoyed hearing the traditional terminology, and learning more about how indigo dye interacts with different types of fabrics. Kaari provides lots of tips for adapting your process for different materials, so you always get a deep, rich blue dye. It really got me brainstorming: I started seeing all sorts of things around my house as potential resists for my dye projects! I love that indigo dye projects turn out different every time, and that this should be celebrated! As Kaari mentions, indigo dye projects have a wabi sabi aesthetic, and there really are no mistakes.
Gretchen
I came across this video a couple years ago and have been wanting to try it. The instructions and technique were very clear. We're going to include an eight year old in the project so it will be fun to see how creative she will get!
Annie Milligan
I found this class and this art form on a whim late at night and it has been such a fun project! I got the kit from French General and followed along with the videos and it couldn't have been easier. Everything is explained and demonstrated clearly and I can't wait to start the Intermediate class.
Student Work
Related Classes
Fabric Crafts