Kumo Overview & Fabric Preparation
Lesson 3 from: Introduction to Shibori Indigo DyeingKaari Meng, French General
Kumo Overview & Fabric Preparation
Lesson 3 from: Introduction to Shibori Indigo DyeingKaari Meng, French General
Lessons
Introduction
01:44 2Creating the Dye Vats
03:39 3Kumo Overview & Fabric Preparation
06:06 4Testing the Dye Vats
03:10 5Dipping & Rinsing the Cloth - Kumo
07:36 6Unwrapping the Cloth - Kumo
06:01 7Itajime Overview & Fabric Preparation
08:00 8Dipping & Rinsing the Cloth - Itajime
12:30Lesson Info
Kumo Overview & Fabric Preparation
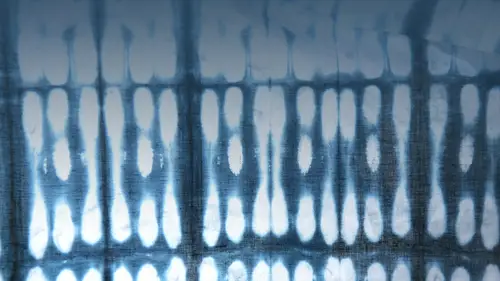
The first story technique that we're going to learn is chemo and chemo is probably the most basic of all the chivalry techniques and it's something that most of us probably learned in kindergarten so with coo mo it's considered a twist and bind technique and you can almost use anything to twist and bind so any sort of shape would work really well sometimes I use beads I use glass cabbage, schanze glass pebbles, champagne corks they make a perfect shape traditionally the japanese would use among beans and they they would hand tie each one so what we'll do today is we're actually going to use rubber bands and the glass pebbles and we will create a piece of fabric that looks something like this and as you can see it's a really simple basic design but I like this as a beginning technique because everyone can do it. So for the coup mo technique I love using silk it also works great with cotton or linen today we're going to use silk and so I've got a silk scarf and normally I would say that ...
and this is all pre ready to die and normally I would say you would want to iron it and prepare it so that it's a nice smooth surface but with the design we're going to do today I'm actually going to use the fold marks to help me space out my design so I will be using these glass pebbles today and they're kind of a nice size and not too big not too small and it's something that most people can kind of get their hands around to do a design and this scarf is marked off into six even squares on the top and six on the bottom, so what I'm going to do is I'm going to take the glass pebble and I'm going to place it underneath the silk and then I will hold on to the pebble through the silk and simply twisted and then I take my rubber band and I will layer the rubber band tightly to create the resist so wherever the rubber band is lane, that is where I will find my resist. You want to make sure this is nice and smooth and you want to make sure that your rubber band is laying on top of each other for a whole different design technique. You could make the rubber band be a little more wacky and kind of going down the side of the silk and that'll give you a completely different resist. You never know one hundred percent what you're going to get with shit, boeri it's always kind of ah a journey to see how all the work you've done will actually turn out when you cut out your work and I think this is part of the exciting part of she boeri and different resist techniques is it's always something new and unexpected and really there are no mistakes the japanese call this huh wabi sabi and there are no mistakes so it's all about practicing and learning your own technique and what works well for you and you will be happily surprised at some of your beautiful creations I find a lot of my natural fabrics at dharma trading which is a great resource for buying ready to die fabrics so this is a silk scarf but they've also got cotton scarves they've got pieces of linen and wonderful pieces of velvet it's fun to start with finished pieces like a scarf because then as soon as you wash it its ready to wear and you can give it is a gift or use it yourself so a really important part of any of the chagoury techniques is how tight the resistance and the tighter the better because if your resist is not tight enough then you won't get that nice clean sharp line that we're looking for so you've got to make sure that no matter what technique you're working on everything has to be nice and tight and that's how we will create the negative space which will then create our resist on the fabric I really enjoy using natural fibers in all of the projects I work on but especially for natural dying it's important because the pigments and natural fibers will take the die much more readily than if you were to use on a natural fiber. So silk, cotton, hemp, linen, wool, those air, all perfect fibers to use for indigo dine. So when you are finished, thein, all of your glass pebbles in your scarf should look something like this. So now I've got my twelve glass marbles, and each one has been twisted and bound into the silk scarf. And the next thing I'm going to do is I'm going to place the whole scarf into a bucket of water. So this is just a regular three gallon bucket of clean water, and I'm going to go ahead and let this soak and all of our fibers will have to soak in water before they put them before we put them into the indigo vat. And silk is probably the on ly fiber that has to go in for under a couple of minutes. Everything else you want to soak for at least twenty minutes to thirty minutes so that the fibers really open up, which will allow then the dye to penetrate the fibers.
Class Materials
Bonus with Purchase
Ratings and Reviews
user-458bc3
Kaari is such a great teacher! She outlines the basic process and steps in the indigo dye process, and encourages experimentation. I enjoyed hearing the traditional terminology, and learning more about how indigo dye interacts with different types of fabrics. Kaari provides lots of tips for adapting your process for different materials, so you always get a deep, rich blue dye. It really got me brainstorming: I started seeing all sorts of things around my house as potential resists for my dye projects! I love that indigo dye projects turn out different every time, and that this should be celebrated! As Kaari mentions, indigo dye projects have a wabi sabi aesthetic, and there really are no mistakes.
Gretchen
I came across this video a couple years ago and have been wanting to try it. The instructions and technique were very clear. We're going to include an eight year old in the project so it will be fun to see how creative she will get!
Annie Milligan
I found this class and this art form on a whim late at night and it has been such a fun project! I got the kit from French General and followed along with the videos and it couldn't have been easier. Everything is explained and demonstrated clearly and I can't wait to start the Intermediate class.
Student Work
Related Classes
Fabric Crafts