Unwrapping the Cloth - Itajime
Lesson 9 from: Introduction to Shibori Indigo DyeingKaari Meng, French General
Unwrapping the Cloth - Itajime
Lesson 9 from: Introduction to Shibori Indigo DyeingKaari Meng, French General
Lesson Info
9. Unwrapping the Cloth - Itajime
Lessons
Introduction
01:44 2Creating the Dye Vats
03:39 3Kumo Overview & Fabric Preparation
06:06 4Testing the Dye Vats
03:10 5Dipping & Rinsing the Cloth - Kumo
07:36 6Unwrapping the Cloth - Kumo
06:01 7Itajime Overview & Fabric Preparation
08:00 8Dipping & Rinsing the Cloth - Itajime
12:30Lesson Info
Unwrapping the Cloth - Itajime
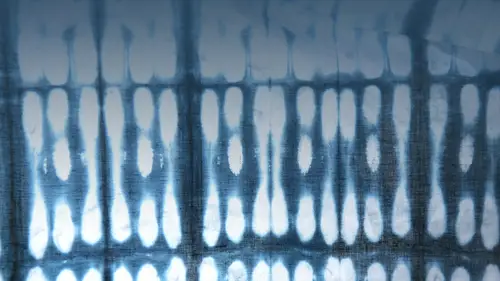
So now we're ready, tio unbind unwrap all of our eat a genie. So as you remember, this is the shape resist she boeri so the first one we did was the antique linen napkin, and so we'll go ahead and we'll take off our four clamps and these pieces they're still a little damp, but that's ok, they'll dry even better once we have opened them up. So as you can see, the resist is great and its strongest on the outside, of course. And then as we go to the inside, see if it's just a little bit weaker, but not much, and there you even see some of the process that has not oxidized yet. So what it's nice about this is that we're going to open it up and let this air out a little bit so that most of that green will turn a shade of blue and it should happen. It might take a little bit longer um, especially since we're indoors, but eventually that will hopefully all be blue, but you can see how great the shape resist, how it repeats on the napkin. All right, so let's, open up the t shirt and see how th...
at ended up. I'm going to use our stella light again just because I'm gonna be cutting rubber bands close to the fabric and you know you don't have to cut the rubber bands of course you can reuse the's sometimes they get a little weak after they've been in an indigo that but often times you can use them once or twice all right so let's see what happened here so remember this was our cotton t shirt and there you go so we've got a classic kind of eat a genie resist and remember we have a lot of white on this t shirt because we used such a big block have we used a smaller block? We probably would have gotten more of the end ago and just like the first piece we want to let this air out a bit and oxidize so as you can see down here it's already turned blue so that'll that'll happen with a little more air sometimes the air doesn't get into these really tight areas and so you might even have to leave if you decided to leave these bound you might want to leave them bound overnight, but this this works perfectly as well if you're opening them and they're slightly damp then they'll they'll be able to fully oxidize so this was our let's see our little experiment with over dine and as you can see, we've a little bit of the stripe in there but we really we only got kind of that one stripe that showed up this was the stripe ticking fabric and with over dying, you never know you never know how it's going to turn out, but that's kind of interesting, I think it gives it a a little more dimension than if it had just been on white fabric, so we'll let that finish oxidizing as well. What else do we have? Ok, so we've got another piece. I think this was a piece of I think this was anti camp, actually. So piece of an old french linen french hemp sheet. So we'll take all of our binding off. Ok, now I can take the sticks, see what happens. So there you go, it's a great, great cloth if a great stripe on it. And that was all done using the's larger popsicle sticks, so we'll let that drive it. Okay, thank you. And finally, we've got this little little lead to jeanie's sample that we tried with the bamboo fabric and I use quite a big block. So again, we're going to get a lot of nice white on this one. Hopefully so we we move blocs. Okay? This one gave us a really fun little kind of stripy pattern with, um, with the rubber bands in there. So as you can see it's it's, not maybe what we expected it's kind of got a, you know, a completely different look but this is what's fun about saborio's that you never know what you're going to get and it's fun just to experiment and try new techniques and new designs. The last part I'd like to talk about is how to treat the fabric so once you have taken out all your binding or your glass marbles, you can leave it to dry and then if you want, especially on silk and wool, you might want to set it in a vinegar bath, so I take a three gallon bucket and I put in two cups of water and one cup of vinegar and I soak my silk or wool for about twenty twenty five minutes and that sets the color with the cotton and the linen and the hemp, not it's not quite as important. What I would do now is I'd let these fully dry and then I would put them in my washing machine with some blue jeans and I would wash all the any excess pigment that might still be in the pieces and after that they're ready to go and you're ready to wear them or so with them or use your fabrics. So I hope you've had fun in this class learning about some real basic shit bori and indigo techniques and from this point on I hope you experiment with pattern and designs and materials and come up with some wonderful designs on your own each piece you make is unique. And each piece will stand out on its own as a piece of art.
Class Materials
Bonus with Purchase
Ratings and Reviews
user-458bc3
Kaari is such a great teacher! She outlines the basic process and steps in the indigo dye process, and encourages experimentation. I enjoyed hearing the traditional terminology, and learning more about how indigo dye interacts with different types of fabrics. Kaari provides lots of tips for adapting your process for different materials, so you always get a deep, rich blue dye. It really got me brainstorming: I started seeing all sorts of things around my house as potential resists for my dye projects! I love that indigo dye projects turn out different every time, and that this should be celebrated! As Kaari mentions, indigo dye projects have a wabi sabi aesthetic, and there really are no mistakes.
Gretchen
I came across this video a couple years ago and have been wanting to try it. The instructions and technique were very clear. We're going to include an eight year old in the project so it will be fun to see how creative she will get!
Annie Milligan
I found this class and this art form on a whim late at night and it has been such a fun project! I got the kit from French General and followed along with the videos and it couldn't have been easier. Everything is explained and demonstrated clearly and I can't wait to start the Intermediate class.
Student Work
Related Classes
Fabric Crafts