Lesson Info
10. How to Knit in-the-round Using Double Pointed Needles
Lessons
Class Introduction
01:26 2Class Introduction
06:28 3How to Increase Using M1, YO, and kf&b Methods
10:38 4How to Basic Cable Stitch
16:48 5How to Use Mosaic Colorwork Stitch Pattern
10:59 6How to Lace Diamond Stitch Pattern & Read Chart
14:48 7How to Block
10:25 8How to Bobble Stitch
06:50Lesson Info
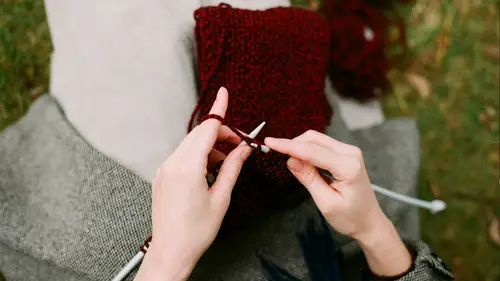
How to Knit in-the-round Using Double Pointed Needles
Alright, let's talk double pointed needles. Double pointed needles are another way that you can knit in-the-round, just like circular needles, only there's a lot more versatility to them because you don't really have to worry about, there's no length of cord to worry about, if your project gets bigger, you can just pick up another double pointed needle, or if it's smaller, it will accommodate it. You almost always need to use double pointed needles for socks, although, I say almost always, but there are methods for using two circular needles for socks, but that's totally a whole other course. Socks, mittens, like the mittens for the bonus course project, the top of beanies, if it's a shaped crown versus it just being one that you kind of bunch together 'cause you want that super slouch, if it's shaped at all, there's gonna come a certain point where you're gonna decrease, decrease, and your circular needle is gonna be too long. Circular needles really aren't much shorter, except with a...
couple exceptions, it's hard to find them. They're not much shorter than 16 inches. So as you decrease, there'll be a certain point where that needle can't accommodate so few stitches without it being stretched out. So you would need to alternate to double pointed needles. You could also, I have friends that don't like circular needles, I love circular needles, but they tend to only knit in the round using double pointed needles, 'cause they feel like there's lots of versatility. So I'm going to just sort of-- I get a lot of questions on Facebook about double pointed needles, I do a live video every Monday, called Ask Me Monday, and again and again, I get questions about demoing on double pointed needles. I think that people get a little bit nervous about them, because there's so many of them at once, but all that you need to remember-- or so many involved, but all that you need to remember, is that you're never using more than two of them at a time. So it's really not that different than just using straights. So I have a few sets here, just different brands and lengths and sizes for you to see. The patterns will tell you, they won't tell you what brand or whatever, but they'll tell you what size, and if the length matters, they'll tell you what length. These are kind of some really pretty wooden colored ones, these are big mamma jammas, these are 15, so these would be for if you were using probably a really really bulky yarn. And then these are my go-to staples. These are the size that I need for the Galway yarn that I'm using. But there are also-- these are takumi bamboos by Clover. I work with them a lot, I'm their Yarn Arts Ambassador, and really why I approached them about it is because I love working with the bamboo, it's really warming on my wrists, and it's slick but not so slick that your yarn's going to slide off of them. So, sets come in five. I rarely use all five, I like working with four better. There are times where I have so many stitches that I do need to bring another one in. I'm going to go ahead and just set aside one of them with the rest, because four for what we're going to be making later or what you're going to be making at home, hopefully, for mittens, or anything-- or if you were decreasing a crown on a hat, is totally appropriate. So, first let's talk about how you cast on to double-pointed needles. Alright, so let's say that we need... Doesn't really matter, but let's say we need 24 stitches. You can cast on to each individual needle as you're going along. I find that to be really cumbersome and sometimes needles fall out and lose stitches. You have to start again and it can be a little frustrating. So, what I prefer to do is cast on-- and you can cast on using whatever method that you prefer unless the pattern calls for different. But I like to cast all the stitches onto one needle if possible. And if not, I would cast on as many as I could with one needle and then slide them onto another needle, and I'll show you how to do that in a second. Okay, so you're just going to cast on as you always would. This is just the method I cast on, this is the single cast on. If you took my Knitmaker 101 class, you would have seen this demoed. But, the long-tail cast on would work, the knitted cast on would work. I wouldn't do just the plain old e-wrap cast on if you've ever heard of that. But really, mostly anything will work. So, I'm going to go ahead and just cast on a bunch of stitches. So, just talk amongst yourself while I'm doing that. And then once I have as many as I want. Let's see, two, four, six, eight, ten, 12, 14, 16, 18... I'm going to do a few more. 20, 21, 22, 23, 24. Okay. So, I've got all these stitches on this one needle but now I'm going to take away one needle. This needle is what I'm going to be knitting with, so let's not worry about that yet. But I need to split up these stitches so they're on three needles. So, I'm going to introduce another needle. When you can, you want to spread them out evenly on each needle. It doesn't have to be exact, but -ish, right? So, you're going to go to the end, not the part where you just cast on, but basically the first stitch that you cast on. And you're just going to slide them on purlwise. So, slip them purlwise onto that next needle. So, because I cast on 24 stitches, I'm going to just slide on eight stitches to this first needle. So that's seven, eight. Okay, so I have those eight stitches there and now I'm going to scoot them down so they don't fall off. I'm just going to let that needle just hang out free and easy style. And then I'm going to introduce the next needle right where I left off. And this is, if you decide that you are casting on onto multiple needles at a time, you would just pull them from the end in the same way. Okay, so there are six, seven, eight. Okay, so now I've got my stitches cast on to all the needles that I'm going to be using to hold the yarn. So, I'm going to flip this over, get that out of your way. And now I need to join them in the round. But to do that, first and foremost I need to make sure that the stitches aren't twisted. So, I like to lay them down. If you were using four needles it would be in a square, but I'm using three so it's going to be in a triangle. And I want to make sure that the bottoms of the stitches are all oriented in the same way. And you can use a marker so that you know where the end of the row is, but honestly once you're at the end of that third needle you're going to be done, so you may or may not need one at all. I tend to not use them when I'm knitting with double-pointed needles, but if it makes you feel more secure, you should absolutely do it. Alright, so now we're ready to join. We're going to pick up all of our three needles in our left hand. And this is the only time where you're going to have to hold multiple needles at a time, more than two, for the joining process. And actually, you don't technically-- the only reason that I do it is because I feel like I have more control. So, you have the working yarn, which is the yarn attached to the ball, is over on what would be the third needle, so let's call this first, second, third needle. We're picking that up and we want to join the third to the first. So, to do that, we're going to insert our needle up through the first stitch on the first needle. Then we're going to take the-- let me make sure the yarn's in the back. We're going to take the yarn from the working yarn, which is on the third needle, and you're going to knit with it. And that just brought them together. So, now you've joined a round. And it'll say join round, taking caution or being careful not to twist. Not to twist is just what I explained to you, making sure that all the stitches are oriented in the same way. And then from there, you let the needles that you're not working with just hang out. So, you just knit... All the stitches on the needle that's in your left hand, just as if you were using straight stitches. And then you'll notice you have an empty needle. So what now? Switch hands so it's in your right, move on to that next needle that's loaded with stitches, let go of the one that you were just hanging onto, and pick up knitting again. So we're knitting just as if we were using straight needles. We're done with this. Turn it to the needle that does not have stitches that have been worked yet. Take that needle, put it in your right hand. Knit those stitches. Okay, now we know we've gone through three needles, so that means that we have knit an entire round. So, that is one round knit. That's really all there is to using double-pointed needles. Since for the project that comes with this course has cuffs that are knit in ribbing, I do want to take a minute just to show you how to do this. You would not do the one row of stockinette stitch that I just did. Which is another point I want to bring up. When you're knitting in the round, just as if you were working with circulars, to create the stockinette stitch, you knit every row because you're never working on the wrong side of the fabric, only on the right side, so you don't have the purl to create that stockinette. So, just ignore that, let's pretend that we didn't just do a plain old knit round. And let's say that we're doing a, I believe the pattern calls for a K2P2 rib. So, that's a knit two, purl two together. I'm sorry, not together. Knit two, purl two. So, we're going to knit two stitches. One, two. And we bring the yarn in front and we're going to purl two. And again, those other two needles that I'm not using are just hanging out. Knit two. Purl two. We're done with that. Go to the next one, switch hands. Reset, knit two. Purl two. Knit two. Purl two. Okay, we're on our last needle. I'm just going to go ahead and finish this round. And so, you would just continue doing exactly what I'm doing right now for as long as the pattern said to make your cuff. And so, this would just be for a ribbed cuff. We end with a purl two. Since we ended with a purl two, we'll be right in stitch pattern to start the next round, which is going to be a knit two, and you would just continue that for as long as the pattern says. So, see? It's totally no big whoop. Using double-pointed needles is really actually super handy. Not intimidating, you're only using two at the same time. And so now, my friends, you are ready to get your knittin' mittens on. Alright, so now we have covered so much today and I'm really thrilled that you have stuck with it the whole time. I think that you and I are going to be long-time knitting virtual friends. I can't wait to see you put your knitting skills in action. I would love to see your swatches, you knitting at home, out in public, working on some of the things that you've learned in this class. Again, bonus materials with abbreviations and with projects and a couple of swatches are going to be ready to download. Please snap those pictures, tag @VickieHowell, tag CreativeLive, and I will see you out on the interwebs, knitting along. Bye!
Class Materials
Bonus Materials with Purchase
Ratings and Reviews
Ramona Morrissette-Nagai
She is engaging, warm, and educational.
Student Work
Related Classes
Knitting