Lessons
Course Introduction
08:52 25 Things Every Landscape Photographer Should Know
23:32 3Camera Gear
11:26 4Gear Q & A
33:04 5On Location: Weather & Safety
18:55 6On Location Pre-Visualzation Sutro Baths
07:29 7On Location: Camera Settings
21:59 8On Location: Composition
27:09Matt Klowskowski - My Story
06:28 10On Location: Bracketing
15:15 11On Location: Artistic Choices
16:12 12On Location: Pre-Visualzation Marshall's Beach
06:09 13On Location: Long Exposure
15:05 14On Location: iPhone
17:31 15On Location: Wrap Location
02:15 16Location Challenges: How to Shoot in Open Sun with No Clouds
01:52 17Location Challenges: How to shoot Cloudy, Stormy, & Blah Weather
01:50 18Location Challenges: How to shoot Beaches
01:27 19Location Challenges: How to shoot Waterfalls
01:40 20Location Challenges: How to shoot Panorama Vista Scenes
01:38 21Location Challenges: How to shoot Lakes
02:11 22Location Challenges: How to shoot Mountains
02:24 23Location Challenges: How to shoot Deserts
01:29 24Location Challenges: How to shoot City Skylines
01:44 25Location Challenges: How to shoot Snow
02:53 26Location Challenges: How to shoot Backlit Situations
06:56 27Outdoor Landscape Workflow & Organization
31:38 28Basic Editing in Lightroom: Part 1
44:17 29Basic Editing in Lightroom: Part 2
26:52 30Lightroom and Photoshop: Intermediate Techniques Pt. 1
30:35 31Lightroom and Photoshop: Intermediate Techniques Pt. 2
12:31 32HDR for Landscape Photography
07:54 33Panoramas for Landscape Photography
18:14 34How to shoot Landscape with Adobe Photoshop in Mind
21:14 35Sky Replacement in Photoshop
18:48 36Processing Project: Stormy Mountains
09:12 37Processing Project: Crashing Waves on the Rocks
10:01 38Processing Student Raw Images
41:03 39Final Q&A
14:17Lesson Info
Sky Replacement in Photoshop
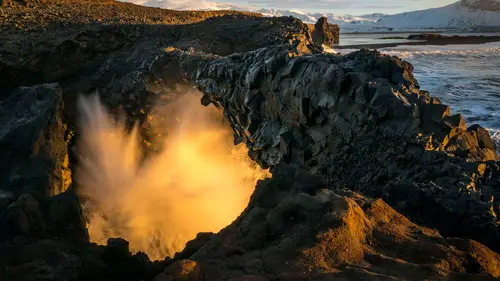
When you were out in the field and you shot this were you already thinking ahead that you were gonna probably replace the sky or put something in? I was thinking this was a strong maybe. I don't do it a lot. Despite the things that I've shown that I will do to any photo, believe it or not, I don't do a lot of sky replacements. I don't want to. Like I've really gotta love the photo to do a sky replacement. And a lot of times, if it's some place like, I'd kinda almost rather go back and re-shoot it. And I don't have anything morally against replacing the sky. It's just, I don't know, sometimes it's a very difficult thing to get to look right. It is by far not a gimmie to just go in there and replace the sky. But, yeah this one, I was thinking maybe it was a strong possibility. Thank you Cool, so I don't know if you, anybody got tuned in yesterday. We were talking about longer exposures and all that stuff. If you look at this one, so this is one of those ones where I used, I shoot S...
ony and I put that smooth reflection app on, 'cause it was really cold and I didn't wanna get my ND filters out and take my gloves off. So I put, used that smooth exposure, or smooth reflection app, which is not just reflections. You can do waterfalls with it. So it takes like 20 photos and merges 'em together and gives you that. And it's, look, it's a raw file. So it's pretty neat. Anyway, let's go in here and let's take a look through. So we'll bump up our exposure. Let's see, I'm gonna hold back on exposure. Let's do whites, option or alt click. Blacks, shadows. I don't really have too many highlights. So now I am gonna go to exposure, 'cause overall I just wanna make it brighter. Pulled back on the highlights. You see it's basically gonna get back there. Looks like it's crooked to me, like kinda leaning down that way. So I'll go to my crop tool and just, too much. There we go. Next up, let's see here. So I do like it a little bit warmer. De-haze. I'm gonna go down here. I'm gonna try de-haze. I think it's gonna get to too hot in some other areas of the photo. Like you see the yellows, it starts to push those a little bit too much. And it's gonna start to play with my blues. That's the, again, de-haze is amazing. I love what it does here but it's not good with blue so we'll switch over to my adjustment brush. And I'm gonna go to my favorite personal brush, which is the haze killer. I don't know where I came up with some of these when I was naming 'em. So we'll go over there. And remember, I told you, I have 'em at MattKphoto.com. That's the ingredients. I don't care if you copy it. You can buy all the whole collection there but if you want to copy it, contrast, highlights, shadows, clarity, throw a little de-haze in there and sharpness. I'm just gonna paint. I'm not even gonna worry about that rock in front. And I usually, when you see me paint, I usually save the edge for last. Cool, and then I'll just go down here and I'll turn on auto mask and just brush right along that edge. If you wanna show the overlay, definitely good 'cause you can see spots you missed. I'm not gonna worry about that 'cause that's already kind of bright. So if you take a look, that's before. That's after. I think I did spill over up here though. So that's basically kind of sharpening things up, removing a little bit of the haze back there. It might be a little too much for me so I'm just gonna kind of reel just about every slider back in a little bit. Alright, so we're looking pretty good. I've done just kinda basic overall settings. I'll go to my lens corrections. That's already turned on. Let's go to detail. And let's sharpen the crap out of it. Looks good. So, photo's developed, right? Backslash key, that's before. Backslash key, after. So before and after. Okay, so now we decided, I think I'm gonna drop another sky in here. The key to dropping a sky in and making it work is you have to figure out, it's gotta basically match. There's no way I'm gonna take a sky from, there's no way, like take a look at these clouds. This is the biggest mistake. Take a look at those clouds and I think, alright, let's go to, let's go to, let's say, that photo there and drop that sky in. That's never gonna work. So it's gotta be fairly similar lighting conditions. And I think, when we think sky replacements we think oh, it's a cloudy, gloomy day and I wanna put a pretty sky in there. You're not, it's not gonna happen. So your sky replacements are mostly gonna work when you have a blue-ish sky and you can put some nice clouds in there or something like that. So that's when it's gonna tend to work best. So let's take a look here. There's our image. I've got, I think I'm gonna go with that one. It's a little bit more subdued. So I think that's the way to go. So let's go take these into Photoshop. Alright, so I'm gonna Shift click, select both of 'em. We'll go Photo, Edit in, Open as Layers in Photoshop. So you remember, it drops us into a Photoshop document with both the images. The only thing I'm gonna do here is just flip. I'm just gonna drag this one below that. So let's just turn that layer off. First thing is, so where's the sun, where's the sun coming from? Yeah, if you're looking at this photo, the sun is over on my left hand side coming in. You could see the last light on the rocks there. But if you're looking at the waterfall here, the sun's on the left hand side. So the sun's kinda coming in there. So let's take a look at the clouds. If you look at the clouds in this photo, can you tell where the sun's coming from? The right side. So that's one of the places that kinda trips everybody up, is you have to, you have to figure that out. And what's gonna happen is, somebody's gonna look at your photo. They're probably not gonna be able to say, oh Matt, you know the sun's coming in from the wrong side. It's just something is triggered in their head that's just not right. And that's where it comes from. They'll just know that something's off. So all I have to do here is let's just go Edit, Transform, Flip Horizontal. And then we'll kind of move that guy up. So now let's go back down to this photo. We're gonna make a selection. So just gonna take my quick selection tool, make a selection. Selection up there. And then we'll go back up to this layer. Remember before when we added a layer and what happened was, then I added the layer mask? And then I did the painting and all that stuff. So this is a little bit different. This time I made a selection first. So if I click the layer mask button, what happens is it keeps what's selected. So if you ever think of it this way, when you have a selection, and you hit that layer mask button, it'll keep whatever's selected. Whatever is not selected gets hidden. So watch what happens when I click it. And it keeps the selection. So, cool, we're not quite there. We're pretty close. Go to my move tool. So what I wanna do is now I gotta kind of move this around. What's gonna happen is, you see that little link icon between the layer and the layer mask? So what's gonna happen is if I grab my move tool and I start moving the layer, the layer mask is gonna come along with it. So it's gonna screw up that whole selection. So what you can do is go in here. You turn off that little link right in between there. You turn off that little link and now I can control the layer however I want. Make sense? So now that I've got it into place, and just to show you what happens if I keep the link on, that's the difference. So you can actually turn it off and you can move the layer mask if you want too. I don't know why you'd wanna do that but you can. Alright, so we got our selection active. We got our layer active. Now the only other thing here, and this is, this is the benefit when you can pick a good sky to drop in on it, is just reduce the opacity. 'Cause I don't think the sky, like if you look at the original sky, and you look at that one, it's too blue. So just drop the opacity. Kind of blends in with the original one. If you like the clouds and you don't necessarily want to drop the opacity too much, the other thing that you can do is I go to Image, Adjustments, and I'll go to Brightness/Contrast. And I could start to play a little bit with the brightness and contrast. I personally like the opacity method whenever I can use it. So, take a look. That's before, that's after. I'll show you one last little thing here. And that is sometimes, I was gonna say, that's a pretty good selection. I don't even see an edge. Alright, so let's assume your selection's not quite as good. This one actually looks really good. Let's assume your selection is not quite as good. If you click on that layer mask, there's a panel called Properties and that Properties panel let's you tweak the layer mask and what you can do is you can feather it. It's like if I crank the feather up, see how it puts a little cloud over there? But what it does is it softens the edge of the selection just a little bit. So I don't really, there's not much of an edge there, but it starts to happen. You can go in there and feather that edge, take care of it that way. It's tough, I could do a whole day on selections. It's a huge topic in and of itself. There's, Ben Wilmore just did a, sorry, Ben Wilmore just did a Photoshop course. I know he did selections and he's like the selection wizard. Yeah, selection wizard. He did the boot camp right? About 20 days, month long, and I think almost two full days of just selections. If you wanna learn more about, it literally is, it's a full day class. Ben is, he knows Photoshop like no other, so check that out. Alright, let's see here, what do we do to finish this up? I think I will use my tourist remover, which is my spot healing brush. So go to the spot healing brush. I got a little spot down there. By the way, this is like, just to show you how cold it was, this is like one of the most popular waterfalls in Iceland. The parking lot's always full, all that stuff. That's how many people were here. On another day where it's a little bit warmer, it's full. And as I said before, I probably go through and get rid of a couple of these little spots. I mean, I don't know how much I need to pay attention to it. Oh, wrong one. Come back. Drop that down a little bit more. We'll do File, Save. This'll bring me back over to lightroom. I got my merged file. And I could still go do all my lightroom stuff to it. If I wanted, maybe check the, like whenever I go back and forth, sometimes I'll check the whites and the blacks. Still pretty good on my whites. Lost a little bit of the black point there. Yeah, maybe a little bit warmer. Something like that. So that was our before. That was our after. That's, actually, let's reset. So that's before. After. And if I could do one more thing to it, and I will, because I can, I would, I would probably go in here and let's go to my brighter foreground. And I'm just gonna drop in. Probably reduce both sliders. And you know what? See how, 'cause I'm usually painting things warmer, see how it's over to the yellow, my temperature? I'd actually take that away on the water. I actually wanna counteract it a little bit and make the water look a little bit more white. So I'll probably do that. So that's the, kind of the work flow. Nobody asked, but I gotta tell you this because, so it's really interesting. This past winter, I was looking at, I was reading some articles online. You know, like one of the most searched for terms on the internet was Iceland? And especially in the photography realm, like 500px, Google Photos, Iceland. It was the most searched for term on 500px in I think January and February. Pretty crazy. I went at the end of February. I get it now. It's like the tourist haven. Like you couldn't go anywhere without huge amounts of tourists. But that said, I gotta tell you, I mean I say huge amounts of tourists. Not like some of the places here, but I don't work for the country of Iceland. I get nothing for saying this. I was so scared about going. I ended up going with a group because I don't know my way around. A couple of these people have been here already. I'm gonna go with a group. I was so worried about going and I thought it was so unattainable to me. Guys, if you ever think it's such a hot spot to go, go now. 'Cause number one, it's just gonna get more crowded. The other thing was, it was so easy to get around. So all these great places, these amazing places you've seen photos of, they are parking lots off of the side of the main road. Like I thought, man, I'm gonna need somebody to, I'm gonna need a guide to take me hiking in the back and all this crap, no. These are parking lots off of the side of the road, all these amazing places. It was pretty cool and really accessible to get to. So all you have to do is just pick your spots and drive around to 'em. But you don't really need a guide to take you there because it's totally open. So it was definitely something different for me. I didn't expect it. Okay. That seems pretty basic. The line on the mountains is pretty smooth. What about if you have like a mountain that has a lot of trees Somebody was gonna ask that and stuff like that? I'll show ya. It gets trickier. But, I'll try it. We'll see if we can have time to show you. If not, I'll try to show you after. But it does get trickier. The quick selection tool in Photoshop and the refining options that they have are really amazing, so, believe it or not, they can do it very well. But we'll see if we can get to it.
Class Materials
Bonus Materials
Ratings and Reviews
Christian Ruvolo
Mat Kloskowski class is really amazing, full of very useful tipps and inspiration. Wonderful pictures by him help to understand the explanations an I am learning A LOT from him!!! Thank you for the class!!! TOP!!!!
Louie
I love Matt's teaching style, humor, honesty, friendliness. I love On1 and all the other demos and critiques he does. He makes me enjoy the craft/art of photography much more and is a great inspiration.
a Creativelive Student
This class was for beginners and I believe Matt did a great job of giving students an great introduction to landscape photography. More on the practical than technical side, but that seems appropriate for an intro class. He comes across as a "real" guy who loves what he does and is eager to share his knowledge. Those new to photography will get a lot of helpful information and tips in this course.