Lessons
Class Introduction
03:50 2Why Not Erase or Delete?
05:27 3Add a Mask
07:13 4Make a Mask From a Selection
04:18 5Select & Mask
07:33 6Automatic Masks
06:21 7The Magic of Overlay
09:39 8Mask with Paste Into
10:31Lesson Info
Mask with Paste Into
the good part about this whole thing is there sometimes where mass can be made automatically. So I have a photograph with a very boring sky and a much nicer photograph. So I'd like to replace this sky with the other one. So the very long way, if you charge by the hour, is dragged the sky over and then spend three hours manually painting it with your paintbrush. But what I would do is not do it that way and still tell your client it took you three hours. Just don't do it that way. So usually in photo shop we drag and drop everything because it's more efficient. In this case, there's we're not gonna copy and paste. Exactly. We're gonna copy and use a special paste that does something different. So I'm gonna select all of this photograph and copy it. Come over to my other one on to make a selection of my existing sky doing time in a photo shop. You see fairly definite edges like this. I would first always try the quick selection tool because it's like an edge detection selection tool. So ...
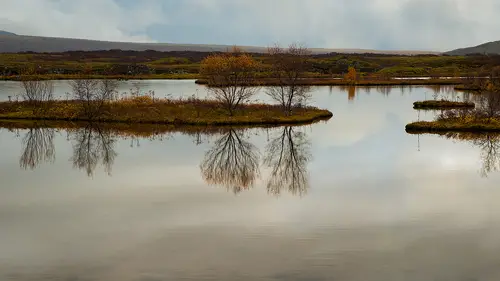
I go to my quick selection tool and I just drag, and you see it's done a pretty decent job without me doing much of anything now. It's probably not absolutely perfect in amongst all the little tree branches, but we'll get to that in a second. So if I now remember, I copied that other sky. If I now just said, use the pace command, it would ignore this completely and just make a new layer. So I need to somehow telephoto shop. I want you to not ignore this selection. I want you to use this selection to make the new layer the way we do that. It's a command called Pay Special and then paste into with the incredibly easy Remember a shortcut entire left side of your keyboard V. So every single key there is V is the shortcut for paste into and what it does. It makes a new layer. It makes a mask, and if you look really closely, they're unlinked because the whole point of pasting into is you want the mass to stay put and the layer to move by itself. So this is basically doing all that work for you. So now I could and already has the sky selected so now I could move it around and decide where I wanted to go. And as a tip for you, every so often, when you do this like if we zoom in closer down here, you can see that there's some areas Don't look quite as good here because the selection wasn't that accurate. So a simple solution, which is actually crazy. How simple, but effective it is, is whenever I'm gonna replace the sky, I always deliberately take the sky like this one. That's way too saturated. Like I know it doesn't look realistic because then I just take the opacity of the layer and lower it. And as I do, look at that. I mean, it just basically solved the majority of my problems because I'm letting the original sky show through. So, in effect, I'm adding, um, or overly saturated sky lore in the opacity, and that helps with the majority of the problem. Okay, so any time you do that, the mask stays put, and the whole layer is there, depending on what you paste in, because I didn't really check the sizes of them. I have Really, I'm not sure. So if I hit command control tea for free transform. I can see I have a whole lot more sky here, so I know I literally have all of this room to move it around. So the other kind of suggestion would be If you're going to do a sky replacement like this, try to pick a sky which is oversaturated and larger than you think you'll need. You could pace one in something, go Oh, it's too small and scale it up. Any time you scale something up, you lose a bit of quality, Which in the sky scenario, this might be okay, but I'd rather air on the side. So I got to be honest. When I'm driving around with my camera, I see a nice guy and I'm taking a few pictures of that at the highest quality I can. And I have a folder called Skies literally that just I have for exactly this purpose. I was lucky enough to go toe Iceland in October, and unfortunately, every day we were there. The sky was great. So I have these wonderful photos with like, horribly boring skies. So I've taken heavy use of my folder of Florida skies and just don't tell anyone because it's my photo. I mean, if I was working for the National Geographic, I wouldn't do that. But it's my photo that I want to print on my wall, and no one except me has to know that's not exactly what this guy looked like. You know, they look at it go. That's so pretty unlike, Oh, thank you. So now you could scale it if you wanted to and say, Well, this cloud, you're looking a little unrealistic so I could scale it down and still move it around, etcetera. But that suggestion I've seen people that struggle because they choose a sky which is not that different than their existing Skype's. That maybe has a few more clouds, and they have to be really careful about the edges. If you deliberately, even to the point of going to that file before you copy it and saturate it yourself so that when you bring in lower the opacity, it just blends in better right away, right? So that happened because of paste into digested copy and paste. This would I would have been back to manual effort, so the way again just to let me go through those steps again because for some people it's like what just happened here. So in the sky photo, you select the entire thing and copy it. Then you come back to your other your destination. Let's call it photo and make a selection. Not this would make any sense, but just to show you if I made a selection like that, well, that's where the new sky would appear. So, needless to say, the better your selection here. So this is the part where if I was teaching a class on selecting, I say, Well, let's spend a few minutes making the selection even better, But for our purposes, for now, we're going to say, Well, that's pretty good. And again, it's pay special paste into that will automatically make the layer the layer mass. It's unlinked, and then I can go through steps like lower in the a passable, bit free transform. Move it around, etcetera. Okay, now it's important we realize that this function, called paste into, is not the sky replacement tool. It's any time you want to stick something inside something else, and I say that because I taught a seminar once and I was little this time about paste into and I thought I was making fairly clear and someone came up during a break. It said, What if I have something other than a sky with mountains and I'm like, OK, it's not that's not all what it's for, but okay, so any situation, let's do another one where we have this. So I've got a stock photo of a tablet and we have photo of some are, ah, screen capture of some quartet that I happened to sing in, but that's nothing to do with it. So I select all copy. Come over here and I have to make a selection, right? So once again, I always almost always start with a quick selection tool if I see edges because I'm trying to replace that screen and I've watched people take the pen tool and draw around. I'm like you clearly have lots of time on your hands because I would just go there. I'm finished. Pay special paste into now. It's not that smart to go and let me paste it on the perfect angle for you, but that's the next step. But what it did do is it added the layer it added the mask in the right area. Unlinked. So now on my photo layer, I could take my move to once. Okay, clearly into free Transform it. So I hit command control T move outside and then start to try and line it up. Now, it's not just a simple matter of rotating, so the trick here is with free transform. This is a little bonus outside of layer masking, but often happens is I need to scale the corners independently of each other. Normally, when use free transform if you move one corner, both sides moved the same way. So if I will take this corner, you'll see at a certain point. Well, that's not really matching up. So what you do instead is you hold down the commander control key on each corner. When you do now, Aiken scale or move each corner of free transform independently like this Now, normally, I'd zoom in a little closer to make sure I was really accurate. But you can see pretty clearly how it's working. I had enter, and now it's in the right angle and perspective. Now, depending on what it is like in this case, the screen is fairly dark. So if I tried to use any blend mode to try and make it blend in, it probably wouldn't look. It would it would disappear from San. Fletcher's Multiply was way too dark. So instead, I still want to kind of emulate. See how this area of the tablet has a little lighter, So a simple way to fix that would be to add a new layer on top, take my paintbrush with a nice big brush, maybe even bigger than that white as my four run color and drag across and see there. It looks perfect. We're gonna talk more about this in a few moments. But along with a layer mask, there's a companion kind of mask, which is really interesting. A layer mask, as we now know, uses shades of gray for masking. This other thing, called a clipping mask, is a shape based mask, so it doesn't care what shade of gray or color it is. Just as I will look the layer below and see what shape there is. And because I have this shape, I go to the layer menu and I chooses command called create clipping mask, and now you can see. See how it's on Lee appearing inside. If I turn this off for a second, see how the white goes all the way onto the tablet when it's on, it's staying just inside that area, and now I can lower the opacity to taste to make it look a little more realistic. So we'll go into more detail about this clipping mask idea in a moment. But that's another example of how that paste into confused in many different ways, including things that would be otherwise awkward angles to try and get it to look. And the key to that working is free, transformed by itself, will not help. You have to do that, hold down command of control that lets you independently move each corner and match whatever angle. And I've done ones where it's a crazy perspective and it still works. You can crunch pixels pretty far down for something like this, with free transform. If you're moving each corner independently
Class Materials
Bonus Materials with Purchase
Ratings and Reviews
artmaltman
Dave Cross is a superb teacher and this is a superb class. Very clear explanations, well organized, and the demonstrations are spot on. I thought that I already understood masking but really I had just scratched the surface of the topic. Learned a lot of useful techniques. Thanks Dave!
a Creativelive Student
Dave is an amazing instructor and even though this is for beginners he takes you to intermediate. Amazing class learned and learned. Thank you!!!
Tony Walker
Enjoyed the course. Now that I am of an age where I tend to forget more than I remember having this course will help when I want to mask something. I can always come back to a specific video for a reminder. How many folks out there follow a tutorial and think great, then a week later you go back and say how on earth did I do that. Having access to this course is great especially if you are not photoshopping everyday.