Lessons
SPECIAL: Evening Light Painting Session
48:10 2Introduction to Light Painting
17:34 3Shoot: Objects on a Tabletop
22:43 4Shoot: Using Gels
14:55 5Editing: Objects on a Table
25:37 6Morning Q&A and Timing for Light Painting
23:22 7Students Shoot: Vase of Flowers
25:02 8Editing: Student Images and Composites
21:28Review of the Special Evening Shoot
08:25 10Shoot: Scooter Composite
27:07 11Compositing the Scooter
19:39 12Shoot: Light Painting a Person
18:19 13Student Shoot: Iris
05:46 14Light Graffiti
14:10 15Light Painting Example Review
20:09 16Fun and Unique Light Sources
27:42 17Sparkler Painting
10:20Lesson Info
Compositing the Scooter
So anyway, interesting backgrounds oftentimes just has to do with it creative light subjects you know the sources to put behind there let's take a look first those backgrounds and see if we might want to enhance them I'm going to go to the developed module in light room and if you look at one of these and you find that is just not bright enough, the highlights aren't all that bright and all that you can bring up the white slider the white slaughter controls the brightest party your picture and it controls exactly how bright it's going to be so we can decide how much do we need that to come in if you want it to be more defined where you don't see the semi light areas in between quite as much you can bring up clarity and if I need the black areas to go really black you can bring down blacks I can always mask that out so you can't see the parts of the scooter that aaron let's look at another image would do the same thing bring up the whites, get that show pa's much as he'd like clarity it...
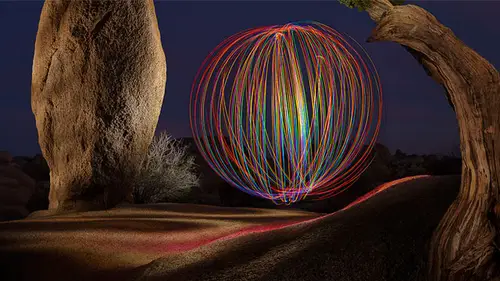
's fine tune it also the white balance will affect it quite a bit I could make it much more green you push it towards the yellow even more that kind of stuff I'm not worried about the scooter I can always mask it out uh, painted in backgrounds, same thing whites controls. The brightest party of picture highlights will also control the bright areas in vibrant for how colorful it is. All right, then, if we get out of that funky streaks of light, what I might do with the rest of these is for the ones that when I'm not using a colored jell, uh, I'm going to select all the images, just hold shift. I clicked on the last image held shift to get the first to get rid of ones that have the color gels. I can see three of them in here that do I can hold down the command key control in windows two d select them think this one's got a yellow gel, and then I'll find one of those where I can see the scooter nicely. Maybe this one and I'll go to develop in. The main thing I want to do is the scooters white, and so in order to get the color to look right, I'm going to do white balance to correct for whatever color the light source is. So if I grab the white balance eyedropper on the right side, I could bring it down and just click right on the scooter, and that will. Correct for the color of light I was using now if it was not a white scooter it was blue, red or some other color I can take a little gray card and put it in the scene and just shine my flashlight on it and on lee one of the exposures junkie and help me for a moment on that table is a small card the size of a business card it's in a little white envelopes yes can you bring for me? Thank you. All right, here's what I happen to use it's something called a y belle card there are other brands and stuff but what it is is it's a card that is truly gray, meaning this is not bluish yellowish, pinkish or anything else it's been measured to make sure it's gray and if I put this in my scene point my flashlight at it so it's the only light source covering it and included in one photo doesn't have to be in a mall just one maybe a test photo then when I come in here tio adjust my images I make sure all my images are selected in the lower right of light room looking like room. Now the lower right of light room is an area that has a little light switch like thing there the bottom and it's right next to the words that will either be the words sink or the word auto sync near the lower right in light room um if that is turned on so the light switch is in the up position then uh it means that any change you make will affect all of the images that you're currently working on if it's in the down position it means it would only work on the image you're currently viewing and so I would make sure auto sync is turn on I would grab that white balance eyedropper and I would click on the y belle card in that way you would compensate for the color of your flashlight yeah coming one thing that then yes just because you clicked on this card that's going to make it look as if the light coming out of your flashlight was truly white that doesn't mean that that's the way you want it to look after that you confined to knit right bringing and adjusting your temperature or tent if you want the light to be a little warmer or cooler michael is that on your careless turn your website um this I'm assuming is on my gear list karen if you're listening my fiance check if this is on my gear lis if it's not at it it's why belle in its spell w h I b a l and that's the website as well it stands for white balance like short you guys take a look at pass it around they come in various sizes that once the size of a business card, you can leave in your wallet, which is nice, they have one the same size as those little plastic things that grocery stores give you to scan your frequent buyer thing, whatever. They also have him, eight by ten kind of size and that kind of thing. So, it's a nice thing to have so let's put some of these together. Usually I would go in and refine each one here in light room, but I mainly want to talk about the compositing process, so I'm going to get rid of our test images, at least the first test image at the very beginning, and I'm just going to choose photo editor in and then open his layers and photo shop, and it'll take a while and, unfortunately, forgot three shots here because remember, there was three that we didn't adjust because they were done with colored gels. Once it's done loading the rest of these images, I could get those three in, but it'll take a moment for it to throw those together while it's throwing those together. You guys have any questions? It'll take a few minutes for this, any thoughts going through your head about what we were doing here, yeah, where did you get your many my bended stick I actually most of my flash lights the way I require them it's just by running into him that one I needed to light paint somebody and I didn't know I was going to have to do it I didn't have a flashlight with me he was in a recording studio I walked downstairs and next door was some store in the in there I look for a flash light that's when they had so that's literally how most of my flashlight's work acquired with the exception of my favorite one but it's called a stylists reach I think it's down my gear list and if you search on online vendors they'll carry them and I'm not sure what kind of stores would but it's a nice one to have composites on dure doing each individual piece do you want one that's like at least a full shot? Yeah and the fact I didn't do that here but I usually do what I call an ambient exposure which he is I will make sure that I have one that is like what I'll do is backup maybe even this far I'll put on my harsh light and I'll light it just so it's evenly lit nicely done or if it was a place like this, I'd turn on the lights and just take a shot in that way if you ever forgot one little area of your image or if just you're up close painting just didn't do it. You got something to put in there, and also sometimes having that ambient or overall exposure eyes great for picking up things like chrome areas or something else, sometimes they might light a lot more from that. So, yes, I usually do, and I actually didn't think about it here, so I, uh, neglected to load a few of these. I'm just going to drag those over, take me a moment to get him there. All right? So to put these together, I can select these. I just clicked on the top one held shift and got the bottom one set the menu at the top of the layers to lighten. Now this is all of them put together and usually that's way too much light and usually doesn't look very good. Also, something suspect might not be set to light mode because the background ones aren't showing up as much and let's see if there's anything odd about it now, let's, see if one of those looks like okay, no, they're just dark. Oh, I know it was I didn't include those because those were ones that also were not way didn't need to do the white balance adjustment to them, and so I didn't have them selected. At the time, I did my white balance adjustment. Remember when I did that tall the images right after I did that to all the images I said, okay, let's, combine them together and I said, combine them and that only took the ones we did white balance on so there's a couple more, I need to get in there it's open as layers and photoshopped. So if you forget some images, just select those images in do open his layers and photo shop so it stacks them. And if you need to get him over to your main file here's how you can do it, you will need to select all the layers. And so if the top most layers selected already, I could hold shift and get the bottom ones at all the way down to the bottom, I'll click within the image itself with the move tool clique within the image with the move tool drag on top of the tab that contains the rest of your composite dragged down into that image and to keep them in register, hold the shift key that's a little bit much to remember, but that's what's needed. I'm going to then set those layers toe light mode so they can combine together. And now we have all that choice look at that crazy looking image so at this point what I want to do is see if I can pick a master image an image right no I want to use the majority of it and so to find that master image is a little trick that I use I goto whichever layer is active and I hold on the option key alton windows and I click on the eyeball for that layer that lets me view a single layer then there's a keyboard truck that I can use to cycle through the layers and do it like a slide show. The slide show thing only works if there's only one layer visible and it's the one that's active so I'm gonna hold on the option key alton windows and I'll use the square bracket keys the same bracket keys he used to change the size of your brush and I can cycle through these and see if there's any individual one that I'm pretty darn sure I want to use all of it let's say it's that one I just want to add to that so I'll have that one I'll drag it to the bottom of my layers stack just by clicking on its name and dragging down then I'll turn on each layer one at a time and decide if I like what it's doing and if I do I'll leave its eyeball turn on if I don't I'll leave these eyeball turned off so before we start working with a background like images I will start clicking on some of these others like there's a nice headlight and I'm just looking for ones that I like not the little accent wants the big guys the ones that are filling in big portions of the image well I might like a tail light though all right now that one if I ended up lighting too much it's too bright I could've adjusted it light room before I opened it by bringing down the highlights slider it would've mellowed out that bright area were here I could lower the opacity of it toe lesson how much it is contributing to the image and then if there is an area that I don't like from what's in there like in this instance when I turned on and off I can see some white streaks where the edge of my flashlight was caught by the camera and on the very front you see the front wheel is getting a little bit I'm not sure if I like that or not what I do then as I add a mask I click on the icon that is a circle inside of the rectangle grab my paintbrush painted out so I'm just going to quickly do that with a bunch of layers adjusting their opacity because usually don't blab why do it and blabbing makes it take longer they got inside if I want the colored ones, the blue and the red in there, I think what I'm going to do is leave this normal colored so that I can reserve the color for the background rumor that funky background we did, and they just keep working it until I see if I want each one that's too bright, I might have only lit that once most the time I liked things more than once, but I can, uh, lower the opacity mask it if I want to continue it's not exciting when you're at this stage, but it's pretty nice having the control and let's see and again, if any one of these is overly bright, where I can't just lower the opacity on it to get what I want, then I would go backto light room and I would just sit there because I'll have more control over the adjustment and I could be more radical with it. So I'm going to spend that much time here because you could spend all day doing this and you're not learning much so let's just get a background in there, and when we got that background in let's, turn it on and off and I see where it reflects onto the subject in certain areas and there's a little purple on it and stuff I might not like that and if that's the case, I'll simply mask it and get it off of those areas if I'd done this always one exposure, I wouldn't have the option of getting rid of that kind of stuff actually elected up on that area. All right? So you get the general idea of compositing light all sorts of little areas when you're done with your composite, then you can start using all of photo shop to further adjustment. I do a lot of brightness adjustments I might come in with something like curves to brighten up certain areas then you can paint on the mask to control where that happens if there's certain areas they got too bright you khun come in and say, don't do this part don't do that in fine tune the whole thing but it's just a matter of spending time with so that is the general idea with the scooter and the general idea of shooting with composites it's just a matter of the amount of time you invest, I think it would be good then to move off from shooting still things like this and see what you have to think about was shooting humans, so that would be our next thing as we switch out the scooter will probably quickly roll out of here and we're going roll in a chair and get somebody seated there, but as we're doing that we have any quick questions we do have questions and also want to give a shout out to scoot about school about this good about moved on with scooter so thank you very much good about it hey stood about and that is good about dot biz and it is what are around you know see what did you say then? I don't know if john's around to get the scooter loved or mike do you mind? We'll see if we can find their twitter handle on then you guys can go thank twitter hand good about twitter handle is that's good about nice a c o t a b o u t cool right let's have some questions let's see did you say the end question from diana? How you save the file, what you're doing with the layers do you flatten them down? I don't flatten my layers I save it in photoshopped file format if I'm sure I'm not going to use any of the other layers like I've turned him on and off I go I know for a fact I'm not going to use this even if I make a print later decided make refinements, then what I would do is go to the side menu in the layers panel in the upper right of it you can click there and there's a choice called delete hidden layers that would throw away all the layers that have the eyeballs turned off and then I would save it in photoshopped file format and I keep my layered files because who knows? If later on I decide to make additional changes like in this particular image I can see in the lower right in the lower left, the there's a a light stand that's even got an orange piece of tape on it thinks I might not notice that until I make a larger print and by keeping all the layers that are in here it makes it easier for me to make future edits, so I just save it in photoshopped file format, but I might go to the side menu, delete hidden layers first, teo, get the file size to be down to only what you're using so then there's so many people that are like wanna try this? What about this? What about this? And I don't usually read those off their great there's just too many but jeremy case that how about having two people hold this string of lights like a jump rope and make it waving motion or jump rope motion? Have you tried that before to make it go like a jump rope? Do you want to see want people jumping or maybe like all you could do that with scooter? Yeah, well that's kind of like what I did last night when I did the orb it's not too similar so I haven't tried it with these lights is the first time I've used those lights. So but that's, what I love about light painting is any kind of idea like that. You could suddenly create an image we've never seen before.
Ratings and Reviews
Julie Coder
I've been interested in light painting for awhile, so I was thrilled to see this included in Ben's bundle package, since I'm learning Lightroom as well. Really enjoyed it! I appreciate the "trial & error" approach of the class so we can see the thought practice behind the photos, not just the final images. Really helpful tips for editing as well. I love the images on his website, which gave me ideas for things to try on my own. Fun, fun, fun!
Paul
Really cool class so far. Just wanted something to get some inspiration and this is fun class but it's gonna force you to exercise. I don't work for creative live but I don't have to say that the quality of the few classes I've just started in photography is very good. I once was a professional photographer and I've taken lots of live classes and I feel the value of these is good. I am looking forward to watching the Clay Blackmore class.
Student Work
Related Classes
Lighting