Lessons
SPECIAL: Evening Light Painting Session
48:10 2Introduction to Light Painting
17:34 3Shoot: Objects on a Tabletop
22:43 4Shoot: Using Gels
14:55 5Editing: Objects on a Table
25:37 6Morning Q&A and Timing for Light Painting
23:22 7Students Shoot: Vase of Flowers
25:02 8Editing: Student Images and Composites
21:28Review of the Special Evening Shoot
08:25 10Shoot: Scooter Composite
27:07 11Compositing the Scooter
19:39 12Shoot: Light Painting a Person
18:19 13Student Shoot: Iris
05:46 14Light Graffiti
14:10 15Light Painting Example Review
20:09 16Fun and Unique Light Sources
27:42 17Sparkler Painting
10:20Lesson Info
Introduction to Light Painting
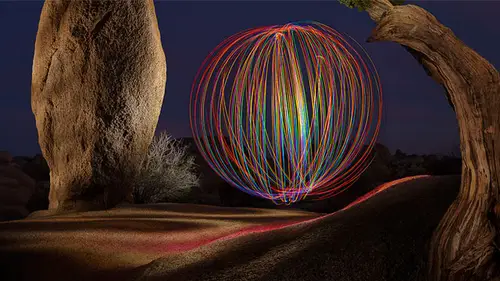
Today is all about, like painting it's, my favorite kind of photography because I can create images that are much more unique looking and where no one else can take the same photograph because every single like painting is unique and will you know, if I did the exact same scene and just let it a second time it's not going to look the same as the first? The general concept, though, is with normal photography. You're exposures are very brief, you know, one, two hundred fiftieth of a second, those kinds of times in when that's the case, the only option you have is either to use flash that is very brief and khun hit the scene during that time or use whatever available light is there with light painting most of time it's set at night because we need a dark environment in the key concept is we need to get a long exposure, and if you can get an exposure that is at least probably about twenty seconds, then we can like painted. And so what we in general want is we want to get an exposure of at ...
least about twenty seconds, twenty to thirty, but we'd like it. So if you pointed, your camera has seen it's dark enough where in that twenty to thirty seconds, if you just took a picture, it would look black and that's why it's usually done at night when we're done in somebody's basement or somewhere where there's no light so I want to show you a few examples of light painting these air all once that I've done and I'm just going to go through like a little, uh kind of slide show of it and each one of these had something unique about it that I had to do but let's, just take a quick look at a few light paints with these, like in this one, for instance, uh, up in the sky at this time was the full moon, but this area where the car and the trailer is would usually be in silhouette just like the trees that are behind it, it would just look like a black shape and that's what we want to find is a place where if there's any light at all, then that light is not falling on our subject and so we're going to end up lighting what would usually be in. So what so same thing is true here that's not the sun in the sky that's the full moon in the moon would have lit the back side of this this car if I walked over there, but it wasn't lighting the front side and it was dark enough that I could walk in there with a flashlight and like this so I'm literally walking in front of the camera, walking right through the scene, walking right on that fake green grass there and walking right up to the chair that's they're walking right into the trailer lightning, the interior and I'm using a common flashlight you notice that I don't show up anywhere in the scene though, and that's because I never point the light source at myself, so if there's no light pointing at me, I'm being lit just as much as the trees that are back here there's pretty much no light hitting me and see me be careful that a couple things that I don't reflect light off of something like a mirror or some chrome and have the light bounce onto me then I could show up or I want to make sure that when I'm on the right side of the frame by the car that I never stand still long enough that I turn up like a shadow over here because I can block the camera's view of the sky so let's, go through a few of these and see what what is interesting about with this one again this would have been in silhouette you khun see somewhat like the trees that are behind it and there was a light source over on the right side there's a building over there which is lighting the trees there and in this one this was at a campground called the starlight classic campground in colorado great place that you can go there and stay in vintage trailers and rent them out so anyway, I wrote the name of their trailer park right down here on the ground all he did was use the flashlight, get it close to the ground and draw out what I want just imagine it's like having a can of spray paint you're putting graffiti down there this one was a challenge because usually you tryto avoid light pollution light pollution would be where there's light spilling on your subject matter and so here I had a light on a building also there was a street light across the street into over my right shoulder if you're facing this and so with that I had to do some special techniques, which we'll see if we can get to talking about but not something we should get into at the very beginning usually want to avoid places that have blatant light like that here I'm in the town of brody, which is like a ghost town that's actually a park where the don't know if it's the national park service or if it's a state park that preserves that but in this case it's full moon and the moon is lighting the front of the church in usually the left side of the church in the left side of the entrance way and the left side of this little shack in the front would be in the shade and will be black for the most part the same would be true of the entrance to the church and of the windows and so in that case I had a light all those areas, if I wanted him to show up here I'm in africa doing a light painting and I, like painted this tree, which again would usually be in silhouette just like the trees that are in the distance and then started like pain things but it just wasn't that interesting altogether, so I went over here and why can't I think of what this is a termite mound? I think here and I decided to try to turn it into a volcano and so I was like coming out of it that's what I would call like graffiti you get like graffiti if you point the flashlight towards the camera so that your blinding the camera with the light of your flashlight and in this case I was using a red led the kind you might have, like on a key chain or something similar that and I ended up trying to create the little flow coming out of there I was standing behind the amount anytime you see a light source in the sky like this it's the moon and we'll talk about the moon in how it can help you to different times of the month you can either help you delight the surroundings to make it look like daylight, which is what we're getting in this case or if it's missing, then it could help you to make sure you get nice stars to make those really stand out. And so in this case, what I did is I have the moon and I walked around the scene looking for an area that was not being lit by the moon. You'll notice that with all my images shot under full moon, if you ever see the moon it's, the subject is always where the moon is behind it. So this moon would be lighting the back of the car and would not be hit in the front here. And so where hurts and shade it's what I live here? We're at mono lake in california, and these are known as the two photos and they would usually be in silhouette so ended up lighting those and here's another one. This one was a challenge because in the distance, thes tooth is a really far away, and the problem with light painting faraway subjects is each time you double the distance you are away from a subject, the amount of light falling on it goes down to one quarter of what it wass so if that is really far away my light is falling off a lot in order to reach that distance in. So in order light, something like that, I need an extremely powerful flashlight. And so in this case, I used one that is so big that it comes with a shoulder strap if one is called the cyclops and I got it at costco for fifty bucks, you know, so it doesn't have to be expensive. It just needs to be powerful. So this is the other time the moon can help you by not being around. If you have no moonlight, then you're able to possibly get the stars of the milky way star trails, that kind of thing's. So oftentimes you plan your like painting adventures according to what the moon is doing so it's gonna have a big influence then another thing is time of day when you're out shooting, we'll talk about that later on. And that is that if you want to have a blue sky there's a certain half hour of the day where you can get that and that's why we were outside yesterday with our shoot the timely words to try to get that nice blue sky you gotta be careful, though, when you get a blue sky. If you're in the scene, walking around instead of being outside the camera's view you will show up is a dark mass, and I see a little hint of me on the left side of this photo there's just a slight, dark, shadowy area right here and that's me blocking the the sky, the camera's view of the sky, just cutting some of that light there because I was in a little closer. So I end up going out to junkyards and middle of the night or just abandon cars because they think it's an interesting subject matter and lighting them so let's, talk a little bit about how we're going to do this. I mean, how it all works. So the first thing is we need enough time to be able to like the subject, and when I'm lighting the subject, I'll have a flashlight and I just got to think about how big is the subject, and how long would it take me to cover that area with light and usually having twenty seconds for a small subject, like a tabletop set up like we'll start with or something you can just stand near and not have to walk around instead you can just stand next to it twenty seconds is pretty good to be able to paint some light into that area. If you end up with a larger subject like a car that you might have to walk all the way around and you might have to reach your hand inside the window and do everything else, thirty seconds is going to be a minimum and there's a little thing about your camera, and that is just about every camera has a limit of the maximum exposure that you can get without adding an accessory to your camera is thirty seconds, and so if you're just getting started and you haven't bought any extra gear, you'll be limited to thirty seconds as and that khun somewhat limit how big of subject you'll light paint because you won't have time, tio uh, make it all the way around and actually like what you need to in order to go beyond thirty seconds, we'll need who set our cameras in a mode called bulb mode now show you how to do that, but with bald mode, the life of your exposure is determined by how long you hold down the button, but you don't want to have your hand on the camera holding down the button, you'll be shaken it a little bit and you won't be ableto be out there like painting, so usually you attach the cable, release him with the cable release attached, you can press the button, slide it forward into the lock then you let go of it walk into the scene like pain as much as you want to come back when you're done to the camera and release the shutter by releasing the cable release and the only thing there is you got to make sure that it's dark enough because if you're doing it where it's the full moon out or you're doing it just after sunset where the sky is still blue you got to make sure that sky doesn't become too bright or that the moonlight listen light things too much so you got a lot of little issues to think about well keep things simple at the beginning though by doing thirty seconds or less so we don't need toe have any extra gear and we'll keep things small which will be in this case tabletop when you do your first light painting I would suggest that you do something very familiar and very simple and stay away from doing people because people move in people blink and people when you shot a flashlight in their eyes khun you know move their head and in squint and it's something where you progress on two people start with something overly familiar I would actually suggest you start with your toilet that's overly familiar it's fixed it's bright so any kind of light you get on it even the cheapest demus flashlight is going to light it and it's a subject matter that most people think you don't take photographs out and you've got to see can you get it to look interesting using just light because otherwise it would be a boring photo people would look at it why would you take that and then progress on shoot your chair in your living room with nobody in it into progress until you're good at it then progressed to a tabletop where you put some objects on it and arrange it and just keep getting more and more complicated what you're shooting and then eventually get to people and eventually get to other things so that's why we're going to start with a tabletop something small and simple, so when we're shooting here we're going to have a little bit of a challenge and that is it's what time is it? Nine twenty in the morning I've never liked painted at nine twenty in the morning nine twenty at night? Yes on and so here we have some windows behind me which have shades going across them, but the sun right now is falling directly on those windows. We've put some black cards and those windows s o that we block some of the light, but with a son falling directly on those windows there's still some light streaming in there in some light on the corners and that makes this room much, much brighter then I would usually want for light painting in about an hour and a half the son should get high enough where it's no longer falling directly on the windows in that should help us tremendously so the challenge I have here is being able to do a long exposure of our scene without seeing anything in it and right now I think if I do about a twenty second exposure I'm getting where you see just the tiniest hint of what's there it's almost black but not quite in the settings that I'm using to get that I have to go look at it but I think I have my iso setting set to fifty which is the lowest I can go to my f stop I'm not certain but I think it's either f sixteen or twenty to something that cut us much light as I can and then a twenty second exposure main thing is I shut down the aperture as much as I could too cut as much light as I could so setting down as low as it could go to make it less sensitive to light and then experimented with the length of the exposure to say how long does it need to be before I barely see what's there at all now the problem with doing that with this much light and that's not what I would suggest is now we have to use a light source that's powerful enough that the camera will see it because we've done enough with the camera to make it so it can't see the light coming in this window and it's easy to see in here and walk around I mean it's it's bright in here in general, so I'm going to have to use a bright flashlight that's gonna limit me and what I can do in our table top set up usually I would end up with a much darker room and I'd be able to use tiny little flashlights like the kind you'd have on your key chain and by using things like that, I could come in and like the tiniest little detail within the scene and the camera be able to pick it up because the room would be so dark and my camera sightings would be set up to be relatively sensitive to light here, though just when we start, I'm gonna have to use the big gun, the flashlight I would usually use outdoors and all that just to overcome that hopefully later on in the day will be able to do it where we use smaller light sources and can get in a little more detail. But just so you're aware of that when I'm first getting started, so our setup is my camera is on a tripod it's not absolutely essential, you could set it on the table, you know that kind of stuff, but it has to be something that is solid but tripod is most ideal I framed up my scene and I simply experimented with my exposure the main thing is I did some test exposures and I'm trying to get it so whatever length of exposure ideo the end result ideally would look black but in this case I think my end results just a little bit of visibility in it and so you had experience with that if it was a really dark room my generic settings that I start with are usually I s o one hundred that's where my camera has the lowest noise f eleven and thirty seconds ideally that'd be great thirty seconds gives me enough time to paint my light in f eleven lets a lot of light in so I can use small light sources instead of having to have big, powerful flash lines he and if I'm shooting with a wide angle lens usually gives me okay depth of field and all that that's how you usually work but today will be a slightly different anyway that's what our setup is we have a table top in on that table top I've placed a typewriter, a old radio in an old camera that's our subject and we're just gonna experiment and see how it works. The main thing is with the flashlight is if you have a flashlight on the closer you hold the flashlight to the subject the smaller oven area it's going to cover and the more you pull that flashlight away from the subject, the larger oven area it's going to cover, and also, the softer the edge of the light will be. So if I haven't really close, I get a hard edge on the light and it's. Very obvious. Where I am painting, if I'm far away, it's more vague and soft. And so I'll have to experiment with that to see what looks best with this particular situation.
Ratings and Reviews
Julie Coder
I've been interested in light painting for awhile, so I was thrilled to see this included in Ben's bundle package, since I'm learning Lightroom as well. Really enjoyed it! I appreciate the "trial & error" approach of the class so we can see the thought practice behind the photos, not just the final images. Really helpful tips for editing as well. I love the images on his website, which gave me ideas for things to try on my own. Fun, fun, fun!
Paul
Really cool class so far. Just wanted something to get some inspiration and this is fun class but it's gonna force you to exercise. I don't work for creative live but I don't have to say that the quality of the few classes I've just started in photography is very good. I once was a professional photographer and I've taken lots of live classes and I feel the value of these is good. I am looking forward to watching the Clay Blackmore class.
Student Work
Related Classes
Lighting