Lessons
SPECIAL: Evening Light Painting Session
48:10 2Introduction to Light Painting
17:34 3Shoot: Objects on a Tabletop
22:43 4Shoot: Using Gels
14:55 5Editing: Objects on a Table
25:37 6Morning Q&A and Timing for Light Painting
23:22 7Students Shoot: Vase of Flowers
25:02 8Editing: Student Images and Composites
21:28Review of the Special Evening Shoot
08:25 10Shoot: Scooter Composite
27:07 11Compositing the Scooter
19:39 12Shoot: Light Painting a Person
18:19 13Student Shoot: Iris
05:46 14Light Graffiti
14:10 15Light Painting Example Review
20:09 16Fun and Unique Light Sources
27:42 17Sparkler Painting
10:20Lesson Info
Review of the Special Evening Shoot
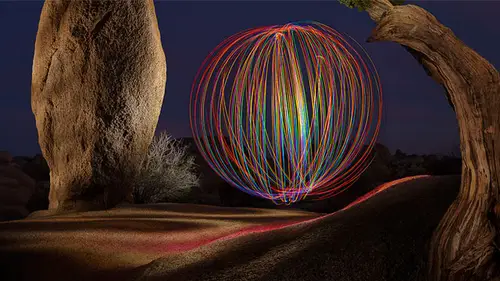
All right, well yesterday last night we actually went out shooting in the field and we haven't looked at the images yet from that so I haven't loaded up on my screen and light room and so I thought we'd uh take a quick look at what we got and coming about him in general now there is one thing about that shoot that was a little less than ideal well not just one but but right before we got started to shoot it we realized that my cable release was not attached to the camera and was not immediately available meaning it was getting really dark and it wasn't weren't sure what bag it was in and so we didn't want to waste your time by having us scrounge around looking for it so we were pressing the shutter button when a finger and the problem with that is you can easily bump the camera a little bit what that means is if we decide to composite any of these together they might not perfectly aligned so just let you know that ahead of time any time I'm going to shoot knowing no want to composite t...
hem together I make sure my camera is locked down really tight on a tripod my subjects not going to move it all and I'm using the cable release and that's the one thing we didn't have cooked up that time so let's take a look at our images let's, see here it looks like we shot a total of thirty one shots, all of the same subject matter and that's not unusual for me to take that many shots for some people, that would be a little much, but I know I like to composite in, so I like it gives me a lot to work with. So let's, take a look at these images one of the time this is the very first picture that I took, and this is just when we're doing testing and this is before the sun really had gotten low enough to give us a dark image, and so you're experimenting with camera settings. If you look at our camera settings there overlay on the image right now I had my eyes, so setting this lowest I could go and s o fifty, I'm an aperture closed down as far as it could go at f twenty two, and I had my camera set to the longest exposure it's capable of making without being in bulb mode, so I was doing all I could to make it as dark as possible, but the sun hasn't gone down enough, and so we were just waiting. Unfortunately, there was like a time we're supposed to start and then there's nature, and they don't always coordinates, so some of you guys I saw on the on somebody online things were like, are they starting what's going on? We're waiting for it to get dark enough. But then the sun rapidly starts going down and I was able to start getting the image to be darker in darker and even experimenting with. It was getting dark enough. Where? In this shot, I was able to do a fifteen second exposure. A shorter one. Get it to be this dark, so we weren't getting too bad. And I started to experiment just to see how bright is my flashlight going to be. Is it going to be bright enough? Enough twenty two to show up at all because f twenty two would cut out quite a bit of light. But once we got going in, the sun was low enough. We were able to, uh, get going. This is my first attempt. I knew I was going to be blocking the sky, though, and I can see my total shape here. Here's, my arm coming up towards the right there I can see the shape of my head. I think I can even see my hat behind this text and I knew that was gonna happen. I was just testing how bright the flashlight was in the test, it seems like it was giving me an okay mind of light. So we keep going. Here is just another test shot. Somebody happened to turn on a blue light somewhere behind me which got a little blue in here but we were able to get it where we can get it pretty darn dark so at this point it's time to start painting and so if I progress a few shots after a few more tests here's, our first light paint now with this I was trying to show that if you hold the flashlight close to your subject you get kind of a reflection on water in a pool kind of look and so is going for that look here I see a little street which is the edge of my flashlight being visible to the camera not hard to retouch out when it's in a sky like that, but something usually want to avoid. You do that by snubbing your flashlight, building a little snow around it which will do then here I'm lighting it further away and I think nice soft light just not getting enough for the car in the back in the wheels and so I keep going around trying different exposures in different areas you see the various results there again you can see the edge of my flashlight and I can see the edge of my hat, my arm and even my nose in there blocking my view of the sky now, that's fine if I know I'm going to composite this image because I could always paint in a mask to get rid of that sometimes it's necessary to get right in there, close to the subject to light it. So it all depends if these will line up when we try toe if and when we try to composite them. So anyway, after experimenting for awhile here, I wanted to try something different, and so eventually I started lighting the ground that was underneath the car, because having just a boring kind of dark ground isn't always exciting. So what I did is I want to the back of the car near the back driver's side tire and I got down on the ground and I just I pointed my flashlight under the car and let the grass going back and forth, and I thought that might be a nice backdrop for the car. Start lighting individual parts I might not have gotten in the others and then here's my orb with the orb. I'll try to do an orb if we have time today just to give you a few pointers about it. Because I messed up on this one a little bit, first off on the ground at the base of the orb, you could see a dark object right here. That is a roll of gaffer's tape I put that on the ground as a reference point so I know that I'm rotating around the same point the whole time at the top of the orb though I see kind of two different rotation points and kind of something odd going on I think what that wass is when I was spinning the line I didn't have a perfectly vertical instead it was at a slight angle I was looking straight down to make sure the bottom was staying in the same spot at the top was wavering so then we tried out some e l wire in e l wires electro luminescent wire and with this it wasn't bright enough in here because this is about is a one hundred I did bring up my aperture f eleven so we could let us more light in but it just was a little too basic so here's the second one I went upto so four hundred to really make it sensitive light in f ate and now that he'll wire really shows up and you'd have to see this on video to see how it was done all I'm doing is flicking this this line around the ground and uh I think it could look like water it can look like flames if use redial wire and all of that so if I were to take all of those images and put them into photo shop which I've done I could take all these layers. I'll hold the shift key and click on the bottom layer to get him all I could send himto lighten mode and that's all of them put together. It looks ridiculous with all of them let's. Just try a few. I want the orb so I'm going to make it so the orb layers visible. If I option, click on an eyeball, it'll hide all the others. I also want my e l wire still turn on that one and then I'll see if I got a good version of the car pop in there. See if we got one that's. Interesting looking it's, fun enough let's say that one and all you have to do is add a mask then because I don't like the light hitting the ground and so I get a mascot, I paint with black and I say, what part of that particular layer? Here's? What that layers contributing? Don't I like? I don't like this part, and so I just painted out. So now we got an overly funky looking version of this. You get the idea that you can just kind of composite like that.
Ratings and Reviews
Julie Coder
I've been interested in light painting for awhile, so I was thrilled to see this included in Ben's bundle package, since I'm learning Lightroom as well. Really enjoyed it! I appreciate the "trial & error" approach of the class so we can see the thought practice behind the photos, not just the final images. Really helpful tips for editing as well. I love the images on his website, which gave me ideas for things to try on my own. Fun, fun, fun!
Paul
Really cool class so far. Just wanted something to get some inspiration and this is fun class but it's gonna force you to exercise. I don't work for creative live but I don't have to say that the quality of the few classes I've just started in photography is very good. I once was a professional photographer and I've taken lots of live classes and I feel the value of these is good. I am looking forward to watching the Clay Blackmore class.
Student Work
Related Classes
Lighting