Shooting with Black & White Collapsible Reflectors
Lesson 21 from: Light Shaping Tools for Professional PhotographersTony Corbell
Shooting with Black & White Collapsible Reflectors
Lesson 21 from: Light Shaping Tools for Professional PhotographersTony Corbell
Lesson Info
21. Shooting with Black & White Collapsible Reflectors
Lessons
Class Introduction
05:22 2Categories of Light Shaping Tools
07:59 3When to Use Different Light
10:50 4Softbox and Octabox Overview
25:55 5Beauty Dish, Reflectors & Collapsible Reflectors Overview
27:55 6Pros & Cons of Small Light Sources
08:10 7Shoot using One Reflector
12:24 8Shooting with Two Standard Reflectors
08:53Shoot Using Grids with Reflectors
14:37 10How to Use Beauty Dishes
28:24 11Pros & Cons of Softboxes
12:30 12Common Uses of Softboxes
21:24 13Subtle Elements of Controlling Softboxes
20:33 14Different Techniques with Softboxes
29:32 15Pros & Cons of Umbrellas
07:25 16How to Control an Umbrella
12:25 17Uses of Umbrellas
08:27 18Different Techniques with Umbrellas
19:55 19Group Shot with Umbrellas
19:37 20Differences Between Collapsible Reflectors
25:36 21Shooting with Black & White Collapsible Reflectors
15:07 22Shooting with Silver & Gold Collapsible Reflectors
13:49 23When to Use the White Translucent Collapsible Reflector
33:18 24How to Use the Large Octa Softbox
20:50 25Shooting with a Large White Deep XL Umbrella
18:59 26Shooting with a Large Silver Deep L Umbrella
07:19 27Shooting with a 4x6 Softbox
17:05 28When to Use Specialty Light Shaping
04:40 29Shooting with a Hard Box
15:29 30Shoot to Incorporate a Fresnel Light
09:32 31Shoot Using Ring Flash
10:23 32Studio Lighting Photo Critique of Student Work
1:05:41Lesson Info
Shooting with Black & White Collapsible Reflectors
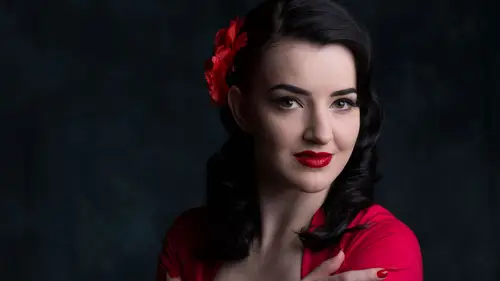
Okay so let's bring, it's Stacy right? Let's bring Stacy in. John come on in and we'll get this all set up. Why don't you just grab a seat a right there for just a second Stacy. Of course I joined by my compadre, my Seattle connection, John Cornicello, who's just the best guy there is to have on your team. That's for sure. What I wanna do is let's talk, first and foremost, let's talk a little bit about white and black and then we'll start taking it from there and we'll start moving it forward. John let's bring this around here at about a 45. I wanna bring in the white first and then I'll bring in the black. Sometimes, when you get these, you need to look at 'em and see, like this one's white and black. Sometimes the white has gold. Sometimes the white has silver. There's a lot of combinations, a lot variety. So you need to make sure you, once you understand what you're doing, you need to get the ones that are appropriate for what you want. But usually they're double usage. So this is a...
absorber on one side and a white reflector on the other side. The translucent diffuser material, because it's not opaque, it's really not good at all for a reflector. A lot of people try to use it on the shadow side and they don't understand why they're not getting much of a shadow. We'll it's because light's going through it. It's not bouncing off of it. So you need the reflector and it's coated in such a way that no light's going through it. So that's why the difference between the white and the translucent. Translucent just doesn't work to bounce light. How you doin'? Good, thanks. Are you ready for this? Mm-hmm. This is easy. Okay, good. This is easy. John let's pull it around this way just a bit. I just wanted to. Question for you Tom. Yeah, yeah. What's the state that you didn't teach in? You said you were in 49 states. (laughs) North Dakota. I've never taught in North Dakota. Yeah, why is it? Anybody North Dakota? If I could get a job teaching in North Dakota, then I could say I got 'em all. Let's just, just for grins here, I just want to... I'm wondering if I can talk to my three main light guys? Well, if we could get, if we could get... Yeah, that. (laughs) I just wanna be able to see the shadows and highlights when we do this. Third one down and this one off. Yeah, that's probably better. If we could take down that third one and then bring on that last one. That would be... (laughs) That's it. I feel very powerful today. Magic. You say it happens. Voice activated. It's great. Okay, so, see, hear what she just said? She just said, woo hoo. I did that all day yesterday, woo hoo. And that's from Carole King from Princess Bride, woo hoo. Okay, so John, let's tip that down a little bit and let's get a reading on that. So let's shoot something without the reflector first and we got my, my LightRoom is up. I'm tethered. I'm shooting tethered in today. I'm shooting with my 5D and yesterday I shot all day with my Sigma and today I'm gonna start with 7200 now. Where's your flash trigger? The trigger. Is it in the bag? That's a good question. What's interesting about all of this, we're all equipment junkies. We all know this right? And camera bag junkies. If you're like me, you've got closets of camera bags. There's no perfect bag. For this trip I need this kinda space. I need a body and three lenses. I don't need two bodies and six lenses. You know, it's like, oh we just keep buying so much stuff. But I'm shooting the 7200 f4, not the 7200 2.8. Now a lot of people are like why would you not use the 2.8? Because this weighs nothing. This lens is a fraction of the 7200 2. and it's $1,400 less. So and it's crazy sharp? So why would I not use it? I'm not a sports guy, I don't need the 2.8. So, you know, it's something to consider. Thank you sir. Okay, so... What we wanna do, John, yeah let's go ahead and get that right there. Here we go. 11 and a half. So we're at 11 and a half. So, let me see. And that's a 200. Alrighty. I'm gonna drop that down just a little bit. Why'd this turn off? Oh I did it here accidentally. (both men laugh) Yeah, I've got this controller and I've got control over the light. Okay, so I'm gonna go down here. Just pull that down. And I'm just gonna keep, I'm gonna shoot this horizontally. But I would probably normally shoot this, you know more vertical. Stacy let's turn you that way just a bit. There you go. And just kind of lean forward this way a bit. Yeah, and just bring your head back into the light. Little bit more. And if you could just push your hair back on the left side and the right side both, just a little bit. There you go. I just wanna see your cheeks real nicely. Good. And just bring your head this way a little bit. Right there, okay, good. So let's take a look at the shadow here. And here we go. Nobody moves, nobody moves. Woo hoo. (laughs) Woo hoo. Ah that's funny. Okay, so we're tethered in. Let's do this John, let's move it around a little bit further. That way. That way? Sorry yeah. There you go. That's probably gonna work. And Stacey just little bit turn your head to me. Are you a little hot there? I think we're 11 and a half. Oh sorry, sorry, sorry. I knew that. Let's try this. Good. So I think the shadow's gonna be a little bit deeper here. There is a little bit of ambience in the studio, but I don't think it's hurting us. There we go. So you can see how the contrast ranged from highlight to shadow. You can see that density, that change, from the highlight to the dark side. So there's two things that you can do. You can leave it alone and as it is, it's not too bad. But if you do wanna control it, there's two things, you'd have two options. I can take light away and make it even more dramatic or I can add light to it and make it less of a ratio, make it a lesser contrast ratio. Right now if you measured that, the bright side of the face versus the dark side of the face if you go to her cheek area on the dark side of the face, there's probably two stops difference between the highlight and the shadow. So what's the right way to do it? I don't know. I don't know what you want and that's the toughest part for some photographers to grasp. Just tell me what to do. No I'm not gonna tell you what to do. I'm gonna tell you here's what you can do and here's three options for you. You pick which one you want. Does that make sense? Are you guys awake yet? Just checking. All right, so let's do this John. Let's bring up the black first. So this, I got it, yeah. So let's bring it in pretty close and let's just make sure that we're not getting any, we're not adding anything from the studio. Can you just bring it forward? Just right in there. Good, good. Stacy, you look fantastic. Just bring your head around a tiny bit, right there. Stay right where you are, don't move, don't move. I just wanna make sure that there's no influence of the ambience here. And I'll just do this right in here. John can you move. Your back shoulder's in the shot just a little bit. There you go. There we go, good, good, good. Little sparkle in your eyes, woo hoo. Great. Okay, so what you're gonna see, is I don't know how much difference this might make, but I just wanna make that we're getting. Okay, so yeah, that brought in a little bit more shadow. A little bit more. You can notice, especially in her hair. The light's in a pretty good position and the way that the light box is aimed, the soft box is aimed, I'm getting a pretty good light on the shadow side of the face also. But I'm certainly getting good fall off into the hair. Now let's turn it around. Let's just flop it around to the white side. And now here's what we're gonna do, let's bring it in. First let's just bring it in, in the wrong way. Most people would just, come forward just a little bit and then just wedge it in a little bit. Most people would put the reflector right about here. You can see, go ahead and just take it in and out again John. Now back up again. It adds quite a bit of brightness in the shadow. There is a problem though with the placement of it. When that light, when that reflector is placed in that position, the problem is this. If I look at the bridge of the nose, and again, it's kinda hard to tell in the studio here, 'cause of all the light. But if I look at the bridge of her nose, the light comes around the nose and then you can see right down the ridge of her nose, the light stops and then the shadow begins, right? When we put this reflector right where John just had it, go ahead and put it back up again, when he puts the reflector there, what you see is this on the bridge of the nose. You'll see this highlight, then you see shadow, and then you see the highlight again from the reflector. Make sense? Well here's the problem with that. If you squint your eyes and look at that, and really look at it, you see light, a strip of dark, and then light again, meaning that that becomes a secondary light source. I don't want a secondary light source. I just wanna fill up my shadows. So for me, and this is just my way of thinking, I could be wrong here, and I'm sure if I am, somebody's gonna tell us, I think that reflector needs to be brought forward quite a bit, until it becomes, that the reflected light from the reflector, reflected light from the reflector, becomes a continuation of the main light, meaning it looks natural. It doesn't look like it was another light added. So go ahead and bring it forward. And now let's just bring your head this way a little bit. Right in there. Now as I bring this in, right there, I'm getting a great ratio on the face and it looks like it's part of the soft box. It looks like it's supposed to be there. Don't be afraid to work the reflector forward to where you almost think it's not in the right spot. I mean it almost looks like you're doing it wrong. You're not doing it wrong. Go ahead and bring it back up again John. And once you've got this up in this position here, then I've got the ability to move the soft box around and how much do I hit that with. I mean you can actually even, you can actually even add more light to the reflector, by just tweaking the soft box a little bit. So let's bring that in. Let's try one. So let's try here first. Yeah, you're right in my shot a little bit. There you go, there you. There's a problem with that? So go back a little bit John and bring your hands in closer to her. There you go, there you go. Okay, Stacy, now just bring your head around just a little. Let's keep your shoulders away from me though. There we go. Interesting thing about that and I talked about this yesterday. Anytime I photograph a woman, I want to get her shoulders and her chest away from the light and then bring her head back to the light. It's not a rule, but it is something that I notice I can always improve the picture if I can get the woman's chest away from the light. Does that make sense? It's just something to consider. Okay, now then just bring your head around. Yeah, chin down a tiny bit. Down, down, right there. Whoop, hang I'm slipping here. There we go. Great, right there. Good. Now bring it forward John. And there you go right there. Great, perfect. Good. There we go. Let's take a look at those two. And what we'll see is all of a sudden now the light on the hair is gonna change. We're gonna start seeing the shadows open up. If we look at right in here... Let me bring this down. This is within its proper placement, brought forward. But you what'll notice is that you really don't notice that there's an added reflector. It looks very, very natural, because it doesn't add the look or feel of a secondary light at all. And that's the key. The position of this is really important I think. It might be nitpicking and some people are like, oh just get it brighter. I know, but, you gotta do it right. (laughs) I think. I think that looks great. How's our exposure? We pretty much did what the meter told us to do. How's our color? Well we've pretty much dialed in daylight, which is what this flash is based on. So our exposure looks good, color looks good, shadow looks good. Let's shoot a couple real quick. I do wanna go back to the previous shot real quick. There's the one. Notice the darker ridge from the nose. Notice how it falls into that dark area. As we move the reflector forward, that filled that in. It's a small subtle detail, but it is a detail. Okay let me shoot some. John, why don't you flip around and come to this side. There you go and now you can just, now you can have your assistant, and when they're in the front like this, then they can just wing it in and out like a barn door. Make sense? And they can see better what's going on, I think. And then when the wind comes along, off they go. You'll see them next week. Okay, Stacy let's just bring your head around. Yeah, good, good, good. All right, let me grab a couple of these real quick. Woo hoo. (laughs) I like to keep myself entertained. Good, good, good. A little sparkle in your eye. Good, that's great. Chin down a little bit. Down, down, down, perfect. That's pretty. Let me do one of those. I'm wanna do the same thing, I'm just gonna shoot one vertical real quick. Ah, thank you sir. Okay. Great. Do this, do this for me. Just fold your arms together. Let's just bring your arms together in front. Yeah, yeah, yeah. And can we just push your hair back off of the right shoulder. There you go. And a little bit more, one more time. You almost got. There you go. Now bring your head around a bit. Perfect. Perfect, perfect, perfect. Great. And your head this way just a bit. That's it right there. And little sparkle in your eyes on this one. Good, good, good. Turn your head a little bit further. Your eyes right over here at me this time. Right here. Good, good, good. Chin down a tiny bit. That's it, oh, yeah, yeah, yeah, good. Okay, relax for a second.
Class Materials
Bonus Materials with Purchase
Ratings and Reviews
Stefan Legacy
Bought this class on sale for 19$ and it was a great buy considering it was my first class I purchased on CL. Tony is an excellent teacher and demonstrates extensive knowledge on lighting and different uses of modifiers. Overall this is an excellent course for any one who is interested in learning studio lighting, this will give you a great detail of information.
a Creativelive Student
This is my first time watching Tony Corbell teach and work he was great! I am a natural light photographer and this class made me think about picking up some lights and umbrellas! You can tell he absolutely loves what he does. Thank you for sharing your knowledge!
a Creativelive Student
Important information if you want to be a photographer. Great teacher, good pace!!
Student Work
Related Classes
Lighting