Softbox and Octabox Overview
Lesson 4 from: Light Shaping Tools for Professional PhotographersTony Corbell
Softbox and Octabox Overview
Lesson 4 from: Light Shaping Tools for Professional PhotographersTony Corbell
Lesson Info
4. Softbox and Octabox Overview
Lessons
Class Introduction
05:22 2Categories of Light Shaping Tools
07:59 3When to Use Different Light
10:50 4Softbox and Octabox Overview
25:55 5Beauty Dish, Reflectors & Collapsible Reflectors Overview
27:55 6Pros & Cons of Small Light Sources
08:10 7Shoot using One Reflector
12:24 8Shooting with Two Standard Reflectors
08:53Shoot Using Grids with Reflectors
14:37 10How to Use Beauty Dishes
28:24 11Pros & Cons of Softboxes
12:30 12Common Uses of Softboxes
21:24 13Subtle Elements of Controlling Softboxes
20:33 14Different Techniques with Softboxes
29:32 15Pros & Cons of Umbrellas
07:25 16How to Control an Umbrella
12:25 17Uses of Umbrellas
08:27 18Different Techniques with Umbrellas
19:55 19Group Shot with Umbrellas
19:37 20Differences Between Collapsible Reflectors
25:36 21Shooting with Black & White Collapsible Reflectors
15:07 22Shooting with Silver & Gold Collapsible Reflectors
13:49 23When to Use the White Translucent Collapsible Reflector
33:18 24How to Use the Large Octa Softbox
20:50 25Shooting with a Large White Deep XL Umbrella
18:59 26Shooting with a Large Silver Deep L Umbrella
07:19 27Shooting with a 4x6 Softbox
17:05 28When to Use Specialty Light Shaping
04:40 29Shooting with a Hard Box
15:29 30Shoot to Incorporate a Fresnel Light
09:32 31Shoot Using Ring Flash
10:23 32Studio Lighting Photo Critique of Student Work
1:05:41Lesson Info
Softbox and Octabox Overview
The tools of our craft and what we have to understand is that first and foremost, we've got a lot of tools. We have a lot of price ranges, we have a lot of capability. Photography is one of those little industries, I think, that whatever you pay for a piece of equipment, that piece of equipment is pretty much at the right value for whatever you pay for it. If you pay for a very high end something, it is that much better than it's competitor at a lower price. You do kind of get what you pay for in photography. If you think I think I'll save the money and I'll just get the whatever brand on this one, fine, but understand that you might have to replace it at some point, whereas with the higher end one, you might not ever have to replace it, and that has to do with filters. That has to do with tripods, heads, softboxes, slights, everything. It's kind of across the board. Sort of a rule of thumb that you can count on the fact that if you spend more money, it's going to last longer and it's ...
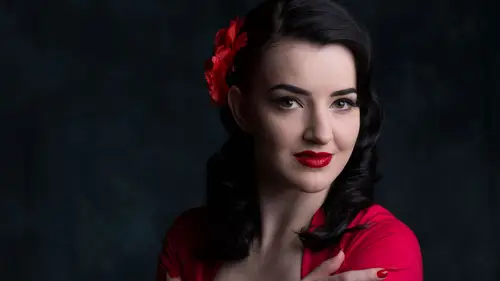
going to be a better quality whatever it is you're looking at. There's very expensive filters that are optically perfectly clear and pure and there's very inexpensive filters that'll kind of do the same thing, but there's some wavy lines across them if you look at them just right. It's just, think about that a bit. Tools are important. In terms of light shaping tools, let's start with this guy. I stayed away from the octabank for years, or the octabox. In the ProPhoto line, they call it the softbox octa. I stayed away from them for years because I didn't like the octagonal catch lights in the eyes. That's not a good enough reason not to use them, because I don't like the catch lights. I don't like the octagonal highlights, but the light quality that it produces is pretty terrific and I want to talk about it first because it has become my light of choice for, not most of my work, but a very large percentage of my work. I am a big fan of this light. On the left, it's a three foot octa and then the one on the right's a five foot octa. They have become my new best travel companion. They go everywhere I go. I think it's great. This is my favorite five foot octa with one of my favorite models, the lovely Kaitlyn from Dallas. I just like what it does. It gives me a good cliean, fresh look. Here is a little closer view of that. The only think I did here in terms of retouching, I did clean up the lower highlight a little bit. It was just a little bit dull and muddy. I just cleaned that lower highlight up just a bit. That's got a highlighter filling in from below. There's not a lot of highlight and shadow, but there it enough to give me some dimension. There's a little bit of highlight on the nose, a little shadow under the nose, a little shadow under the chin and that light, that five foot octa worked, as you can see in the top catch light, working it in very close, did a real nice job for me, and that's the point of that light. That light, it's really unique in that it does a nice, nice job of almost every face that you photograph with it. Its placement is critically important. As with any light, if I back it up too far, I lose the benefit of having it. I might as well use any tool. It's just kind of like the beauty dish, which we're going to get to that in a little bit. The beauty dish is fantastic if used right. It's not good at all if you use it wrong. All these tools have a right to exist. They all do something very, very unique or very, very specific and that's what we have to keep in mind. Thank you Kaitlyn. Another one, she's just lightly, the light source is above me slightly and above my camera slightly and she looking just beyond me slightly. The octa in this case lit her and the background, which just gave me just a little bit of a separation. That's a medium gray seamless in the background. It was one of my favorite pictures from last year. I loved it, I love this picture. I think we pulled off a nice image that kind of worked, but look at those cheek bones. You see those shadowing coming in under the cheek? It's because of the placement of that light in that butterfly or paramount position. The paramount word came from the Paramount Studios. It came from, it was butterfly light, also known as paramount light because Paramount Studios in the hay day of Hollywood used that sort of light all the time in their head shots for their actresses specially. Actors some, but most of the actresses. They got that treatment on their face. George Hurrell, Cecil Beaton, all these great black and white headshot photographers with the great eyelashes dripping with shadows down to here from the eyelashes. That's all from those kind of lights. The octabank does some things, here it is over pushed around to the side and back up a little bit, but you can start to see I'm starting to get a little bit of sheen on her nose, a little bit of shine on her nose. There's two things I can do to fix that, and first of which is I can hit her with a little bit of make up. Makeup does one thing and I know that there's a lot of people what are watching that do makeup and hire makeup artists. Here's what makeup does essentially. It alters the ability of the surface to reflect light. It's almost like I'm changing the efficiency of the surface to bounce light back by dulling down and in people, you use makeup. With products, you use a little product called dulling spray. Some of you have never heard of dulling spray. Those of us that have done a lot of commercial work over the years, you've got to have a can of dulling spray on your set because it might be you're getting a weird highlight from this bottom tip of the pen that I don't want to see. Hit it with a little bit of dulling spray and I won't see the highlight. It mattes that surface, so instead of a high gloss surface, it becomes very dull and it doesn't give me a proper reflection. That's hugely important. Those kind of controls are great to have and more little nuggets for your back pocket. In fact, speaking of highlights, we photographed cars a lot in the late '80s. We on the kick for some reason, we were getting hired by everybody to shoot cars. There was on particular tire that Porsche uses that couldn't get highlights off the tires. No matter what we did with the tires, we couldn't get highlights off the tires and they just look dead. They just looked flat and black and dead. We figured out that if you air it extra dry, spray an anti-perspiration, you can just spray a highlight on there and then the tires don't sweat, so it works out pretty well. That was the humor part of our program. (laughter) You know, hopefully you guys get that part. We just paint them on. Sometimes in sports cars and some of the European cars, the windshield wiper will be a flat matte paint. If you've got a beautiful highlight across the hood of a black shiny Porsche or a black shiny whatever and then you've got this flat dead windshield wiper, we'll get some air and extra drying. Just spray a little highlight on there. It works great. It's a big eight sided goober light that you just kind of can't miss, you know. If you just kind of get it close, you can't miss. One of my friends talked about umbrellas that way too. He said umbrellas, when you aim an umbrella at a subject or a group of people, it's kind of like you can't miss if you throw a bucket of rice at the side of a barn. You're going to hit something. I have no idea where that saying came from, but that's what he always said about umbrellas or big sources like that. Just get it close. You're going to get something. Anyway, it's fun. The softbox is the defacto standard, right? Everybody's using a softbox. Everybody has softboxes of all variations of sizes and shapes and they're kind of the go to light source of the world these days, and that's great, as long as you understand how to use them and when to use them and where to place them. I'm asked all the time what size softbox would be best for me? And my answer is get the biggest one you can afford because you can always make it smaller. I can back it up. I can cover off half of it with fabric. I can alter its size and shape smaller, but I can't make it any bigger that it is if it's a small source. If it's a small two by three softbox and I need really big softer light quality, by the time I get that soft light quality, the box is in the shop, so I can't use it. You've got to get a bigger source and I can always minimize its size, but we're going to go through these in some detail and work with them and show you the differences. On the left, that's a three by four box with the egg crate grid, the soft grid. On the right is the four by six. That's the big gigantic, oh no, that's the one six. Sorry, that's the strip light on the right. The strip light, the one by six strip light is one of those lights that I didn't think I cared that much about it, but I'm finding more and more uses for it and because I have it, now I'm finding reasons to need it, if that makes any sense. It doesn't just put out a fire for me, but I'm also trying to go find fires that I can put out with it. What? You know what I'm saying. You guys are smart, and you can get a round mask for many of the different sizes and if you don't like those octagonal tex lights, make them round. Pretty clever, pretty clever. They are the standard. The softbox, that's it. That's the one, and it's really great. I've got so many different sizes. You can also put a little strip box, if you've got one and you need to mask it off, you can mask it off and make a strip out of the one box that you have if you've only got one box. They're very versatile and you can do some things with them. This is a portrait of my old friend Donald Blake I had in New Mexico and I've used this picture for a couple years now. I just love this picture of Donald. He's an old actor and a cowboy out in New Mexico. He's in 300 movies. He's been, I'm a big fan of photojournalist, a commercial guy named Joe McNally and Joe and I are both very close friends with old Donald and every time I see Joe, he'll ask me hey, have you talked to Donald? No, have you talked to Donald? Yeah, I talked to Donald last week. Oh, you did? Yeah, Joe sent him a camera a while back and I go in to satisfy and the first thing I do is call Donald and take he and his wife out for dancing. You know, they want to go out and they want to drink tequila and dance, but he's just this great old guy. This is a three to one, a three by four softbox and it's fairly close to him, but look at the highlight side and look how, if you follow it around into the shadow, look how great the shadow looks. There's no other reflector here and there's no other light source. It's one light on this picture of him. This was taken in a saloon at an old West town, an old movie set. What I love about this is that highlight rolls into this great shadow. It gives him character. The lines, the years come through. The stuff that he's gone through in his life, I read it on that face, but it also gives me, he's got this leather slicker on, this black leather slicker, so I've got this great highlight if you come down the slicker and look toward the hands. That softbox is what's doing that for me, and that's why it has a right to exist. That's what I use it for most. It's really great. It's a great tool and you guys know about it, you all own one probably or two or three, I would imagine. Again, very, very close to her face. Only light source on the set. Oh sorry, sorry, sorry, no that's not true. There was an umbrella behind her that was lighting her hair and the background at the same time. But you can look at her fingernail polish and you can see that's another spot where that highlight shows a mirrored image of the softbox. This was my idea for, I wanted to do a scary movie poster. That's about as far out as I'm going to get. I'm not too wild, but this was the spur of the minute thing one weekend when we were shooting down in this river in Central Texas, and basically, I had two lights. I had just a standard reflector head in the background. I just put a blue gel over that. Then I have a two by three softbox up high coming right down and I wanted his eyes masked underneath the edge of the hat. It's pretty far back, so it's pretty sharp edge shadow, and then my assistant had a fog machine in his car and we plugged it in and made it work and we got like five pictures before it stopped working. But it was great, we pulled it off. That's the thing. Sometimes, you just got to try this stuff. I don't know if it's going to work or not, but what the heck. In the old days of film, in the film days, you know, we had a little bit of a problem and that was every time you hit the button, it was three dollars. When you paid for film, processing, and with me shooting Hasselbach five by five inch proofs on every frame that I shot, it's three dollars every time I pulled the trigger. We get into this wonderful luxury now of it doesn't cost a thing to keep pulling the trigger. It's a little storage space. You just keep shooting and shooting and shooting and shooting, right? Well, my rule is let's shoot a little bit less and let's go for more heroes and fewer failures, you know? It's funny how, I read a story abut Babe Ruth. We all know he was a home running king. A lot of people know this. He was also the strike out king. What makes that unique is he went for it every time he stepped up the plate, he tried to hit it out of the park. Every single time, and he hit it out of the park more than anybody, but he struck out more than anybody. He never got any singles. He never got a double. It was either out or he was out. That was it. I kind of love that about that guy, you know? You got to love a guy that'll just go for it. In photography, you can't really get hurt. It's not costing you three bucks a pop anymore, so just try it. Here's one thing I was cautioning you about, and I'll caution everybody that's listening to this, be a little bit leery and at least be aware that you're not spending too much time doing any of your testing on your client. Do all your testing before the client gets there. Every photographer I know wants to make more money. Everybody wants to add another zero, and that's great, but you can't add another zero if your work's not improving and if you're not doing the best that you can for your client every single time. I love my clients and I take care of my clients and I will go out of my way to make them happy. I want to be their best friend. If I'm shooting weddings, I want to be in the will, you know? You know what that's like. Everybody walks up to you at the wedding all day long and says things like you are so good and they haven't seen anything yet. They don't even know how good you are because they haven't seen any pictures, but you're handling the crowd well. You're respectful to the grandparents. You don't miss the kids. You're getting everything. That's what we have to do when you work, is you've got to take care of the client, and remember, in almost every case, if it's not a commercial shoot where an ad agency or a client has hired you, if it's a portrait session, I will promise you the husband didn't set this up and organize it. It was the wife that did or the mom. She's the one that organized it. She's the one cracking the whip and she's the one getting everybody dressed for this thing. She's the one that's going to write the check. You might want to make sure she looks really great. (laughter) Be real sure on who your client is and where does the role, who plays the most important role here? Softboxes again. Softbox on a movie set. My great friend Thomas from New Mexico. It just is a great source that does what it's supposed to do. It gives me great separation. It does a great job of lighting the face. Light direction is wonderful. It's just a wonderful thing. I did this when I was here last and this is actually part of my home studio show that we did for creative live, lighting for the home studio. This was in someone's home here in Seattle and this was a tabletop, just a poster board that we basically put down on the table and we borrowed the jewelry from the producer (laughter) who saw this and went, "Hey, that's my ring," (laughter) and she's like, "Hey, I'm wearing that." This was lit with one softbox and one reflector. It's not the tools that matter, folks. It's the knowledge behind the tools and it's the technology. Here, let me open it up. There we go. One light, one reflector. It was such a simple shot. It was so fast. The softbox, it's a three by four softbox hovering. Here's the set, for example. Right here is our jewelry. Here's my camera shooting down on the table, and it's a softbox that's right over the top slightly past halfway and turned slightly coming toward me, so it's just past halfway, meaning it's creating subtle shadows that are coming and falling forward toward the camera, not away from the camera. Does that compute okay? Great, and at the front edge of the table, right here, we just raise a white reflector and we just raise it up, up, up, up until it was right under the lens and we stopped right there, and that's what opened up the foreground and that's what opened up so I can see inside that ring. I can see who made the ring. I can see the designer's initials on the ring, and it opened up all the gemstones by giving me that reflector, which gave me a highlight and all of the shiny stuff. Simple shot, but you might not think you can pull off a jewelry catalog with one light and one reflector, but you can if you understand the tools. Okay? Any questions about that? It's a good time for questions. Okay, no more questions, I'm sorry. (laughter) We've got one in the back row first. Sure, Tom, right? Yeah, I have a question about the octabox. Yeah. What is it about it that makes a different light that makes it different from just basically (crosstalk) a softbox with eight sides? I'm not sure that I have the technical answer. Visually, it has, there's something about the falloff. There's something about the angle of the design of the box itself, the way it is, it's almost a parabolic with a diffuser in front. It's almost a parabola shape. There's something about that whereas the softbox, it's kind of square looking and everything comes out and the light comes out in a channel and it's kind of straight ahead, right? But there's something about the octa that allows a little bit more spread of the light and yet it's controllable and I can tip that head and almost vignette a bottom portion of it or I can tip it forward and keep light off the back. I just seem to have a little bit more control with it. I don't know if I can quantify the difference between the highlight and the shadow. If I put the two in the same spot and they're about the same size, but I think I like the octabank's like quality better. It's just a little bit different, and it seems to come out at a better angle for a face for me. I'm not sure that even, if that computes very well, but it's kind of what it does. It just looks great. You know, it's like, I don't know how they do that, and if you pull the front skin off, it even looks greater, you know? I can't say that about softbox, but I can about the octa. We'll show you. I'll show you what I'm talking about we're going to shoot it and we'll do it both ways and we'll look at it and we'll, in fact, we'll do a side by side comparison, you know? Let's do it. But it's a pretty cool source. When would you choose a softbox versus an octabank? The octa bank, one of the good things about the octabank, which is also the bad thing about it is it does create a little bit of sending light maybe where you don't want to place it. If I'm going to light you with an octa, let's say I'm going to do a three quarter portrait, Carrol, right? Yeah. If I'm going to do a three quarter length of you, Carrol, and I've got my light pretty high, I really can't prevent it from hitting some of the background, unless I put a grid on the softbox, on the octa. Now, the grid, the soft grid, the egg crate grid, they're fantastic. They're crazy expensive and they're expensive because one guy invented them and he trademarked them and he's got the patent on them. He gets paid and he's sitting on the beach in Canada, I understand. I'm just saying. They're expensive. They're very, very helpful tools and we're going to use them and I'll show you why they're important. They're probably worth the value what you have to pay for them. But without the grid, with a softbox, I can pretty much vignette that light and keep that light from hitting that background, but I can't do it so easily with the octa. That octa sends some light around. Does that answer your question a little bit? Okay, okay good. Tony, we have great questions that are coming in from the folks at home, but I think let's keep going. We'll save those for the end of the segment. Good, okay, well we're rolling right through it right now. This is good. Then, I just shot this a week ago Friday, a week ago Thursday, so this is a real fresh image. One light, and I wanted it, again, just like the jewelry picture, that light source is behind my subject very, very slightly and above and I really wanted there to be more drama here than some might like. I purposely didn't add any light to the foreground, so I let the ligth in the foreground go to dark and I let the background go to dark. I'm seeing a little separation on the background from the spill from the strip, but this is how it's lit. That strip light, that's my one by six and it is in just about that position. It's about that angle and it's up high above her coming down, and it just worked out beautifully for this pose for her and it gave, it elongates her arms and it makes her, you know, if she wasn't a good dancer, it makes her look like she's a good dancer. I don't know. I just think it worked, but that's one of the uses of that softbox, where I've used it not just as an accent. I've used it as kind of a primary source on a long, slender subject matter. You know, thinking about that, with that kind of a shape of any light shaping tool, think about how, think about how size of source and how the shadow edge gets softer with a bigger source and with a smaller source how the shadow edge gets harder and how with a bigger source the highlight gets bigger and smaller with a smaller source. We talked about that. Think about photographing something like this pen. If I light this pen with a strip light and I line the strip light this way up to go along side the pen, or something else that's long and skinny, then I've got a big nice soft highlight down the whole surface of the product with a big nice soft shadow edge in the front, right? But if I take that strip light and if I turn it and just go and turn it 90 degrees, I just changed the physics of everything, so no I've got a small source. Now I'm going to have a hard shadow in front of this pen and I'm going to have one highlight that's this wide right here on this part of the pen. It's not going to be a highlight that's going to cover the entire length of the pen. Specular highlights are really interesting to control. I had to shoot a bunch of pianos one time for Baldwin Pianos and with a black, shiny piano, it's 100 percent control of highlight. There is no shadows here to worry about and you got to worry about the highlights. I needed a light source that's enormous and I didn't have one, but I did have a roll of white seamless paper and four C stands, so I made a ceiling of white seamless paper that was 12 feet wide by 25 feet long and attached that to the top of my four C stands and suspended that above my piano, then I got down below and I fired two lights into that white seamless paper and let it bounce down and reflect a soft highlight across the entire piano, and that's the kind of jobs I get, the strangest calls. We have a lighting challenge. You want to help us solve it? And that's what happens. I get calls to do weird, crazy, goofy things that nobody else wants to like, but that's how you solve it. You take it one step at a time. It's like, okay, first thing we've got to solve is it's a black piano and it's shiny. Then I know I got to deal with highlight. It's a white car and it's flat. Okay, great, no I got to deal with shadows. You have to think through the range of contrast within what you have control and that you have to work within.
Class Materials
Bonus Materials with Purchase
Ratings and Reviews
Stefan Legacy
Bought this class on sale for 19$ and it was a great buy considering it was my first class I purchased on CL. Tony is an excellent teacher and demonstrates extensive knowledge on lighting and different uses of modifiers. Overall this is an excellent course for any one who is interested in learning studio lighting, this will give you a great detail of information.
a Creativelive Student
This is my first time watching Tony Corbell teach and work he was great! I am a natural light photographer and this class made me think about picking up some lights and umbrellas! You can tell he absolutely loves what he does. Thank you for sharing your knowledge!
a Creativelive Student
Important information if you want to be a photographer. Great teacher, good pace!!
Student Work
Related Classes
Lighting