Subtle Elements of Controlling Softboxes
Lesson 13 from: Light Shaping Tools for Professional PhotographersTony Corbell
Subtle Elements of Controlling Softboxes
Lesson 13 from: Light Shaping Tools for Professional PhotographersTony Corbell
Lesson Info
13. Subtle Elements of Controlling Softboxes
Lessons
Class Introduction
05:22 2Categories of Light Shaping Tools
07:59 3When to Use Different Light
10:50 4Softbox and Octabox Overview
25:55 5Beauty Dish, Reflectors & Collapsible Reflectors Overview
27:55 6Pros & Cons of Small Light Sources
08:10 7Shoot using One Reflector
12:24 8Shooting with Two Standard Reflectors
08:53Shoot Using Grids with Reflectors
14:37 10How to Use Beauty Dishes
28:24 11Pros & Cons of Softboxes
12:30 12Common Uses of Softboxes
21:24 13Subtle Elements of Controlling Softboxes
20:33 14Different Techniques with Softboxes
29:32 15Pros & Cons of Umbrellas
07:25 16How to Control an Umbrella
12:25 17Uses of Umbrellas
08:27 18Different Techniques with Umbrellas
19:55 19Group Shot with Umbrellas
19:37 20Differences Between Collapsible Reflectors
25:36 21Shooting with Black & White Collapsible Reflectors
15:07 22Shooting with Silver & Gold Collapsible Reflectors
13:49 23When to Use the White Translucent Collapsible Reflector
33:18 24How to Use the Large Octa Softbox
20:50 25Shooting with a Large White Deep XL Umbrella
18:59 26Shooting with a Large Silver Deep L Umbrella
07:19 27Shooting with a 4x6 Softbox
17:05 28When to Use Specialty Light Shaping
04:40 29Shooting with a Hard Box
15:29 30Shoot to Incorporate a Fresnel Light
09:32 31Shoot Using Ring Flash
10:23 32Studio Lighting Photo Critique of Student Work
1:05:41Lesson Info
Subtle Elements of Controlling Softboxes
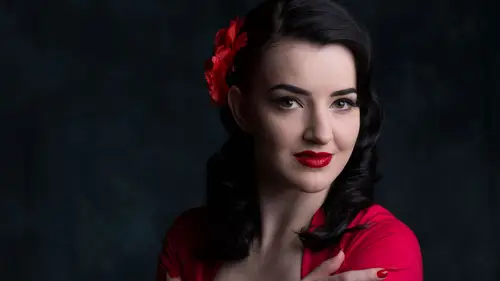
Lets grab the big boy over there, that big honker, and we're gonna put that on that light right there. So, here's what we're gonna do, in fact John, if you bring it over here you might want to leave it down and then put the head on it. Yep. And bring 'em up together, you know that. When you're using a big source, and especially if you're working by yourself, like this big four by six soft box, to put the head onto that soft box is a bit of a challenge when you're by yourself. The easiest way to do it is not to do it with the light on the stand. Take the box, put it facedown on the floor, and bring the light to it. And put the light in there with it on the ground, lock it in place, and then pick 'em back up together and put 'em on the light stand. There's a whole lot less chance of breaking something that way. And for me it's all about that, it's all about the safety, safety in the studio is an important deal anyway. That's why you wanna use as many cordless things as you can. And y...
ou know it's interesting too, the Tether Tools, when they started making these tethered cables, their tether tables, all the things that they're doing, you'll notice this is like a crazy orange cable. I can see it in a dark studio. I don't know why we all don't have fluorescent orange or fluorescent green extension cords in our studios. We're always tripping over cords, stop tripping over 'em. You're in a dark room on a dark floor with a black cable, of course you're gonna trip. And so is the seven year old client, they're gonna pull something over. And that's gonna hurt, both financially and physically. So we wanna be a little careful about that. So what I'm gonna do now is I'm just gonna spin this guy vertical, and we're gonna create our little wall of light, but I wanna show you a couple of things about that. Let me move this over a bit. Probably a little bit more. About like that. There you go. And John knows intuitively to utilize the c-stand for this beast, 'cause now we got some weight on there. So we'll just put it on there and it's gonna be very, very heavy. It works great. So we're gonna turn it, go ahead and we're gonna turn it sideways. Yep. Kinda like that. And actually, that tilt is about right probably. Yeah. Great. Raise it up a bit? Yep. I want it to match this guy and we're gonna bring it right over against this. So I'm just gonna let it touch and bump right up against that. I know that not very many people are gonna do this, but I just want you to see what it does, and get the point that this is kind of an interesting thing to do, and kind of an interesting way to think. And that's what this is. There was a guy that I knew in Texas who shall remain nameless, but he had in his studio, he had this big half circle drawn on the floor, and I said "what's the circle for?" He said "Oh that's where my main light goes." He said "Everything's always F/8 in the studio, and my main light stays right on that track all day long." And I thought boy, you got the most creative art on the planet, and you just painted yourself into a corner. Because now he can't do anything except shoot at F/8 on that track. It works and if you're shooting production, if you're shooting 6,000 kindergarten kids, that's fine. But if you're gonna do creative work, and custom portrait work, you need to have the flexibility to move, and the knowledge to be able to get different things from your products, from your tools. Okay so. Let's take a look at Miss Mona. So you can see now from where you're seated over here on this side of the set, we've just got this gigantic bank of light. John you might be a little bit close, yeah. I put two sandbags on it so I can't move it. Here let me help, we'll just go straight back with it. There you go, that's probably about right. And I'll drop this guy down just a bit. Something like that. This is the part where all the video crew's going "what the heck is he doing?" Creating a wall of sound, I mean wall of light. This is awesome. Okay so John are you there? Yep. Let's take a reading. So let's read, all the way come around the corner right there and let's get this one first, so this one's giving me F... 8.9, 11. So I'm shooting 11 on the face, now point it right straight to the side of her. 11 and a half. Now let's read right where you're standing and aim it right back there, right there. 11.2. So you get it? So let's take a picture and see what it looks like, and if we need to vary the accent from the four by six, if it's a little bit hot, we just pull it down a couple of tenths, or a half tenth, half stop, until we get what we want. You good? Sit up good and tall. Let's do this, let's turn you very slightly that way. A little bit more. Yeah now just your head back this way. Even a tiny bit further, right there, that's real pretty. Really nice, here we go, here we go. Good, good, good, good. I'm on 11, I'm on 11, yepper here we go, great. So let's take a look at this and see what's happening with this wall of light. It's just an oddball weird thing that kind of works. Look at this whole, from her face all the way back and around. Look at her shoulder that's opposite, that's right here. Look at this highlight, it's very subtle, it's very soft. Look at her hair, it's very subtle, it's very soft. It's the only way I can do it though and have it where it's contained all the way back, all the way around. There's an old school portrait guy who passed away a couple years ago named Don Blair, and Don called that second light back there, he said "Oh that's my garlic light." He said "I treat that just like garlic." And I said "What are you talking about garlic?" Then he says "You know when garlic is just right, it's great, but you can overdo it so easily." (audience laughs) And it's the same with an accent light. An accent light is so important but boy you can overdo it so easily. It can get real ugly real quick. Just for fun, since you're standing there, take that second light, the big guy, up one full stop, and I'm gonna take one more picture and let's just look at the difference. Okay, you good for another picture, my dear? Good, good, good, here we go, good. I might need to turn your head a little bit more, let's do that again. I like this one better, whoo hoo, there we go. Yeah, I had you too dark there, we fixed it. Here we go. So again. Here let me get rid of this one here in the middle. There it is at pretty much even exposure, and there it is one stop brighter. I've still got good detail because of the immense size of the wall of light. The size helped me with keeping it from spiking and creating a clipped highlight. Yep? Could you do the same thing with two octabanks? Yeah, you can, they just send light more out in a pattern of a bit more spray. But you can, you can do it with any kind of sources. You can link together several of the strips and do it. I could make one one foot by 20 foot light with those three lights I've got right there. Well not 20 because I don't have that many, but I could make one foot by a whole lot, I could make one very long, skinny light source. So here's an octa, see when you put the octas next to each other you get these gaps. Yep, we lose the smooth, even coverage. This is just one smooth light source that goes all the way around her. And it's just for fun, you know. Isn't that right? I mean we're not, this is not a medical conference, we're not trying to save, we're not trying to cure anyone here, we're just taking pictures. (laughing) I try to keep it in perspective you know. I do wanna do a great job for my client and I always will take this very, as Kenna said earlier, I'm gonna have fun. I'm always gonna find a way to have some fun, but I am gonna take it pretty seriously, I'm gonna try to do a great job for my client. And show them the best work I can and show them the best respect I can. But I'm gonna try to have some fun, because that's just me, that's who I am. I would be terrible if all I had shoot was small widgets in a dark room all day by myself. I would be terrible at that. I need something back. I'd be talking to a box of paperclips. Come on you can smile! Come on, come on, come on, you know. So anyway. Okay so, let me, John let's move this, let's leave that four six right where it is, let's get rid of the three by four real quick. Let me do one more series of pictures with her, and then I'll bring Jason over and we're gonna keep going, do a few more things, and that'll get us covered in this little arena. In fact why don't you just take that box off of there, and let me just talk about this one thing. Let me get you to stand for a couple shots, can we do that? Let me just move that stool out of the way. Let me just get this maybe right there is a safe spot to put that. Okay so yeah while he's pulling that off I'm just gonna have a little quick hit of water. Somebody got a quick question? Sure. Generally it's more of an observation, but on that last one that you did with the two boxes, that seemed like it got the closest to looking as though she was standing just in a room with a big window. You know it started to almost feel the most natural. That's right, that's right. And what's interesting about window light. If you think about window light, if this wall, this big wall behind Kenna were a big window, most people just automatically put their client right up against the window, and then they put themselves right against the window, like this and they shoot right down the line this way. Right? It's kind of the universal way to work with a window. But the problem is you sort of get yourself painted into a corner a little bit, because you can't do much with their face and their shoulders and you can't pose them, and get great directionality on the face, except split light, half lit. So here's what I will often do, I'll have them move about two or three or four or five steps away from the window, and move me closer to the window. Now I've changed all the, geometry just changed, everything changed. Now I can move their shoulders away from me, bring their head back around, now I've got Rembrandt light from the window, which is fantastic. I can control the brightness on the background of the wall behind them in their home, for example, based on how far they are away from the window because if they're right next to the window they're a stop and a half, two stops brighter when I start moving them away from the window, as I change that value in my control of my aperture, our shutter speed combination, I'm making the background brighter or darker based on where I place them. So windows are really great, and I love working with windows. I've become kind of a knucklehead about windows, and now almost always I'll place a battery powered light outside the window. (laughing) I like my battery powered B1's, I'm telling you. Those guys are, they're just, it gives me the ability to change the value of the background brightness that fast, by just changing my shutter speed up or down. Because I've separated the aperture and the shutter speed from being reciprocal any longer, they're no longer reciprocal. You know what I mean by reciprocal right? 60th at F/16 is exactly the same as a 500 at 5.6, until you turn on a flash in an ambient situation and then they're separated forever. Then the aperture takes care of the primary subject that's hit with the flash. Shutter speed takes care of what? All ambience, that includes background and (laughs) that was good, I saw that. Background and shadows, it takes care of the shadows also. Which is why that earlier shot, oh no I didn't show you that picture. I've been doing a lot of lecturing lately, I just remembered I didn't show you one of the pictures I was gonna talk about. Okay so let's do this John, let's bring that forward toward you, where you're standing just a bit. Yeah a little bit more. Great. Great, great that's pretty close right there. Okay, do me a favor dear, let's just move you a half step that way, and if we can get the magic three lights control guy, light control dude. (laughing) So the good news about this is it gives me the ability to see better, that's all, I can just see my shadows better. So here's what I wanna do, I want to just barely turn your head toward the light just a little right there. Can you guys all stand up for just a second, and come over here and gather around me for just a second, and look at her face. I just want you to see what's going on with her. Keep your face turned at that angle and walk forward about two or three big steps. Little bit more, little bit more, right there, stop right there. I just want you to look at the shadow side inside the corner of her left eye. You see that shadow area? Now just slowly walk back, keep your head turned a little bit, and slowly walk back, back, back, back, right in there. You see it all opened up. That's what I'm talking about, that's what I'm talking about in terms of light control. It's small details, it's finessing, it's fine tuning, it's paying attention to that little stuff that makes all the difference in the quality of the work, I think. Okay? Thank you guys. Right there, perfect. 11. 16.2. Ah what! Oh 'cause we bumped that up one full stop, and you guys, ah photography one, Tony zero. (laughing) Sorry. You going down there? Yeah you want 11 even? Actually I wanna go, let's go lower than that. Let's go lower. 8, 5.6. Oh let's keep on going. Four. Four. Go to the lowest you got and let's see what you get. Yeah that's the lowest it goes. Alright let's hit it and see what you got. Should be about F/4. Oh 5.6 and a half. I thought it would be, one more time. 5.6 and 0.7. And that's at ISO-- 200. Okay so let's go 100 and that's gonna put me at F/4 and 2/3. Yep. You guys got all that? So real quick I'm just gonna change my ISO down 'cause I wanna shoot as wide open as I can get away with. So I'm taking my ISO to 100. So now I'm shooting at what, 5.6 what? F/4 and 2/3. Oh F/4 2/3 yeah okay got it. And I'm shooting at 125. So all I've done I've just taken care of the wrinkles in the background, that's all I just did. Okay. Hey John? Yeah? Take that strip light if you would, that's on her now, and just spin it around toward the background, and pull it down to 5.0 on output, and that's gonna make a nice little gradated background for us and it'll be a little bit out of focus I think. Let me come in a little closer. This is the part where you guys are thinking "Come on you nut, you're making this up as you go along." Good, good, good, that looks great, your eyes right here, perfect. One more of those. Let's turn your shoulders away from the light a little bit. Interesting thing when you turn, when you're photographing women, it's not a rule at all, none of this stuff is rules that matter, but it's a good idea to get into the habit of turning the chest away from the main light. A woman's chest becomes a light trap. Man's too, a man you can get away with it. Women you're just really adding a spot of light, especially if you're photographing brides. Get a bride's shoulders away from the light, their chest away from the light, bring her head back to the light, and two things happen by crossing her shoulders and her head two different directions, you're adding more feminine look to the picture, by definition and by design. So you look great just bring your head to me a little bit further, right there. Perfect, don't move, don't move, don't move. Holy Toledo, a little bit further this way. Just a little bit more, yeah right there great, good. That should be pretty nice. Hey our background's out of focus but she looks a little scared so let's do it again. Turn that a little bit more to the background, oh I did shoot it a second time okay. Yeah but I almost got a blink. Turn that a little bit more that way, just a little bit. And let me do one more. And then I'll be happier, okay here we go. Good, good, good, whoo hoo, good one. Okay, relax, everybody blow. (blows air) Blow, come on, come on, there it is, okay. You're not giving the right sound effects. That's it. So here's the thing, look at the difference between those two. Think about this, when John moved that light just now when I said go ahead and turn it a little bit more to the background, here's what I lost. I lost the light on that shoulder, you see the light on the shoulder. It was lighting up my background fine right there, but I thought well think I might just try to get a little bit extra light out of it, and when I did I lost that shoulder separation light. In the real world I would probably go back and fix that right about now. I'm not gonna take the time to do it. But do you follow me? When you get the opportunity to go in and make these subtle adjustments, make the adjustment. Do what you have to do to pull off that shot that you've got in your mind or that you feel that the client needs you to do for that one image. Go to the effort to do it, it'll always pay off for you. You'll never regret taking the extra time to do it right. Okay? Miss Mona thank you. Thank you. You may go sit, take a break. Go relax, have some water. Have a martini. (laughing) Okay so let's, we're gonna bring Jason on here in a sec, but before we roll too far past this, 'cause we're gonna shift gears a little bit, I just wanna double check and see if there's any questions or anything that we need to address yet. No? Okay. I think you're solid Tony. Okay, we're doing okay, chat rooms are okay? Yep, we're good. We got people watching from somewhere? We absolutely do. Do we have any international people this time around? Tell us in the chat rooms where it is that you're joining us from right now and I will report back in. I'd love to hear where they're coming from. There's almost always somebody from Nigeria. There was Nigeria-- We have a Nigeria? Yep. So I went to Nigeria, I went to Lagos, Nigeria, my first big job, I was 25 years old, and I went to the capital city of Lagos, and I photographed all of the government officials at Victoria Island at the Federal Palace. It was the coolest and strangest experience of my life. I got sick, I got the flu, and I was there six weeks and I got stuck because the Sahara winds blew in and grounded all the aircraft. Then the wind stopped, and then was an air traffic controller strike. I've got the flu and I'm stuck in Lagos, Nigeria. Anyway, I'm glad to hear somebody from Nigeria's here.
Class Materials
Bonus Materials with Purchase
Ratings and Reviews
Stefan Legacy
Bought this class on sale for 19$ and it was a great buy considering it was my first class I purchased on CL. Tony is an excellent teacher and demonstrates extensive knowledge on lighting and different uses of modifiers. Overall this is an excellent course for any one who is interested in learning studio lighting, this will give you a great detail of information.
a Creativelive Student
This is my first time watching Tony Corbell teach and work he was great! I am a natural light photographer and this class made me think about picking up some lights and umbrellas! You can tell he absolutely loves what he does. Thank you for sharing your knowledge!
a Creativelive Student
Important information if you want to be a photographer. Great teacher, good pace!!
Student Work
Related Classes
Lighting