Lesson Info
17. Shooting Golden Hour Hard Light
Lessons
Enhancing Existing Light with In-Camera Dodge and Burn
23:15 2Portable Window Light Anywhere
26:21 3Larger Portable Window Light, Pt. 1
19:50 4Larger Portable Window Light, Pt. 2
17:29 5Direct Window Light
15:33 6Perfect In-Camera Flares with Compositing
21:35 7Convincing Environmental Backlight
32:50 8How Atmosphere Affects a Scene
06:38Enhancing Existing Light
19:08 10Enhancing Existing Light with Flare
18:08 11Backlighting as a Main Light
32:44 12Backlighting as a Main Light with Smoke
10:52 13Midday Hard Sun with Godox
32:04 14Midday Hard Sun with Profoto
11:46 15Light and Airy Afternoon Backlight
11:42 16Late Afternoon Indoor Backlight
16:16 17Shooting Golden Hour Hard Light
19:52 18Working with Artificial Flares
26:18 19Golden Hour Environment
09:49 20The End
00:37Lesson Info
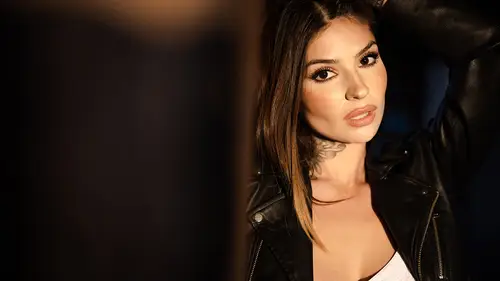
Shooting Golden Hour Hard Light
Now we're getting into recreating Golden Hour, and this is one of my favorite videos in all of lighting. Four. The reason is so often when we shoot during golden hour, we're thinking of kind of shooting the same thing. You know, position your subject with their back to the sun and shooting into the light. We're going to do things a bit different. We're going to shoot golden hour perpendicular to light with an intention to use that hard edge, golden hour sunlight to chisel out our subject. And then we're going to shoot with the light to create high contrast images. Then we're actually going to set up our light. Once the golden hour light has passed down below the hill, we're gonna set up our flash at a CTO and recreate that golden hour light. But we're going to shoot the same images and see if we can't create the exact same look, but using strobe instead of actual sunlight. Okay, we're a few seconds in and let me walk you through what's happening this far. So I'm going to draw our train...
car fairly large so you guys can see this and the camera position is kind of working right around this little arc right here and we're shooting Kylie, who's standing right here and facing into us, kind of leading the wall. You'll notice that there's kind of a window right here. It's the same train car. There's a window right here. There's a window right here and the walls that we had kind of earlier over on this side. I think there's another window like right here or something, like Okay, so what's happening is is that son is in that position. So all I've done is basically just rotated the train car, and I think the sun might actually at this point be closer to this other window. So let's nix that one, and it's shining through and creating that kind of light right on this area. So that's the light that you see in this shot, and we're shooting with a very hard light. So the first thing that I want you to pay attention to is the careful pose, an adjustment of the chin to make sure that those shadows fall in a pleasing manner onto the face. Let's keep watching and now bring the chin over more right there. Okay, first thing. I don't know, Phil. I don't know why Phil felt like it was appropriate to do what he did and write it up on the wall to tell us about it. But that's neither here nor there. Let's talk about the light in this image thus far, because this is one of the first images that I really love from the scene. There are still a couple of things that I would have tweaked about this. If I can go back, I would have controlled the chin just a little bit more to get a little bit more that highlighting the cheek. There's a little bit of an odd shadow and shape right here, which I believe is probably from just a tiny bit of that leather jacket that's casting a shadow across. Still, it looks nice, but there are still some changes that I would make to it. Now, when I'm looking at this, there's several different things going on so you can see that blue. Remember how we did that earlier video that talked about the blue light that we get as that fill that comes in from the sky and other areas, right? We see that exact light. Look at this. In fact, that light that's showing up on the chest, the light that's over here on the right side, the light that's over on the pants. All of that matches not only just that blue light, but it's almost more of that stylised blue light with that pro photo gel, right? So it's more of that darker blue on those sides versus the more subtle blue. So I thought that was really cool to point out, because we can see that right now, right after learning that principle. So we have that orange light coming in and anything that it touches kind of turns nice yellow, that golden hour orange, which is beautiful. We also have that blue light coming through, and we have that window on the right side, and she's placed right here because I want that little subtle edge lighting that we get on the other side so you can see it against the hair. You can see it against the jacket and adds a lot of texture and dimension. So essentially what we have here is we have Phil, so any of this light coming directly forward is actually fill light coming from behind us. We have another light kind of acting like, almost like a strip boxes that outlines the entire shape and body on the right side. And then we have our main light that's coming through and cutting through the scene and adding that warmth to the scene. So we essentially have a three light setup here, although we're just really dealing with that sunlight, right? But it's really a three light setup, and that's important to understand in any kind of situation where we're recreating light from the ground up. So that was worth pointing out. Let's go ahead and keep watching. Give me a little smile. Mhm. Okay, so now with that chin adjusted in the light and with the arm down, we get a much more pleasing shadow shape off of the nose, and I love this now. I love shooting hard light, and I'd be the first person to argue that a hard light when used well, when used correctly with the right subject, I generally find it to be more visually appealing, to be more interesting, then simply the same old super soft light used in every single situation. I love hard light. I think you know that by now. Because I think I've said it about a billion times. I love it. I love it. Is that clear? Yeah, yeah, yeah. But make sure you position your subject to work well with it. Make sure you have the right subject forward as well. So here we're positioning and we're shooting this direction. Now we're gonna do is move into the same direction as the light and keep shooting this time with the light to show you a high contrast Flat light. Let's go watch. It's still hard, Right? Hard right, bro? Right, bro? I love hard like Yeah, yeah. Mhm. Okay, Lean the head against the wall a little bit right there. Turn the channel a bit more towards the light. Right there. And now, right eyes in the camera. There you go. Now switch it up, chin up and lean back there. Yes, as you can see here we have a nice set of Kylie using that natural golden hour hard light. Now let's go about recreating it. We've got this fun set up in here and we can learn a lot from this, and we're gonna actually do a hard light setup where we're gonna set up a light exactly where the sun is setting and the sun is actually down or almost down It will be done in, like, 34 minutes. What we're gonna do is wallets still up. I'm gonna place this flash exactly where it is in the scene. So, Carl, you're going to place the flash, right? They're perfect. And go ahead and boom it up there. That's it. Now, what has to happen is you actually have to tilt the head back to go directly at me. So yeah, that's gonna be the angle. So actually, lower it and then bring it back up. So lower it. Go ahead and straighten the angle of the head with this one you can fire almost like straight into the room. You know what I mean? Mhm. And then we're gonna go ahead and that's it. Yep. Now turn it to the right. More. Turn to this. There you go. Right there. And lower it a little bit. Lower. Lower lower. About six. Right there. Right there. Perfect. That should be good. Just make sure it's secure, and then let's go ahead and do a quick test. How much battery powders that have, by the way? Half. Okay. Got to get him out. We have a gel on that. And what we're gonna do is we've already lost most the natural light. So I'm just gonna make sure that we're actually getting so if I do a test shot, I can actually see where the light is dropping off and where it's not continuing. So, Carlo, instead of putting it there, we actually need to move it over here. Right there. There. Okay, so from this side, scoot it this way A little bit. A little bit more. A little bit more right there. And now angle it left. Now it's right where the sun is going to be. Because we're gonna kind of shoot through this area right here. Should we try this out? Let's see if this looks at all the same. It should. Okay, let's go ahead and get a mhm sample. So we're at 2500. I'm gonna stop this down, and we're gonna lower our eyes. Oh, that's it. Okay, so I'm gonna shoot somewhere around F one to F two. We're at 100 of a second. Yep. That lights firing directly through. And what, You're gonna scoot this way a little bit? There you go. Perfect. Mhm. That's fantastic. Okay, let's test this, okay? It looks very realistic. Let's go ahead and see what the other one looks like. The only thing we have to tweak is just the power. And then, Carlo, I'm gonna have you. So I'm gonna go ahead and get the power setting right first. Okay, Raise it up because we need to create that line. That kind of goes right across. Yeah, yeah. Yes, we got it. Okay. Back to scoot over a little bit this way, and you're gonna reverse the hands. There you go. Just like that. And you're kicking the hip towards this side. So flip legs there? Yeah. Okay. And let's see how this There you go. Your hair was pulled all the way over to this side to see how the hair was falling all on this side and on the belt. Yep. There and was kind of relaxed. Sorry. On the loop of the pants, we're gonna get this as close as possible. Bring the chin this way right there, and let the hair kind of fall over the chest a little bit. There you go. There you go. Perfect. And then, my dear, the hair in the back right here needs to come down. Just bring it forward a little bit. There you go. That's good. Chin over this way. A little bit right there. Okay. Which one of these was natural versus Flash? You tell me. Can you tell? Good. Okay, so here I have the two images pulled up. You're looking at the raw files for each. So these are unedited. All I did was I selected kind of an appropriate white balance for each one of them to get them similar. And that's it. So what we did for the shot was we just basically lined up the flash with a zoom dish and a CTO gel kind of in the same position as the sun and fired it in the exact same direction from the same height. Now, if you're looking at these two images side by side, there are things that you could potentially nit pick and say, Okay, well, the you know, edge on this left side seems to be more well defined than on this side. But to be honest. If you're seeing these just as a client like Kylie or if you're seeing them, even without comparison, could you tell the difference between these two? When we actually posted these two images online, most everyone thought that the image on the right was the natural light image. Do you know why? Because they thought that the blues and the shadows were unnatural. And that's what's funny is because throughout this series, we've talked about how there must be blues in the shadows. But they thought that there was too much, and therefore, this one is the one that was flashed wrong. It's actually the one on the right that was flashed. And we know that just from watching this tutorial, but I think we've done a really great job of simulating golden hour hard light. Now, let's continue shooting with it to finish out the sequence. That's the goal. Okay, So what we're gonna do now is we're gonna play and just have fun. Yeah, Yeah. Cute. Turn the hip toward anymore so I can get there. You go right there. Cute. I love that. I love that. Okay. I'm gonna get tight, Guys. The beauty of this is now. I no longer have to feel rushed. The sun can be down. It can drop in the dusk. I can keep shooting away because I've set up my own golden hour sunlight and that's not going to change. So let's keep watching. Okay? Fantastic. I want you to lean up against the wall. Remember how we did a little sequence that kind of looking down to the side. There. There, there, there. I'm gonna have to Photoshop to fill part. Uh huh. Freaking ville. I think I don't ruin it for everybody. I love that right there. Mhm. Look right into the camera. There you go. And now we're gonna go ahead and shoot from this side. Mhm. I like that with the jacket on this one leaning into it. There you go. That's so red. Okay, what I think I want to do, I'm gonna cast my own shadow right here. So I'm gonna lean back. Yes. Chin down a little bit. There we go. Sure. Doing. I'm gonna have you bring the chin over this way now. Mm. And now look over towards that side. Mhm. Yeah, dear, can you look right towards me now? I'm gonna go ahead and stop down and bring the hands up and into the hair. I like it where you're, like brushing over to one side, like, kind of play with it a little bit. I'm going to kind of squeeze right to this edge. Mhm. Mhm. That's rad. And now, look kind of down to the ground. I hope you guys enjoyed this video. Let's go ahead. And I'm including several different exercise files for you guys in your download. I'm gonna go ahead and grab this one. This is that flash lit shot. Let's go ahead and edit this one together. So first, I'm going to start with just the thing that bugs me most. And you guys know what that is? That's my crop composition. All that stuff. Okay, So from right here, let's go ahead and get a white balance read. I'm just gonna grab it off the chest. And the thing is that I don't necessarily want a super neutral white balance. You know, when we when we drop that white balance down here, we lose that golden hour kind of tone to it. And I want that I don't want it to be like nuclear like up here, But I do want some of that kind of golden hour sunlight coming through. So I'm gonna leave it about right here, adding a little bit more tint and a slight bit more warm to get some of that magenta back in the skin tones. Next, I'm going to lift my shadows a bit. Just so they're not so deep and dark. And I'm also going to add a bit of blacks to this because I want this image to have a more kind of flatten out look, especially because it's split lit. So split lip. Even though Kylie Fitts the look and she has that edgy vibe, I still don't want it to be that dramatic. So I'm going to just bring the black point up quite a bit. Actually, on this image may be about to plus 65 ish, and this will also allow me to just cool it down a little bit just because the skin is getting a little bit warmer. Okay, so once again, thank you, Phil, for your remarks. We super appreciate that. I'm gonna go ahead and add in that radio burn, and I'm gonna place this just over her in her face. And let's see if we want to exaggerate that burn just a little bit. It kind of takes the emphasis off of you know what Phil did. All right, I like it. Okay, so let's go ahead and close that up and honestly, like, right here, it's already looking pretty darn good. So if I were to look at the before versus the after, we still have that nice golden hour toning to it. But it looks really decent. I'm going to warm it up just a little bit more for a little bit more of that kind of golden hour effect. So really, that's all I would do. This image is just kind of get it to a nice place. We kind of balance it out. Remember, when you're shooting with a hard light, you already have a lot of contrast in that image, so you don't necessarily need to add much more to it. You already have everything you need, and I don't want to nix all that, you know, The Golden hour orange. I just want to get enough of it corrected that it still looks like golden hour. But we also have somewhat natural skin tones. So this is where I would take that file And you guys have four of these you guys can play with. So go ahead and play with them. By the way, you want to know the really quick and easy way to create a cool looking image. In this kind of light, you just press the black and white button. Well, what do you think, Carlo? You love party. I love Harley, by the way. Black, black and white is kind of like the cop out. So I want to do it in color. Let's do it in color. I love her like next video.
Class Materials
Bonus Materials with Purchase
Ratings and Reviews
Nev Steer
Jye is an exceptional teacher and these videos really breakdown the construction of great lighting techniques. Enjoy the dry humour throughout. Well worth watching for even experienced photographers as there are lots of tips and tricks here.
Funfotog
Kyle made Pye's work look simple. I learned a lot of new ideas and was reminded of some that I had forgotten about. I'll be reviewing 201-401 again with the practice images.