Lessons
Lesson Info
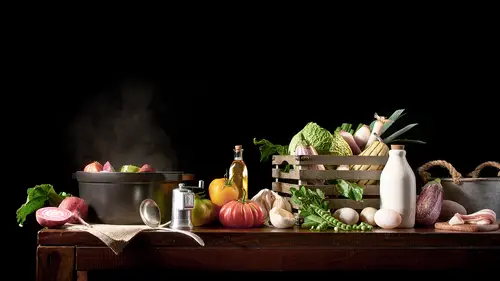
Building the Set
So this is a camera stand that we've weighted down with sand bags. We have two, I think six apple boxes we put through here. MDF board which I find useful. I actually used that for stop motion and I have legs that screw into the bottom of the MDF board, I'll show you here. So I have little brackets here that I screw legs into. And this is actually really good to have in studio because when you're doing overhead shots and you want your shot to be on the ground, but not totally on the ground, this gives you a table you can just pull out and screw the legs and then go. So I drilled a hole in the middle and we actually put the camera stand up through this, and we just took, I have a power drill with I think a one and a half inch core on it and we just went through every single thing. I had to break that toaster and then this guy, I already discussed the wine bottle, but the wine bottle, I think I discussed this in my earlier class. But to get the bottom off the wine bottle, you just take a...
twine, and you wrap it really tight around the bottom, and you put fingernail polish remover on it, and you light it, and when it catches fire it sort of creates this heat circle and you put it into cold water. Immediately, the bottom will just pop off. It's a really easy way to get the bottom off. And which forced me to kind of turn it so you couldn't see the bottom, so I was limited and I had to spray paint the inside to make it look like it was full again. Cause you don't want clear wine, it just doesn't make sense to have an empty wine bottle. So I put the cork back on, and then I sort of gouged, I gouged a little divot for the wire to go around, and we just made a loop. That was kinda the hardest part of this whole build, just getting that wine bottle to stay put. And then I think we're looking at the toaster saying why, it was just a black square in the image, we took a shot yesterday, just looks like a black square. So we tilted it, we were able to get a little bit of the front showing, and then we put a piece of toast in it. So it reads a lot better now. And they'll be problems that we will run into as we go. Cause when I show you how I'm gonna light this and shoot it, we're gonna go from pumpkin, to the ham, to the wine bottle, we're just gonna go up the whole totem pole and fix every problem that we see as we go. And I'm sure when we get the wine bottle looking good, it's gonna cause some sort of weird thing going on in the ham. So we're gonna you know, just kinda go back and forth and find out, we're gonna get this in one shot. That's the goal. So yeah, we did, I think we did a stop motion, or a time-lapse, of the build yesterday that I think we can take a look at if you're ready. We'll put it up right now. Alright cool, awesome. Yeah, this was our, (laughing) I think the pumpkin was the most satisfying. It was very bizarre. I think it was the watermelon. The watermelon was the best? It smelled the best. It was a sensory overload. And I always bring back up, anything that's glass we'll bring it back up, because you never know when it's gonna explode on you. And when you see people build, you know, you see images of food when they have those tall sandwiches? They always put a rod, there's always some sort of rod in the middle to secure it. And when you look at the back of those shots, where there'd be a two-foot tall hamburger or whatever, the back looks ridiculous. There's like tissue and all kinds of gauze and weird, and it's actually not the same with this because we just slid it down a pole, but that was the whole build there, yeah.
Ratings and Reviews
JennMercille
I really enjoyed learning about the details and complexities that go into the orchestration of food and product photography. The shoot that Steve Hansen puts on in demonstration of this was really elaborate and complicated. I never realized how much of the creative aspects of the images I see in magazines are created in camera, rather than in post-processing. I am a portrait photographer, so I was surprised at how much I learned that can transfer to creative portrait shoots as well. After watching this course, I have noticed details in lighting technique and product photography that I never saw before, and that has helped me elevate my work very amateur still life skills to a professional level. I now do product photography on the side for a refreshing change of subject matter, and have been able to photograph my own print products for a pre-sale catalog for my IPS sessions. This course is super useful across niches. I definitely recommend it to all photographers!
Karen
A lot of information to take in, really enjoyed the class. Loved how the layers were built on and the placement of all the items. Would love to see the final picture ofter touch ups :)
Penelope Diamanti
Enjoyed and learned altho I'm far from being able to afford this equipment, but love his work and I found him an engaging teacher.
Student Work
Related Classes
Lighting