Creating the Composition & Concept
Lesson 2 from: Lighting for Still Life and Product PhotographySteve Hansen
Creating the Composition & Concept
Lesson 2 from: Lighting for Still Life and Product PhotographySteve Hansen
Lessons
Lesson Info
Creating the Composition & Concept
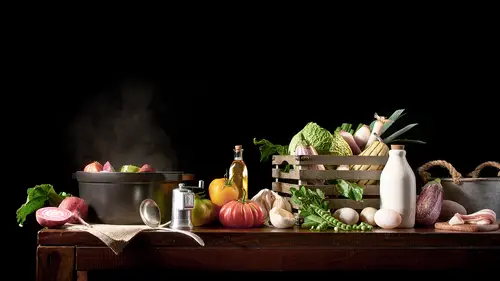
For me, the idea is everything. If there is an image that's just of, you know, I have plenty of these images where you take a shot and it's just a bowl of cereal by a window, and you're like, why, why did I take this? And I always talk about that in my classes. There has to be a reason for the shot. Not always, but if you're doing personal work, if you're doing stuff that's really satisfying, you want to think about what you're doing. It's kind of like painting a house. You tape off all the edges of the walls. You do all this prep work and then the last thing you do, which is the easy part, is paint the house, which is making the shot. So you don't want to, like, just kind of throw stuff up willy-nilly. Sure, if you have some things in the studio, and you're playing around, that's fine too. But you're always gonna want to think about, how is this gonna make me feel? What camera lens am I gonna use? What angle is it gonna be? And especially, what color tones are gonna appear in the stil...
l life? So that was all kind of preconceived here and the way I go about that is I have an iPad Pro that I use for my portfolio when I show it, and I've got a pencil, and I use Procreate, and I just go on there, and I kind of just doodle around. There's a lot of different apps now you can use for it, but I just doodle around and I can erase, and I can kinda adjust and kind of mess around with it until it all falls together. That way, I'm not kind of messin' around on set and going, well, cause I mean, if this didn't work, I can't just take the pumpkin out. I can't just saw it and, like, you know, there's no rearranging at this point. It's set. You know, with food, when you're working on set, you can't, you know, if you're pouring milk on cereal or you're styling it, there's kind of no going back from when you've, you know, when you have everything on set ready to go. So the concept is really everything, and I want you guys to make sure you know, when you go into a shot, whether it be food or anything else, there has to be a why. So, I think when we ... How long did it take us to build this, an hour? About an hour and a half. Hour and a half. Before we get to that building, Steve, could you tell us about why you chose these particular products and what they're gonna help us solve, what problems they're gonna help us solve today? You want me to say why I did this. I don't actually don't know what now. Well this is more of a, this isn't, someone could look at this and say, you just stacked a bunch of food. And this is, the concept I had behind this is it's more like an advertisement saying, you know, is your plate too full? You know, it's like a shopping list kind of thing or a sense of overwhelming, you know, things you need to get done. It's just sort of a sense of, an overwhelming sense of, I don't know. But yeah, it's sort of like, what's on your list today, kind of thing. (laughs) And so yeah, I had, the only thing I couldn't drill through was the plates. So basically what I did, is I just broke, I don't want to ruin this, but I just broke a plastic plate in half and just kind of put that there. Why? Because our camera angle is coming in right through here. And so I'll kind of go into the technical aspects of the shot and like what lenses and what gear and all that, and you know, all the flash stuff you see here. And what you can use instead of it too when we get into that. But yeah, the concept was essentially just, you know, a sense of overwhelming errands that you have to get done. And then the shapes, and the textures that you chose, tell us a little about the why behind those. Yeah, and we'll get into the actual, when I start to light it you'll see. Okay, so the pumpkin you see all the ridges here, and all the textures that are, you know, and we're gonna be shooting a flower, we're gonna be shooting a ham. Here's a secret, this ham has been sitting here overnight. And what I've noticed, I do tons of packaging work, and most of the best shots I've gotten were when we had to like, leave the set overnight because they were making decisions about the shot, like is this good enough, and they were on the east coast, and they couldn't get back to us in time, and we just let it sit. And we came back the next day and we took a shot, there was like, we had to shoo flies away from the set, and we took a shot. It was way better. The textures, like, when things dry, they just become more pleasing. Not everything, but for some reason, this ham is probably gonna read better because of it. It's sort of shriveled up a little bit. But I wanted to have something, you know, with ridges that we're gonna have to accentuate, a ham with all that texture, a glass bottle, and not a vertical glass bottle because I can shoot that all day. This is gonna be a challenge. We're gonna focus a lot on the toaster and the wine bottle cause they're dark. And they both have various reflectivities to 'em. So you know, we have the texture in the bread. We've got shadows in here we're gonna have to get into. We're gonna have the front of the tablecloth that we're gonna have to, you know, light properly so that your eye will go to a certain place. And we're gonna decide on set. Where does your eye wanna go? And we're gonna use various lights to get us there, and various reflectors, and diffusion material. And then the top is really just, I found it, I'm like, we need to get this higher and higher. And this was just basically just get it higher. And then at the end, we're gonna be putting a carrot cake on top. So we're gonna be tiering. Things could get messy. We have a backup ready to go if need be. So, we're gonna put that on last. We're gonna get on the ladder and go for it.
Ratings and Reviews
JennMercille
I really enjoyed learning about the details and complexities that go into the orchestration of food and product photography. The shoot that Steve Hansen puts on in demonstration of this was really elaborate and complicated. I never realized how much of the creative aspects of the images I see in magazines are created in camera, rather than in post-processing. I am a portrait photographer, so I was surprised at how much I learned that can transfer to creative portrait shoots as well. After watching this course, I have noticed details in lighting technique and product photography that I never saw before, and that has helped me elevate my work very amateur still life skills to a professional level. I now do product photography on the side for a refreshing change of subject matter, and have been able to photograph my own print products for a pre-sale catalog for my IPS sessions. This course is super useful across niches. I definitely recommend it to all photographers!
Karen
A lot of information to take in, really enjoyed the class. Loved how the layers were built on and the placement of all the items. Would love to see the final picture ofter touch ups :)
Penelope Diamanti
Enjoyed and learned altho I'm far from being able to afford this equipment, but love his work and I found him an engaging teacher.
Student Work
Related Classes
Lighting