Lessons
Lesson Info
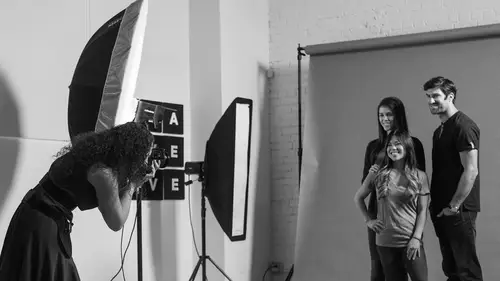
Light Position
So I talk about the modifiers. I want to say, go big, but then where do you put this big modifier? There's some problems that you run into based on the space you're shooting in, so I wanna say that as well, because I used to be in a small space and I would shoot groups, and there wasn't options on where to put the light. There was one place right here, 'cause they couldn't go behind me because I didn't have the depth, this is where it went. So I also want you to realize that I get that sometimes you don't have flexibility, but if you have the choice. You need it a little bit further away to light the group more evenly, and so the reason I also mention this as well, is I always talk about light like a bucket of water. So what happens, if I come over here and I got my bucket of water, and I throw it, she's gonna get soaked, but by the time it's reached the second row, these two caught all of the water. And so what it means is they're super bright, and everyone else is super dark. But if ...
I can take that same bucket of water here, a lot of it's already fallen off, so you are all gettin' more similarly lit or similarly wet. So bring a light further away, but not too far, 'cause if you bring it too far, not only do you have to have a bigger bucket, you gotta fill it with a lot more water, which means you've gotta have higher powered strobes often, or you've gotta use higher ISO. But the other reason is the further you back it up, the harder the light gets. So it's like you wanna bring it back to even out the light, but not so far that you get hard light or have to turn up the power of your light too high. It's a balance. Now for position of light, if you want completely even light across your entire group, I mean technically you'd put it right here, like right behind me, but that gives you super, super, super flat light that's super, super, super boring. But, I'm also gonna say there are different purposes of group shots. So let's say you're doing a family portrait, and maybe there's six or eight people, don't put the light right behind you, give it a little bit of sculpting, give it a little bit of shape, move the light off to the side. But let's say you are shooting 100 people in a group, the whole point is that you just get everyone evenly lit, and so then puttin' them right behind you and havin' it super flat isn't a terrible thing. With 100 people, if I have the light off to the side, you have to consider that whole distance thing. If I have this light off to the side, and 100 people, the people on the left are gonna get a lot more light than the people on the right, unless the light is really far away. One of the things you do not wanna do in a small group is put one light here, and one light here, and just light 'em from either side, and guess what my group setup was for like four years? I put one umbrella to the left, one umbrella to the right, and just flat light everybody, and it was great, nobody had shadows, but it was awful 'cause nobody had shadows. It was nice and even. So don't do that for smaller groups or families, where you're trying to control the light and have mood, but if you are photographing a large group of people and you do need even light, you can do that, just know it won't be interesting light. It's practical versus creatively beautiful. Pick what kind of goal you're doing between the two. So, let me show you this. So we've talked about all of this, flat light's boring. Okay, so here's an instance. In this shot, I have a three foot octabox, and the three foot octabox is just to the right of the frame where Raquel is standing, okay? And so if you look, that light falls off super fast, it's not done in post, that is exactly what the light looks like. She is really, really bright because it's really close to her, the bucket of water soaks her, and then it falls off, it's dim by the time it reaches someone else. And even if you have a group where people are sitting, if it's really close, if it's close to the person standing, people lower in the frame, it's not just depth away, it's actually depth up and down. So that is terrible, so what I need to do is I need to back the light away to more evenly light the group. But what you need to know is when I take that same bucket of water further away, less of the water's reaching everybody. So I either need to, what that means is it's dimmer. So I either need to bump up my ISO, make it more sensitive to light, open up my aperture, let more light in, or I need to turn up the power of the strobe. For me, I stay away from opening up the aperture with groups, I either bump up my ISO, or I turn up the power of the light. So then I bumped up the power of the light, and you can see everyone is much more evenly lit. This is shooting in a small space, so you'll notice the girl on the left is still a little bit dimmer, until I bring it back even further. So let me show you one more problem we have here. Okay, so photographing the three of them. The whole compression thing for distance, you notice, I got them spaced out. One way that I could help make them more evenly lit, if I squish them all closer together, because then the things that are closer together are more evenly lit, more similarly lit. Things that are spread out are more differently lit. So I could push them together, but if you look, the light is just to the right of the frame and you know what, for the girl on the right, that's my friend Jenn, that's really soft light. It's really, beautiful, flattering light on her, but you know what? They're not getting evenly lit, so what I'm gonna do is I'm gonna bring it back out and around front a bit, but when I do, I bring it away, everything gets darker, so bump up my ISO, turn up the power of the light. And so when I do, now they're evenly lit, but this is what I was talking about with the light on the face. You see the shininess on the forehead? And the shininess on the cheeks? This is what I'm talking about with that flat, hard light that you get if you have maybe a small umbrella and just back it up to evenly light everybody. It's not super soft, it's not super flattering, because compare what Jenn looks like on the left and on the right. Like you've got that really soft light on the left hand side, and on the right, it's not, it's much more even, it's just not as soft. So my recommendation would be, if you've got a group, and the picture on the left is a three foot octabox, and I had to back it up to make it more even, which made it smaller, so then I would switch to a five foot octabox or I'd switch over to a large or extra large umbrella, 'cause then it's further away to get it more even, but it's bigger to keep it soft. One other thing I'd like to mention is if you look at the picture on the left, see how there's the shadows on the left hand side, you can bring in another light to fill in the shadows, or you can use big reflectors, big v-flats. And so there's a little bit more math to it than this, but if your light's far enough away and you have that v-flat in, it actually is going to kick some nice light back towards your subject to fill in the shadows a little bit. But shadows aren't necessarily a bad thing, as long as everyone has similar shadows, not the people on the left are in shadow, it's a different thing. So, get a big modifier, a little bit further away, more centered but not like flat centered, 'cause that's super boring, unless it's a big group shot where the whole point is just to light 100 people evenly, and then it's okay. So, I say in my head, how can I get the light semi-equidistant from everybody? That's kind of how I think of it, 'cause if I have, this is how I think of it for you, if I've got a light here and you are, I'm just gonna make up a number, let's say you're two feet away, I know you're further, but you're two feet away, and then let's say you're 12 feet away, you're going to be much brighter, and he's gonna be much darker, 'cause relatively, you're much closer. But if I'm back all the way up here, the relative distances between the two, there's the difference between, but relatively you're similar distance. It's about that comparison that actually makes a difference. So try to get it equidistant without making it hard light.
Class Materials
Bonus Materials with Purchase
Ratings and Reviews
joanne duncan
I got do much out of this course, not just for shooting, but posing myself! I’m getting old, it’s hard to get a good selfie! Seriously though, this starts with epuipment, goes through settings, clearly shows what doesn’t work and why, and what does work and why. This is the second Lindsay course I’ve watched this week, and I’m anazed by what I’m retaining. Lindsay spells it out for anyone to understand, I highly recommend this class, and any class Lindsay teaches. I already have another lined up to watch! Simply brilliant, value for money even if it wasn’t on sale.
Dave Hogan
I have several of Lindsay's course and was lucky enough to see her at the Photography show in Birmingham (UK) earlier this year. I think this course is one of my favorites and has so many "group" shot tips & explanations that it's a no-brainier to any photographer to buy this it. It's great 10/10.
Rebecca George
What a brilliant, fast, well-organized, packed-with-useful-info class!! Lindsay is amazing.
Student Work
Related Classes
Lighting