Lessons
Class Introduction
05:21 2Color Theory
10:11 3Shoot: Introducing Gels
17:37 4Shoot: Adding Warmth with Gels
08:30 5Shoot: Dual Colored Shadow
06:43 6Shoot: Gelling Background Color
18:04 7Combining Light Sources Overview
06:48 8Shoot: Light Shaping Tools
22:36Shoot: Red Gel on Red Background
12:04 10Shoot: Grid Spot, Defining Color
07:54 11Gradient Color Overview
04:36 12Shoot: Creating Gradient Color
29:47 13Shoot: Split Gels, Warm and Cool Color
25:54 14Long Exposure Overview
03:37 15Test Shoot: Long Exposure with Gels
28:42 16Shoot: Long Exposure with Gels
12:47 17Critique
28:39Lesson Info
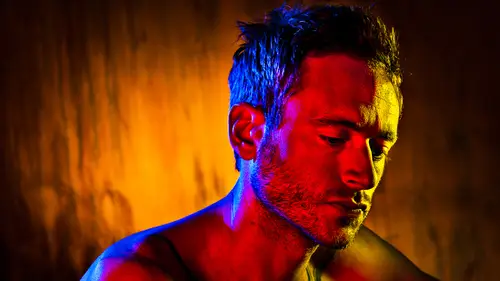
Shoot: Introducing Gels
Let's give it up for Chris, thank god he's here You're too kind. Uh huh. So let me get this one out of the way maybe for now. Let me just unplug this one and pull it over here. One thing we talked a lot about yesterday was the inverse square law and just kind of using light to create shadow, shape, form. So I'm gonna start with where I think a lot of people struggle and then we're gonna kinda move into another place. Godfrey would you mind coming over? So Godfrey's our model for today, thank you for being here. (audience clapping) Thanks my man. Gonna come on over. Right against that wall. One thing about gels and I chose this to start is the white wall can be a hard place to work with gels 'Cause it's white right? You kinda can't add any color to it. But we'll take a look at that and see where it struggles and where it gets weird. Let's give him that stool over there just so he can be comfortable. In a normal situation, I would not pull my talent on set before I had my lights set ...
up. I would never do what I'm about to do right now. But he's modeling with us today, he's here all day, he doesn't have any crazy Hollywood schedule to be on. But I would usually have everything dialed out, so that the moment Godfrey walked in, boom we're on set. But I thought as apposed to just nailing it from the beginning and showing you it's so easy, I'd like to show you where it goes wrong, and how to get it right. Give us a light meter reading there. I'm coming at you. Two, eight, four. Okay, and let's pull that chair out from the wall. Sure Just a wee bit. Alright, so I have just straight up beauty dish on I have no grid on it, no diffusion. It's just straight up like this kids. See that? And it's coming right over. And what did we learn about this light, how did we describe it yesterday, how did it look to us when we looked at it? Anybody want to give me a shout something out there? (inaudible member of audience) Pardon? [Male audience Member] Beauty Dish. Beauty dish, yup okay. Four. At four even? Mm-Hmm Alright 200, okay let me frame. Let me get rid of my glasses (camera beeping) Alright, okay so we got it coming in here now? Sweet. (clears throat) It's there cool. Yeah? Little under Just a touch, I can bring it that up just a bit though. Okay cool, and am I sharp there Chris? Are you what? Sharp, like focused. Very. Am I focused? Okay cool. Yes. The light's flat, straight on, directional now if I try to bring a a gel into this picture, we're gonna talk a lot about this. If you could get that power cord Chris. One thing that's the key to the gels is really how they go into the modifiers. So you wanna avoid any white light spilling from your source So we've really A clamped it in here. We got it tight. We have a pretty saturated This is a CTO, color temperature orange. Which is a color correcting gel, but it's also a great warming gel. And it's got four A clamps in there, it's doubled. So this is a half doubled, so that's a full CTO in there. And I'm careful not to leave any areas that peek out, that's gonna kill and flatten out your gels right quick. We have that in there. The beauty dish is gonna be my main light. Let's bring this over and just throw it to the side. And we are gonna make some photo crimes, we had some photo crimes yesterday, we did that. Some photo faux pas. Mm-hmm Yup. So let's read the fill by itself. Sure. Just gonna swing this one out, gotta give him a fire so we're reading this one light by itself. Two F two right? Yup This is F four right now, this is F two. So that's two stops difference between my main and fill I'm just gonna fire that, we'll take a look. And just put them side by side. Right on, so it's like a little warm, its got some orange down here, but the broad light? Is not giving me anywhere to put my other color. I kinda need ... gels live in the shadows. I kinda need to create some contrast with the light, in order for it to work. It's definitely doing a little bit, it's just a little kiss, it's just a little glow, it's a little orange, it might be nice for a tight portrait Let me just take this camera off here, I want you to swing the light in and out. Sure. This one here now, so we'll start with it in. Yup. Godfrey right here. Right at my camera. Thank you sir. (camera beep ) (camera beep) Great. Let's just see them side by side. Right on. So You see it's doing kinda nice things for his skin, just giving it a warm up just a little bit of the glow. And it's gonna behave a little bit differently than if you just jacked your colors in Photoshop or something like that, because it's two different light sources mixing together. But what I really want to do is create a little bit more depth and separation between those colors. So how're we gonna do that? We're definitely gonna take Godfrey a little bit away from away from the wall. Come a little bit forward on that stool. And Chris can I get the grid spot for this guy. Yes sir. And we're gonna add some more shape to my beauty dish With a grid spot. So coming this way, wait one sec, one sec, on sec. Yup, great thank you. (metal clicking) Gonna pull this over. (plastic rustling) Alright, so yes alright this is looking good. Let's read it again, now when we put grid spot in front of the light it's definitely gonna eat up some of our light cause it's black, it's gridded it's gonna subtract some light. So I'm probably gonna have to come up in power. I'm gonna do that first. (beeping) Eight eight. Eight eight Mm-hmm Alright, Let me come up to 11 even. (beeping) 11.1 11.1, that's beautiful. Can I get a full apple over here, I got one. So this is like your typical situation, like we're in that terrible hotel room, it's all beige, there's nothing going on, and it looks like your grandma's living room, it's terrible. What are we gonna do about it? So this light's not operating right now, just looking at my main light. I always think to practice with working with multiple lights is to build them one at a time, to look at them one at a time and add them slowly. So I'm gonna shoot this a little bit more full length. (lights beeping) Oops I'm not at the right F stop, eight eight- 11 you said? Yup Yup, sorry about that. (camera and lights beep) Okay cool, that's looking good. So we have sort of a more moody directional shot. We have more shadows, more places for my gel to start to live in. In our other shot, just go to the beginning, Where it was really broad and evenly lit. Lighting everything there's no where for the gel to live. I think the first thing we want to do is create some shape with that light and now we are gonna kiss it in there and create some more drama. So I'm gonna add this. We all remember this is a really orange soft box. Really taped in there, full CTO. Just gonna put it- Thanks Chris. Gotcha Yeah, got me. Kinda straight over camera, little bit high up. And we're gonna read it all by itself Chris. So again I'm just gonna swing this guy out a little bit. He was at 11, main light at F 11, reading our second light. (light beeps) Two nine. Two nine. So is that F eight? No not even close. No two point eight or? No no, two point oh nine. So about two point eight. Okay two point eight, okay great. We'll start there. We'll got to the board. Sometimes I just think it's helpful if we just go to the board for a second, and we look at them and we understand just how many stops difference there is between my main light and my fill right now. So my main light is right here and my fill is here right now. So we have one, two, three, four stops difference. Four stops difference. I just think it's helpful to see. It helps me understand because we're gonna do a bracket this way. We're gonna start low, we're gonna go to F four F five six, F eight and see how it changes. And that's very often my practice, when I'm just trying to figure out my light, I get them in there, my main light's looking good and I'll bracket my fill till it starts to feel the way I want to. And I think, more than I can teach you about light, I can teach you about a process of an approach to building light and looking at your options because maybe you think you know what you want but you're not exploring all the possibilities I think we saw that in your shot we did yesterday. Where we kept improvising on it. Camera is set to 11, main light's at 11. Does that beauty dish feel like it's right on him Chris? Mm-hmm Okay. (camera and light beeps) Cool Chris, and could you come up just one stop there? Fast. Yup. (camera and light beeps) and sometimes I think that just doing that one stop bracket there I kinda see all three of them. Mm-hmm Yup. So we got main light by itself, On the left. This is two eight with the fill? That's it. This is F four with the fill. That there. Right, so a couple things have happened. One, the space is just a little bit warmer If you were in a piano bar or something like that it might really help lend itself to the subtlety. Opening up the shadows, opening up the whole shot pretty nicely. Maybe my fill lowers a little bit, so it kinda comes into this part of his pant legs I think would be a little bit nicer. But kinda taking it away from that just plain white wall. You with me? Everyone with me? Cool. Did you lower that? I did. Okay right on. Just doing this- and could you come up one more stop on that? Sure. Fantastic. Yeah thank you. Great. There we go. I just put them all up as a bracket. It's kinda just like what we were doing yesterday, except we're doing it with the gel and we're just seeing how it moves and feels in the shot. Is that all four that we did, three stop bracket or a four stop bracket? We went up in a bracket now this is our final over here. Okay can I see them being like by itself. Sure. It's all the way on the left. Okay cool. Main light by itself, main light with fill, fill at two eight here. Yup. Main light doesn't change in any of the pictures, the only thing that's changing is the fill. Two eight, F four, five six, F eight, And let's see this F eight all by itself. Mm-hmm. I kinda like where this one is going, but I think I'd even want more warmth in the background. I'd even want the background to be a little bit oranger, and I kinda want a little bit more separation from him. So we're just gonna walk him in the light a little bit forward Chris. Mh-hmm. Godfrey if you grab the chair ill move this up. And we're gonna bring in some black subtractive lighting and see if I can suck up some of the shadow on the side of his face, and subtract some of the light. That should be good. Cool, let me just see you face this light a little bit like turn towards this light, great. So I'm angling my light even more from the side to kinda get it off that back wall subtract it from that back wall. That looks great, this guy we'll bring a little bit up. We have more cord here Chris? More cord there? Yup. Yup I'll get it for you. (cords rustling) I always think it's a little bit of noodling and a little bit of fishing that's one thing when I'm teaching lighting I sometimes I want it to be there really quick, because I feel this audience in front of me, but you know there's always some fishing, some exploring there. Godfrey let's move your head over a little bit that way, chin up a little bit, eyes to me. Yup that's great. I think this card is gonna have to come out a little bit Chris. Alright. And I think I wanna go to where we started, like bottomed out on this. Do you remember what that was set to? Yeah about two stops. (light beeping) Great. (camera and light beeps) Right on. Okay let's back it off a little bit. Come over this way, if we back the fill off a little bit and come up a stop, I kinda can't see. Looks like it needs to come up a stop. Yeah. (light beeping) Some music would be really nice right now, it would help me think, (audience laughing) if we could have some music happening. (camera and light beeps) Great, and come up a little bit more on that guy. Another stop? Yeah, and lower that light a little bit. (light beeps) Great. (camera and light beeps) Alright let's check this out, doing great Godfrey, thanks so much. Feeling good? Feeling good. Uh-huh I can't even understand how I'm taking pictures at nine o'clock in the morning, (audience laughing) I usually don't get going until 12 o'clock. Let's just walk me through the whole sort of process from the jump off Chris. Sure. Yup. So it looks like we started about here, nice and open with the beauty dish and this was with no gel whatsoever. Kinda looks like doody, looks typical, looks flat, looks boring. Yeah go a little forward. Then we add a little bit of orange to fill it up, you can see that here. Yup. Slow it down, just go back one. Sure. Beauty dish with the grid all by itself. Mh-hmm. Little kiss of fill, and then next one, started the bracket here. And I a think the mantra's ... I always say "good, better, best, I will not rest until my good is better and my better is best" That's the thing, whenever I'm in the studio I'm trying to fish that way. This is where we finished? Not quite. Okay. Then we created a little bit more drama. This is looking better thank god. Right here. Yup cool. (Chris laughing) This is where we ended. Great. Any adjustments on that Chris? Just a few, just a little bit of sauce. Okay, when you said sauce let's just define that for our audience. Yeah so I went in, it's a bit of sharpening right here as you can see. A touch of clarity but not too much, and then ten points of contrast and just a few other things in levels, but it's nothing crazy. I'd like to crush the blacks a little bit too Chris, could you crush the blacks? Yeah, kinda like this? Yeah bring those blacks up. Yeah there we go. I don't know it just kinda helps me to see the picture looking a little bit more finished.
Class Materials
Bonus Materials with Purchase
Ratings and Reviews
Vitamin Dee
Great class if you're wanting to learn how to work with gels! This class will take you through the process step by step as you build your shooting playbook. I enjoyed Clay's honest and simple approach. Clay and his assistant, Chris, make a great team as they show how gels work and show you what not to do. They make learning fun!
Magda Mazur
I really enjoyed the course and have learned a few new techniques. Every photographer is a different artist, and I do not try to judge them by the way they proceed, but by the knowledge they have, use, and are able to teach. Clay and Chris have great teamwork and a lot of fun with this.
user-45f26e
Enjoying every minute of this class.
Student Work
Related Classes
Lighting