Lessons
Class Introduction
08:18 2Luminosity Mask Image Enhancement
15:50 3B&W Conversion in Lightroom
04:48 4Using Lightroom and Photoshop for Great HDR Images
12:19 5Light Painting Processing
05:58 6Panorama Processing and Correction
10:12 7Sky Replacement
06:52 8Smart Objects
14:26Lesson Info
Sky Replacement
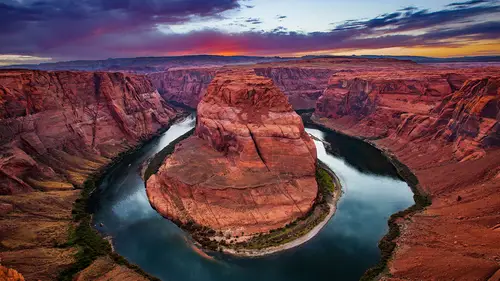
So I just have this image here. I've already replaced the sky in this, but I'm gonna show you how I did it. So we've got our image selected. I'm just gonna hold the Command or Control + E to open up. I'm gonna say Edit Original, not a copy. And this will open up quickly. All right, so let me get rid of these guys here and get rid of my mask. Yes we want to Delete it, yes. Okay, so there's my dark sky and there is my shot that I really like. This is of Horseshoe Bend in Page, Arizona. If you're scared of heights, might not be the place you want to go, 'cause you're basically putting your tripod seven inches from a thousand-foot cliff when you take this shot, so be careful. It's great to shoot it early in the morning, before the sun comes up, so be especially careful then. Make sure you have headlamps on and everything else. This was shot at sunset and looking directly in the sun and I like what I have here, but I want to add this sky to it. So we're gonna come through and try to do a fa...
irly quick selection here and get this so that it doesn't take us a lot of time. So I'm gonna go ahead and just grab my Quick Select tool and just go ahead and see if this will do it. Now, I could do a luminosity mask if I wanted to. It would probably work too. But, I know this is a fairly easy one, so I'm just kinda zooming in here and picking up what I want. I'm just trying to get that little bit of a dark, oops, so you get too much now, if that happens just go to the lasso tool, hold the Shift key to add and just kind of we're gonna feather this anyway a little bit and do some stuff with it. So, there we go. Think that's pretty much what I want. Let me check over here, no I got a little bit more over here. See if this'll pick it up, with the quick select tool All right, there we go. So, what I want to do now, is just go ahead and add a layer mask. And, I'm just gonna go ahead make sure my layer's on and let's go ahead and just feather it anyway, so we'll just give it a two-pixel feather, say OK. And add a layer mask. Now you can see right away that's not looking too great. I mean that doesn't look real at all. But, I think if we just go ahead and just use a paintbrush and paint away part of the mask, it's gonna make this look very natural. So let's go ahead and get our brush, make sure our foreground color is black. Get a very small brush, and set our opacity to 20%, no 30%, we need a little bit bigger brush then. And all I'm gonna do is just run this by here a couple of times. One at 30% And now I'm gonna go 20% again to see if I can just kind of blend it without it showing and if I think I went too far, change my foreground color to white and paint a little bit back in right there. So there's our sky and that's pretty good I mean that looks pretty natural. It doesn't look like I overdid anything, you know kind of pull that back a little bit. All right, I like this image but, I think it needs a little bit more help. I think we're gonna add a curve adjustment layer but I really don't want it to affect the sky, I think I just want it to affect this area. So I'm going to select by holding down the Command or Control key and just click on my mask that I just created for the sky. I am now gonna go ahead and go to Curves, create a adjustment curve layer and on my mask I'm going to invert it, because it selected the sky before, I don't want the sky, I want you know, the canyon right here. Go to my adjustment layer and let's just, give it just a little bit more. I'm actually, I want to add a little bit of contrast I think even to it, so I'm gonna just kind of open it up and give it a little bit of contrast, all in one curve. So, that's the way it was, that's the way it is now. I Like what's happening there, when I did this though these areas right here, became a lot lighter. So let's go ahead and just create another Curves. Let's bring our curve layer down and just look at just these areas right here and adjust our curve, so it's just, we see what we want it to look in those areas, think I'll take that. I will now invert the mask and now I can go ahead with a white paintbrush and 30%, go ahead and start painting this right here, just to kind of darken those in a little bit. You know, come in here and just paint it. I'm gonna go 40 so I can see what I'm doing. Just paint that in, probably come over here and do these a little bit too. So we just went ahead and darkened those areas up just a little bit, it needed a little bit of help after doing what we did. I think it's looking good, I think what I want to do now, is add a curve layer to the whole image, just for a little bit more contrast and this will be very small. Like so, and that's just giving everything a little bit more pop and I like how we did right here. This works out really well for, you know just a quick sky, you didn't have to go through and do a layer, I mean a luminosity mask you can just go ahead sometimes, especially something like this and just select it and do it very quickly.
Ratings and Reviews
Tim Cooper
Fast paced but excellent demonstration of enhancement techniques