Lesson Info
9. Syncing Retouching
Lessons
Lesson Info
Syncing Retouching
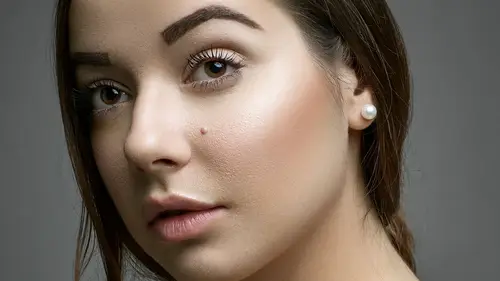
Okay, so my last thing that I wanna teach you guys about today is talking about syncing these adjustments. If you spend a lot of time adding lots of adjustments to an image, you wanna maximize your time and you wanna see if you can sync that to other images as well, right? So I will caveat this, and I will be very honest to you and say, this is only gonna work for images where the face is in similar positions. So if you've got one image where the face is turning this way, and you've got another image where the face is this way, syncing local adjustment changes between the two photos is not gonna work for you. But, if you have two images that are similar, why not see if we can apply changes to one image, and then add them to the next one by copying them from that image and pasting them on the next? Alright? Wouldn't that be awesome? Alright, so we got our first shot, here. Yowza. What just happened? So, with our adjustment brush activated, let's go ahead and add some eye shadow. Eye sha...
dow brown. Kay? And you can see I've added this color down here. I think eye shadow brown is one of the screen-grabs that you'll have, which you'll be able to create for free for one of these brushes. And then I'm just gonna come in here and paint in some of that brown eye shadow. Just to make those blue eyes pop a little bit. Complimentary colors are always gonna make the eye color of your client pop a little bit more. Alright, so, you guys think that looks natural? Hope so. I can't really tell from this monitor. Alright, so, and then, let's add something else. Let's add a little bit of eye liner to these eyes. So we'll click our 'New' button up here. And then we're gonna choose eye liner. Medium. So for the eye liner, I like to use brush B because it's usually much smaller. Add a little bit of feather. This eye liner. So I'm just darkening this upper lash line. Is this something you guys would usually think to do in LightRoom or would you go over to PhotoShop for it? Yeah. Alright, so we've got our two adjustments, let's add a little bit of lip color, too. So, let's do lips. Peach. Woo No, stop. Kay. So we've added lip color, we've added eye liner, and we've added some eye shadow as well. So, what if we could take those adjustments and--let's bring up my film strip for this. Let's take those adjustments, let's hold down shift and select our next image. And let's choose to sync these adjustments across to the next image. So we've got our local adjustment and we've got our brush. We've got our brush here, and that's the only thing that's activated. If you hold down your 'Option' key, Let's go ahead and check all. If you hold down your 'Option' key, whatever you click is going to be the only thing that gets activated. So, you check 'All,' and then hold down 'Option' and say, "I only want the brush to be synced across." That's a really quick way-- that way you don't have to go back through and uncheck each of those other things, right? So let's sync. Let's see what we got here. Dun duh-duh-duh- Daaa Well that looks like crap. There's our eye liner, there's our eye shadow, (laughing) and there's our lips. Okay? So, how many people would stop here and say, "Eh, this isn't gonna work"? Alright? Hopefully, you are smarter than that. So we've got our access points for our lips. Let's go ahead and click that. And then we're going to click and drag that effect and line it up with the new lips. Go ahead and accept that change. We have our access point for--what is this? The eyebrow? The eye shadow? Let's click and drag and align that eye shadow with the new eyes. And let's click the access point for our eye liner. And click and drag the eye liner to our new lashes. Alright! There you go! Much quicker, right? You did the work on the first image, you put in the time, and then you synced it to the next image and all the work that you had to do on that second image was just click and drag and align those different points to the areas that you want it to show up. Thank you guys! Here's my email. If you want to follow me on Instagram, that would be awesome. So, that's it.
Class Materials
Free Bonus Material
Ratings and Reviews
Cheryl Jones Schindler
This is an excellent class. I have covered over half of BenWilmore's complete guide to Lightroom, which I needed as I have mostly played around with the obvious sliders in Lightroom until now. So fortunately I had a little familiarity with brushes. This is so helpful for me to now use what I learned with more detail and more skills specifically for portraits of my family. I am so excited to use all this! Thanks!!!! She is an excellent teacher.
Lesa Wright
I very much appreciated Kristina's energy and concise instruction. She was very easy to follow and remained focused on each lesson without being repetitive or random. I learned great time saving tips that will not be difficult to implement. Thank you, Kristina!
Stacey Feasel
This was a fantastic, easy to follow course! So glad I took it!!!