Lessons
Day 1
1Class Introduction
24:29 2Lightspeed Workflow Overview
39:04 3Skype Call Testimonials
16:13 4Backup Options and Safety
19:00 5File and Folder Management
16:36 6Job and Client Tracking
31:27 7Enhancing Presets
17:47Lightroom Preferences and Watermarks
32:11 9Renaming and Export Presets
27:54 10Basics of Making Presets
36:49 11Assigning Metadata and DNG Conversion
20:00 12Editing Workflow
24:33 13Overview of GoodSync and Kumu
31:38 14Labels and Quick Enhancing in Lightroom
32:53 15Editing with Lightroom
22:39 16Photoshop Integration
27:53 17Compositing in Photoshop
33:50 18Publish Services
20:11 19Slideshows and Orders
36:38 20Albums and Soft Proofing
19:57 21Portrait Workflow Part 1
32:22 22Portrait Workflow Part 2
24:56 23General Q&A
11:44Day 2
Lesson Info
Portrait Workflow Part 2
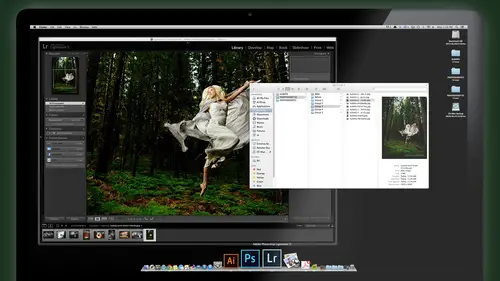
last one we're gonna take. He's here, and I'll do it. Monitor kind of a quicker composite just for the sake of time here. But we'll do those books so you could see how it's a dime, but I won't price as clean. So library edit in photo shop is layers. And again, it's going to send all those composite pieces to photo shop in one file. Each is a separate layer, which saved me a ton of time having the open them separately and dragged them over one at a time to the same file. And as soon as they're in, I'm gonna put the images that I want to work with of her jumping on the bottom layer and the books all together in one folder so that they are easy to organize and recognize. Uh, there. Okay, so there she is, and the background dragged those to the back grab. The others do new group from layers. Those were the books right there. Turn those off. These two I need to edit auto align by default that will line the background so that I could easily now paint away stuff I don't want. So I use my brus...
h again Black 100% soft brush and I could paint away the junk that not least has not jumped Very good. Paint her away and out of the scene, and then I zoom up. And as I get closer here and I want to get more precise, I'll just keep my brush smaller and smaller. And when I get really close here, he's a small brush will start to use my shift click, make a straight line and erase that right there and then a little bit of her hand back there. Right now I've got the suitcase clean. I'll crop again to crop out that the left side lasso tool flatten the image. Alas, so that shift delete content aware fill to get rid of that leg of the light stand that was in there and it was a little white dot in the top of shift. Leave that. And now we're ready to do with the oh, I don't fly my books away Bad Kevin Bad. So back in my history here I flatten my books away. I want to do that. That's the books there. So instead of flattening, I'm gonna merge the visible layers and then I can lasso away that stuff. No, right. That makes more sense. All right, turn on the books and we're gonna go one by one and pick the book. So first book, make a lasso around the rough selection of that book to deter doo doo doo doo doo doo doo doo doo Invert it, delete it, move it where we want it un selected. That's gonna be right about there. Probably add a layer mask to it. Zoom in brush black soft. Ain't it away the edges s so that it blends into your background We'll go to the next book here. Lasso tool L on your keyboard does yells knowing keyboard shortcuts can save you a whole ton of time. Command shift I to invert. Delete the move Tool de command E d Select. Pop that over here. We're gonna put the red book. Let's put it there. Has your layer mask zoom in. Okay, be for brush tool X exchanges to background color and we'll juror rob that across That will end those edges in a little bit of glow on there. Well, next book that one. L lasso select command shift. I delete Mandi d select V move Tool man zero Fit to view. Move the book on over here. Okay. Plus zoom at our little layer mask on that one. Be brush tool. Ain't away the edges a little more. Three. The edges. It's a little blurry on the edges. It's OK because it supposed to be flying in the air and moving and blurring. That's okay. Next one, almost there. 0 Image. Ill last. So so elect around the book. Hey, mention if I select inverse Deletes Commander Li VI. Move tool. Throw that book over there. Okay, zoom on in. Add a layer mask. Be brush tool. Paint away the edges with black. A little closer shift. Click drag. A straight line shift click drags a shape straight line. I want to get a little closer, the smaller brush to get mawr Fine selection. That's all I could do is just zoom in with a smaller brush. Okay, shift click. Clean that up shift click draws a straight line. No fight over paint, something I don't want. I just inverse x two Inverse My paint colors X and paint with white, and I can bring back what I might have erased automatically by or by accident. Okay, X again Go back to black, Do we? Those edges, Andrea, Command zero fit to view. Last book. Select it. Lasso tool. We're getting down where most done select with a lasso tool can shift. I deletes Mandy V Move it on the little flyway book. This could be the one that's gonna be right here inside the book case. Select at layer mask. Zoom in. Be tool paint with black on the layer mass because black blocks and white reveals when you're on a layer mask and that's all I want to do is block and reveal a mask to show this. So you're not actually losing any of the image, which is great. You can go back at any time and recover Reeve store parts of this image because you're just masking it. You're not actually cutting it out, deleting it. It's all the mask. It's a facade. It's all a facade. So as I'm finishing this last book here, we're gonna add a little drop shadow to it as well. Or a cast shadow. Um, let me what you know, if you want to composites, that's one thing people like. That's not really imaging because you're doing in photo shop. Of course, it's not really that's the whole point of this thing is to create something we couldn't do in real life. And that's what's so much fun about photography. Do whatever the heck you want. You're the boss. Um, and I love creating fantasy kind of stuff for fun, whimsical things that you couldn't do in real life for making people think. Is that real reason? Not really. You know, that's kind of the whole point of the thing. So on this ah, bottom image, which is that behind us, you can see I wasn't that clean, but it doesn't really matter cause that blends right in to the background. But I want to create a cast or a drop shadow. So I use levels and bring down the white here to bring down the levels behind the book. So the book is not changed. Just that okay and then back inverted to hide it because I want to block it and then we'll veal it with my white brush that is fairly large and just create a little shadow cast onto the suitcase right there from the book. If I go over the edge too much going on a little smaller and reverse my paintbrush and cleaned up. Said I'm going outside of the suitcase only on the inside on one more little dab here to add that to that section there. Okay, little cast shadow. We also did in one of the books before. But let's say this book is gonna be Oops, wrong one, that book there with my move tool. It's a It's gonna be a little closer over here, so it's gonna cast a little shadow into this book, right clicking on it to get to that book. So in that book of holding option key Down and create levels, clip it. And now I can adjust the shadow just on that book, which I now invert to hide it. Use my brush tool again and because I've clipped it. Whatever I paint will only happen on this book. Like pretend That's the cast shadow from the upper book on the lower book, Man zero. We're back, the books air done. Everything's flying out Looking good. I'm gonna play with my crop a little more. I think this looked more balanced. If I crop in there a little bit, and I'm gonna cropping from the top a little bit to get rid of that garbage. And there we go. I think it's pretty good like that. Finally, I'll finish it off with a action, and I want something kind of vintage. So type in vintage on here. Scroll through the options that pop up bohemia ones. We've used those already. Custard cream was, I think, a cool. And it gives me a nice little border, an old viewfinder fuel to make it really look like an oldie, Which kind of for me works. That's what I was kind of going for. There's a final image. Close it and save it. Send it back toe, light room. And all we need to do is to stack it with all the others. Were the pieces of that? So we go group stack and group into stack. Okay, so the main image here, make sure you can see what we're doing here. Back and group into stack, boom. And same with this one. Here we have the main image that we worked on the others. We'll group those into a stack. All right, we turn off our filters Now we have all of our images basically ready to present to the client. That composites, We didn't photo shop the effects, We didn't photo shop, and we're ready to post them to our blog's. I'm gonna pick a few favorites for my blawg, and I'm gonna pick that one. That one. I'm hitting him with one stars, ones that I'm gonna post up. That one was different than the other ones. One of the rock star image is there on this one down there, That one. Okay, now I filter for one. Stars thes air. The ones I wanna blawg select all export with preset E mail to blogger at 800. Put those into the blawg folder of her folder. Sure, in the right folder, this time Jane Smith blogged folder. Um, while that's preparing that even I can start to think about my smugmug. Although that's already done. Boom. There it is. So I'm gonna type in here my blawg address, my test site. Not my real blawg. By the way, Kevin Comodo blawg. If anybody wants to check out my real block and I put a lot of tutorials and cool tips and things on my real blog's so Kevin koe botha blawg dot com If you're interested in that. But this would be a test post, which is my super cool Mustang. Oh, and a girl. Hey, this was fun. She could tell the guys are interested in right cars and girls. Okay, so the title becomes the title or the first line. If I want to break him up to a gallery which we talked about put a space and puts him or text in between it. This is a gallery of mawr stuff. All right, so now I have my main image, some text and then the rest of them that there's no text. They're gonna be linked together, send it off to the blawg and wait for that to happen. Well, that's doing I'm gonna set up a client viewing blawg and inside clients. I'll set up a folder for her. So she was, uh, Jane Smith? Yes, us Jane Smith in my client folder. And I've created that gallop ho here. I did that again. We can't Can't get to my, uh, resolution. Because my thing, what if I just enter, You go. I see that worked. First change. Jane, there's Jane. Okay, So here's Jane Smith. That's where I'm gonna put this stuff here. Go back to my images. Select those. Um, I'm actually gonna turn off the stars, because for for her for her viewing, she's gonna see everything, including the ones that I am, um, blogged those in my few selections. But she's going to see all of themselves, like Mawr images here. Go down to Jane Smith. Blawg dragged in right and hit. Publish. So now in the background, those gonna start uploading to smugmug and then we're ready to get ready for a presentation for her in the studio. So remember the slideshow kind of DeLeo While that's back uploading to SmugMug, I'll shift back here, go to our slideshow module. We also might want to make the an emoto. We didn't do the automotive. Why don't we just do that to will select all those images in our main sort? I liked all of images that are flagged whether they will not. And we're gonna export those with pre set for an emoto 1200 pixels. Go to her slideshow folder. Open that up. Choose that It's a light room is now doing several things in the background. It's making for an emoto. It's putting up to SmugMug in the background. I've already got my email off to the blog's. So while that's happened, Aiken, double check here. Um, my fake Blawg Rather. And let's refresh it and see if we got the new stuff in there. There he is. Oh, supercool mustang. Oh, and a girl. So there is the main shot and gallery of more stuff. So just like the one we just shot a little while ago Put it up there. Same thing. Okay, so the blog's good. You know, the blog's ready to go, and you've got your SmugMug almost ready to go to publish to send to your client. Slide shows pretty much ready to go because you have a template already made. So you call her on the phone? Come on in your pictures already. I'll just sent you a link with even all your Enomoto show. Should be up there in a second. Um, I'm not gonna go through the an emoto upload. We already know how to do that. You say saw that we create the atom Oto show and another five minutes we greet the animals show. But right now we know we've already got him on SmugMug. We've got him on the blawg. We've got him ready to show a slide show. All we need is a client. Come in, Sit down. Plant comes in, sits down with us for our slideshow. We'll make sure that we have all of our images selected that we're going to show her. Okay? And we'll say, Sit down, enjoy the show. We're gonna, um, go through images here and let me know if there's when you see that you might want to order and I'll stop and play it. Hey, what do you think of that shot? Just maybe that 10 go back. Let's go to that one. I'll mark that one. The flag. OK, I like that one. Stop. That might be a potential. Normally, I'd show her the whole slide show once so that she gets not interrupted. And then we go back and do this, but to save time. Oh, stop about that one. Yeah, we gotta have that one. You spent so much time on that. Yes. I think the hours to correct that. Look for him. Nice calls up. Oh, Grandma would like that? No. I suggest we just take all these images and throw him in an album for you. That'd be a good idea for the Super Book. There's really just so many different unique images. Why not? Let's just making a Super Bowl. Let me show you some of these books we could potentially put together. This one has a little thumb drive. We can put in a slide show your Enomoto show right in there if you want to. Like, you have to create a dio. Maybe so. Okay, that was kinda cute. Tag it. You have to stop the show. You can just flag it while it's running. Soon as you see the image, that's kind of groovy. Put little flag on that sucker too. And then, Oh, that one's beautiful. Make a big print of that. Good. That's what I was thinking to. Let's make a big print of that one. Okay, cool. Let's go back now and decide what you want to order. And I've already got a place for us to do that. Oh, by the way, I've got your online site already ready for you. So if I go to Smugmug, this is a link. You can show your family and friends if you want all the images air here. And to get a link, I click on share, get a link Gallery link, copy. That's on my clipboard. Pop it into an email and send it to all your friends. And it's all my friends said he wants to know. All right, so that's online. The whole world knows about it. Now we need to place our order. Here's our orders. That's or these by size if you'd like to. And I'm gonna just clean that up. First of all, let me know which ones we want to order. Which are the flagged ones, right? Did we decide we're gonna hide the high, the others. So I'm gonna change my filter to show me on Lee flags ones that we picked in our slideshow. And let's just decide what sizes we want on that. That one. Let's go. That eight by 10. OK, dragon there. How about this one? That was cute. Closer, actually. Can you do that? Is a vertical for a wallet. Sure. Put in the wallet, go to the car up mode and we're going to a vertical wallet which is about, ah, to buy three ish proportion, and I'm gonna bring it in there. But I'm gonna change this corrupt rotation. Uh, there you to a vertical, because as a wallet, you're not gonna want so much space because you just want to see it. So let's crop it like that for the wallet. That good? Yes. Okay. And how about I make a virtual copy of that since we're gonna crop it? Virtual copy. Andi, we're my and right here. Jane Smith folder. Sorry. You lost myself jumping around too. Quick, Master short. Okay, so here is the one that we corrupt. Let's just back up here. Reset that. OK, there you go. So let's make a virtual copy, and we'll put that virtual copy into her corrupt folders like er up it. Are it okay? Which corrupt dragged that to wallet on that one? We want 10 by 10. So we'll make a 10 by 10 folder for that. Create that and we don't need to crop. That one is already corrupt. And let's see what else that when we're gonna have ah by 12. No cropping that when we're going to use it as is no cropping, but we're going to kind of a big my 14 ish. And that one will do for by six. That will do a four by six. And then we're going to a big 1 24 by 30. No cropping on those. Okay, so now here all the images I need to order. OK, but the regular ones, the crop ones I'll select all while export with preset. Send a White House print ready and put them in the print folder for Jane Smith. After I've done this, I'm gonna go down back to CU two creator an invoice and cancel that. So here's her catalogue. So here's her job, and first thing I do right here just create invoice and coo moo and start adding products again. This is something that we would have said. That's just showing the images are exported and ready to go. We would have set up those exact same products that we offered her inside of Ku Mu, which we didn't do it all the same products. I just pretend we had picking those products and add those to invoice just like this. Hey, little it. She's paid anything paid today whom great printed invoice in the print button. Just this one you don't need to spell. Check it. We're not gonna actually print it. And we're good to cancel Print, boom under and voice. Thank you very much. Jane Smith's mom. Uh, your prints will be ready in 46 years. Now we know if we want to ever jump to this catalogue. Here's Jane's information. So the nice thing about Koumura at this point, uh, on the top I can always search for information. So if I'm in my contacts lists and I wanted to search for somebody, I picked the find button right here and ah, search for whatever I want jumping around too fast. So get the find button type into the field when I'm looking for I'm looking for Jane or I'm looking for somebody with a Smith, maybe James to common. Don't look for the Smiths in my catalogue and then I hit performed find and there's James Smith. It jumps up again. You can search anything in any job. Any invoice, whatever you want. Just using the search at the top of Kuma. Here, make your invoice. And then once you have a job, it's gonna be linked to her. Here's her job. Here is the invoice is linked to that job. And if you create Maurin voice of this, say we create a new invoice for this. This is gonna be for Mom. And I say ship to Mom at 123 House Street and moms gonna order 2030 And that moms Ah, that's it. Print the invoice won't show it. But then if I go back to the job I see now both those invoices air now linked to that job easy to find the catalogue is right here. So if I click DoubleClick catalogue boom, it opens up Jane Smiths catalogue on Pretty much were we're done replacing orders at this point. All right, so that's that's kind of your workflow there, little, uh, tidbits that we skipped over but basically covered the entire thing, including the compositing and retouching, which is not common because you normally wouldn't do that much compositing on every single job. But if you did have compositing, it could go by still pretty quick to get all that ready to show and didn't take too much time
Class Materials
bonus material with purchase
Ratings and Reviews
fbuser 471f6dc7
Amazing.... Amazing.... Amazing
smilies
This course has been more than helpful in the areas of organization and functioning more efficiently with my photography. Thank you for all you do Kevin Kubota and CreativeLive!! :)
a Creativelive Student
This course was really helpful for me to speed up my workflow. It gave me ideas about how to keep things organized and backed up, making me more efficient and my images safe.