Adjustment Panels in LR Develop Module
Lesson 1 from: Adobe Lightroom 5 Develop Module In-DepthJared Platt
Adjustment Panels in LR Develop Module
Lesson 1 from: Adobe Lightroom 5 Develop Module In-DepthJared Platt
Lesson Info
1. Adjustment Panels in LR Develop Module
Lessons
Adjustment Panels in LR Develop Module
12:30 2Basic Adjustments in LR Development Module
15:39 3Vibrance vs Saturation
06:41 4How to Use Drastic Tone Curves
08:14 5How to create a film look using tone curve in LR
04:25 6Black and White Mixing in LR
02:46 7Using Luminance, Saturation and Hue for better color in LR
03:22 8Split Toning Explanation
05:49Lesson Info
Adjustment Panels in LR Develop Module
The develop module is our place for all adjustments I was just speaking to someone who doesn't really use light room and uh and they were kind of asking about you know, what's the difference why why would I leave my comfortable photo shop and go to light room? And uh I thought about that and I realized the comfort level that people have a photo shop is really misguided and misplaced because photo shop is a very, very complicated piece of software and so if you're comfortable with photo shop you have I learned a lot of stuff and you've e guess you've gotten comfortable with it because you're like, ok, I learned how to do this later thing and I learned how to do this masking thing and I don't know why I do so turned something to a soft layer and I don't know why his soft light layer and why you do this and that on dh so you've come tio understand photo shop the lighting was so much easier it is so simple and it is so powerful but it yet it's so simple and so a lot of people are so comfor...
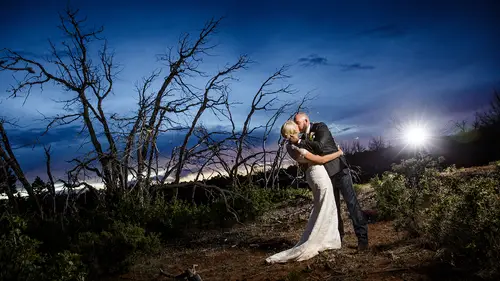
table with photo shop and they really don't realize how much easier light life would be if they were inside of light room it's just a one stop shop does most things really, really well occasionally you still have to go to photoshopped photo shop is absolutely essential when you need to be there but you don't need to be there all the time and so we're going to show you all of the developing tools which is basically this is the part that's kind of photo shop inside of light room so this is where you adjust your image is where you work on your images you do you're burning and dodging you even can repair the images and get rid of you know, flyaway hairs or blemishes stuff like that so we're going to go through most everything in the developed module in the next hour and a half, but that means we kind of have to fly, so please ask your questions. I want to know your questions on dso as you have questions, please interrupt me and let's have questions, but let's start with a tour a very quick tour so we're in the developed module here and you can see in the center we've got a picture down below we have the film strip where we can choose various images that we want to work on s o I can kind of toggle back and forth between my images below the image right below the image you'll see the toolbar the tool bar will change based on the tools that were using if you don't see that it's important to know that you can hit the tiki and the tiki will give you your tools and then also over on the right hand side is a panel and this is where all of your adjustments are made and there's a lot of different adjustments here and on the left hand side there is all of your presets right here so these are things that are calling up specific slider adjustments hears you have sliders here and the presets all they do is they say turn the slider exposure to number fifty and that's what it does and so it just moves a slider to a very specific position and it could move a lot of sliders or a little sliders and we're going to show you how to make presets but not just make presets because preset creating a preset is done in a very specific way to be an effective and useful presets so we will talk about that towards the end of the class on dh then below the priest's area you will see that they're snapshots you can take him just like you doing photo shop where you get to a point and you say I like what I've done but I'm going to work further all you have to do is hit the plus button and it will add a snapshot and now I know what I did at this specific time in history and I can always go back to it in any time and then below that we have the history of what's happened to this image and then, below that we have collections, collections are everywhere in light room because you can just quickly move from collection to collection, even if you're in the developed module or the matt module or whatever collections is, you have to go back to the library to choose different images that you want to work on you, khun use that in the collection area, provided that you've actually put the images into a collection. Ok, so that is the super super fast, a tour of the developed module now in the developed module. We're going to mostly focus over on this right hand side throughout this hour and a half, so let's start right up here at the very top, which is our history, graham and the history, graham explains to you what you're seeing in the photograph, so history, rams or super super useful tools, and you should always use them on your camera. When you're shooting, you shouldn't be shooting with a full screen image. You should be shooting with the little tiny image and then hissed a gram, and if you have the ability, want color hissed a gram and they're all separate out the black, the the red green on blue, the rgb so that you can see as much history ram information as possible when you're shooting the photograph. That way, when you look at the back your camera you're not looking at a picture you're looking at a history graham because the hist a gram is what tells you whether you exposed it right? The picture doesn't tell you that because you can't quite see what it really looks like it always looks better than it really does so you really want to be looking at history so here you can see that we have a great history graham that kind of gives us the overall exposure of the image and then inside these colors you can see this is what speaking red this is where the yellows air peaking this is the blue peaking here I can't even tell me what that is the sky exactly so it's the sky so that's very informative to us but notice when I mouse over the history graham it tells me what area of the photograph I'm working with. So for instance, I'm hovering over black right now and so you see this blacks that's what I'm hovering over if I go here now I'm hovering over the shadows and you can see shadows start about here on the history ham and go to their kind of is giving you a lighter area then I go here to the exposure which is our mid tones and then we go over here to the highlights, which is what's in the sky you know the bride or things in the photograph and then we go to our whites which is what do you think is white in this dress and some clouds right dress and clouds that's the highlights so I need you to understand what each of these tools down here doing so you see we have an exposure highlight shadow whites and blacks so knowing what those do is based on hovering over here I know that the blacks are these low, low, low, low low low low darks and the shadows or the kind of dark grays the hot the exposure knob is dealing with the middle tones all the middle so about half of that photograph is going to be exposure tool and then up here the sky we can tell that that's the highlights and then the whites are like her dress on the super bright clouds and things like that all right, so that gives you an idea of what tools to use if you want to adjust them that way because a lot of times people go okay I want the shadows and they start messing with the shadows and nothing's happening. What they really want is the exposure because the exposure is the middle grades so that's most of your photograph all right, but the history it was actually a pretty cool tool not just information because if I grab onto this middle here and click and drag aiken start dragging the hist a gram around, I can adjust my photograph from the history ram itself, so I'm clicking on the show on the exposure and you can see right below the exposure knob is moving, too, because that's what I've just clicked in the history ram, then I can go down to my black and I can bring that down, or I can bring it up. I can go to my shadows and aiken brighten up the show see all the canyon is actually shadowed see that I'm working on the shadows of the canyon, and then I can go over here to my highlights and that see how the sky is getting darker and brighter and then I can take my whites and say, I want those to be brighter or darker, and there I've done all of the adjusting on the photograph without having to go from slider to slider just grabbed the history and start moving it that's pretty cool, isn't it so it's a useful tool and it's a available just for informational purposes as well? Ok, so right below that you will see something really important here and it's just information for you, but it tells you what is available for the photographs, so for instance, you see here, says original photo if my photo was disconnected so if I had removed my hard drive and that's so that hard drives over here and I had removed it and the photo was missing, it would say that the photo was missing if I had disconnected it, but I had a smart preview built it would say smart preview there so that you know what you're working on if it has disconnected photo if it says the photo's missing, then you won't be able to actually work inside the develop module because the photo's missing it can't find it and it can't work on it. But if you have a smart preview bill then even though the photo is missing inside of the catalog there's actually a very small raw image that you can work on and you can even export up to about a five by seven but you generally want to work on you want to export from the original photo, but when you're working just on a laptop, you can unplug your hard drive and kind of go on your own on work as long as the smart previous year built. And let me just show you first if you want to build the smart previews the way to do that is in the library when you when you import photos so let's say you went to photos and you want to import them on the way in, you can build the smart previews right there if you build the smart previous on the way in then all of your photos will be available to edit off line so you'll be able to work on him even though they're not on the disk that you've taken him off put him somewhere and you just on your laptop so that kind of helps you plus those smart umm those smart previous air actually what's used in light removal so we talked about that yesterday in lighter mobile it's using those smart previous sending it up to the mothership in the cloud and then that sending him down to all of your devices and you're working on smart previews so smart previews are ah fantastic advancement in light room so there is super super great yes yeah just shut out that you did a whole class on that as part of photo shop week so anybody that is interested in my room mobile which I was very excited of how can check out that class as well and I just ran into someone that was like, hey, I I watched that class yesterday and I started using it and I've already done like a whole bunch of photos that just sitting on my phone so I was I was happy to hear that it was actually in practice for people already, so light removal is really cool but we're going back into the develop module so inside of our develop module we have everything below that hissed. A gram is what we're gonna talk about now. We also did a class yesterday about these tools here, which we're not goingto will use them a little bit today, but not not vastly important to talk about today because we spent a whole hour and a half on all of the adjustment brushes and tools up here. These air called local adjustments. The local adjustments are instead of a global adjustment, which is all this stuff down here, it's specific to an area of the photographs. So if you wanted to, you know, do a little burning and dodging, we could do that with brush tour. If we wanted to paint their skin to be a little softer, we could do that with the brush tool, so we won't go over those but know that yesterday we did a class on it. So if you're doing the whole week, you could just rewind to that. Go find that and watch that hour and a half, and you'll see how to use the brush tools.
Class Materials
bonus material with purchase
Ratings and Reviews
Bill Frye
A very informative course dealing with an important module within Lightroom. Significantly improved my comfort with and capabilities in Lightroom.
Raquel
Thoroughly enjoyed this package. I learned a lot and found everything Jared explained very useful to me. I'm new to using Lightroom. Thank you!
a Creativelive Student
I am only half way thru and I love this class! I knew there was more to LIghtroom and what I could accomplish and Jared did that for me! Big thumbs up for me!