Basic Adjustments in LR Development Module
Lesson 2 from: Adobe Lightroom 5 Develop Module In-DepthJared Platt
Basic Adjustments in LR Development Module
Lesson 2 from: Adobe Lightroom 5 Develop Module In-DepthJared Platt
Lesson Info
2. Basic Adjustments in LR Development Module
Lessons
Adjustment Panels in LR Develop Module
12:30 2Basic Adjustments in LR Development Module
15:39 3Vibrance vs Saturation
06:41 4How to Use Drastic Tone Curves
08:14 5How to create a film look using tone curve in LR
04:25 6Black and White Mixing in LR
02:46 7Using Luminance, Saturation and Hue for better color in LR
03:22 8Split Toning Explanation
05:49Lesson Info
Basic Adjustments in LR Development Module
So we're going to start now in what we call the basic adjustment area now you'll notice that all of these if I right click any of these panels this is really important watch this right click any of these panels and aiken decide what will show so if I never ever, ever, ever used the tone curve and I don't want to if I uncheck that the tone curve doesn't exist now anymore it goes straight from the basics to the hs cells so if I right click this and want to turn that back on now I have access to my tone curves again so there's the tone curves also if I right click this I can put it in what's called solo mode solo mode is my favorite mode if I click on that watch what happens if I close up seat now they're all closed and if I open one then on lee that one is open let me zoom out so you can see the sea so one is open and then if I goto open the tone curves so I could work on it, the basics close so I don't have to scroll way up and down I just simply click on the one that I want to use clic...
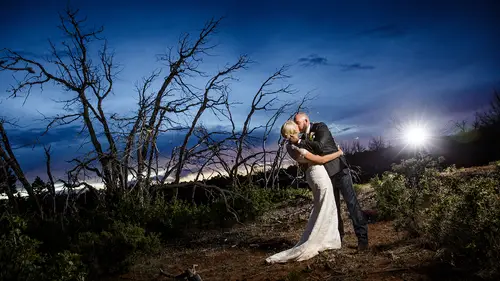
k on this one and all the other ones close so that I don't have to move my mouse is much it's kind of a carpal tunnels thing you know you the more you have to do this and scroll and move your mouth, the more tight risk gets and so this is just a really nice way to work, so we're going to go into the basics first inside of the basics we want to look at all of our tools so our tools are first black and white or color pretty obvious I want you to pay attention to the way they've mapped this out because there's some really brainiac people who have thought through the process of what comes first and what comes last what is most used what is least used and that's the way light room is designed, so if you're trying to fight the way light from his design, you're trying to fight nature okay, just go with it roll with the organizational structure you'll find that actually works really, really well. So first we decide are we getting the black and white or color that's the most basic decision? Once we decide that, then we start moving down to what is the color temperature? So if I turn this to black and white notice the color temperature intent or still there, why? Because it's a raw image and the information is still underneath it so there's a black and white of for lack of a better for there's a black and white layer over the top of it and you're looking through the black and white but there's still color information under there, so if I grab it and I go really warm with it, you'll see that the sky changes see that how the sky is changing because I'm changing the underlying color and if I make the blue really saturated than it becomes a different color in our different tone in black and white all right, so same thing with ten it's still available but they're so we're gonna leave this one color because it's very beautiful sunset um below that is the exposure we want our basic exposure below that the contrast then highlight shadows whites and blacks and then we get into clarity vibrant saturation so we started the top and start moving down then you'll notice that you go from basic to your tone curve tone curves where you start getting remember there's a contrast knob up here see that there's contrast knob right there? Well contrast is kind of the poor man's tone curve right tone curve is where it's really at when you want to deal with contrast, if you want to trick out your contrast and make it look really snapping and beautiful, this is where you deal with it then below that you have the hs sells hs cells if you're in black and white it turns to this the black and white and then it's the black and white mix area and then you get to decide how dark do I want the blue sky see how I can pull that blew down so I'm just grabbing the blues and pulling in down and then I could say while her skin is orange and yellow so I can take that and bring that up saying I'm playing with individual colors at this point if I'm in the hse cell area, that means I'm in color and I get to do the same thing I could take the luminous of the sky down so I can go upto luminous area and take the sky down to do the same kind of stuff all right? So that's the basic concept behind the hs cells in the split tone area that's where I get to add split toning and a lot of people think that split tony's for black and white on lee it's not it also does some amazing things in color will show you in a minute the detail areas where we deal with sharpness we deal with how clear something is this is where people try and fix their out of focus photographs it's not super good at magic it doesn't take up out of focus picture and make it focused, but it could certainly full you a little bit if you're just barely off but mostly it's there to help to give you a new apparent sharpness for a new affect more than trying to fix you're out of focus photos if you have out of focus photos, get your lens fixed or learn how to focus that's how you fix out of focus photos all right um and then there's lends correction issues that deals with, you know, warping and it deals with and yet ing and a lot of other things will go into greater detail on that there's the effect area which is where we do post crop vignettes and we do grain and then there's the camera calibration, which is where we look at the underlying color structure of the chip itself, all right and that's why it's a the bottom? Because we don't use it very much. All right, so did you notice that we got mohr and mohr intricate and maybe even a little esoteric as we went lower down into the the panel's right? The one on the top is called basic because we use it all the time the one at the bottom is so complicated and weird and different we don't ever use it that's why it's in the bottom? So if you start at the top and go to the bottom, you'll only get halfway down and you'll be done with the photograph in most cases now what we're going to teach you how to do is on ly use the basic panel and then we're gonna make presets for everything else so that we no longer have to use all the things below the basic panel so the basic panel to me is the opportunity to normalize the image that's where I decide whether it's got the right color balance that's where it's got the right contrast right tones all that kind of stuff that happens in the basic area everything else below it is just an appendage to that's just added to it and so because of that we don't actually have to fuss with it because image by image it's not going to change all that much so what we do is we say I like a tone curve it's really contrast great I'm going to make a preset for that and so then that pre set is going to be what I call up every time if I understand the tone curves really well then I can make really cool presets but I have to keep going to the tone curves so we'll teach you how to make really good presets all right? So we're going to start with the basics and we're just going to really work on an image they're not that hard is everybody used the bait everybody hears use light room correct ok, I don't know have a little bit okay so in the basic section it's fairly self explanatory all we're doing is grabbing an exposure and increasing and decreasing it in order to see what's best now I'm gonna warn everybody you need to calibrate your screens before you start adjusting thing, so buy yourself a color calibrate er of some kind I use x rights, color collar baiters. Eso they're fantastic. The color monkeys not all that expensive and does a great job. So it's called color monkey it's by x, right? If you're not looking at a calibrated screen, you have no idea whether the colors you're looking at a real, so calibrate the screen. If you can't afford a color monkey or something like that, then my suggestion is go in and do the manual calibration by eye, and you'll get closer and that's great, at least do that, but you've got to calibrate the screen. Ok, so the other thing that you should know, though, and this is very helpful. First off is the jakey. So jay, it allows you to turn on the highlight and shadow warnings so highlighted shadow warnings, the jakey. So if I take exposure up watch see that red that red tells me that that's blown out so there's no information in the highlights if I go the other direction that blue tells me that there is no exposure in the know information in the shadows, so it's completely black oh so with that information, then I can make informed decisions as to whether I've gone too far, so I'm going to take this exposure up until I start seeing clipping and go, ok, now we know where the edges I can't go beyond that. Now, I don't necessarily want it to be as bright is this either? So I'm gonna bring it down just a little bit, and fortunately, my screen is calibrated, so I know exactly what it's going to look like. Um, I'm gonna then go into the contrast and decide how much contrast I want do I want it to be? See how if I go low contrast, I start to get all the details here inside of the canyon that's because we've taken the shadows and brought them up, and we've taken the highlights and brought them down that's lower, in contrast, and then as I go the opposite direction, it's going to extend that, so I'm going to grab the kid contrast and bring it up to the right level. I'm going to take my highlights and play with those. Now I want you if you hit the option key or the altar key, so I'm going to hold down the option key, and when I click, watch to see out went black, and as I expose this, see that so that's telling you where the clippings beginning so you don't actually have to if you want pure purely scientific results, you can do this and get exactly ok now if I let go see that there is my exposures right there so that's what's going on when you do that? Of course we want to go to about right there, but the same thing is true with like your highlights hit the option key, and if you grab onto the highlights, you can start messing around with it and all of a sudden, well, you're going to see any clipping because there's no clipping areas there, but we can see there there's a little clipping gonna happen there tells you what you're working with, so we're now working with the shadows see, I'm got that's where I'm getting those shadows and if I let go you can see that's what's blocked up and that's what's blocked up so you have the ability to kind of play around with your shadows and highlights and stuff with the option key held down and that gives you more information. However, the information is very clinical it's the computer telling you where the clippings are and stuff like that but it's not giving you it's just because the computer says this is where the clipping starts is where the clipping stops doesn't make the photo good you still have to make your own assessments as to what's the actual beauty in the photograph so most of the time I'm not gonna use that I'm just going to do it based on I again my screen is calibrated so I can trust what I'm seeing on the screen so I'm going toe also play with the whites because I really want that dress to shine out but I don't want to get it's important that we look at the dress itself because you can you can get too crazy with going with the bright so if I take the highlights up too much or the whites up too much and I start to blow out the dress I lose the detail in the dress and I can't allow that to happen so I need that detail because it's such a beautifully detailed dress I need that to show up so now I've got the full dress in there see that that's perfect okay so once you've got your basic underlying structure of the image you've got the exposure you've got the highlights and shadows now it's time to start playing with style so everything below this line right here this line right here so you've got your highlight shadows and then there's a line and then there's presence presences where style begins everything else is normal everything else is science is the image correctly exposed is it correctly you know does have the right white balance on it all that is science and now we go into style okay, so style I'm going to go into the clarity knob and I'm just going to start playing around clear now it's easier to see clarity when I zoom in and this dress will be a perfect example of it if I take clarity way down do you see how that dress stopped being clear? Okay, clarity is is a contrast in the mid tones is what it is, so if you pump the clarity up, what you're really doing is taking the middle of the image and increasing the contrast inside the middle of the image, not the edges. So if I take this clarity up now watch what happens see shadows get deeper in that dress and the highlights get a little lighter and so then you start to see the folds so easily and so now you have a very clear image. However, it also starts to do that to the person okay, so clarity can be very damaging to a person it often times makes a really cool uh landscape so this landscape will look really cool. The more clarity I put into it it'll look really cool on the person will look really weird and so we want to make sure that we don't go overboard so my favorite place for clarity when people are involved this somewhere from twenty down not to my preference once you get into black and white, you can go a little higher on the clarity because you don't start seeing all those weird color issues inside of the clarity, but twenty down is pretty good for a person, and by the way, if you go to low, you'll start to see the person become really weird too, because everything will get mucked up, their hair will just disappear into one matter mangy thing, and so you don't want that happen either. So twenty up twenty down like that's just kind of stay within twenty of zero, and you're pretty good for people once you go beyond that, then it's anybody's guess as to what you're going to get okay, so a little bit of clarity helps the beauty of it. And remember, we talked yesterday in the tools are in our targeted adjustments, so in the brushes we can actually add clarity to the entire canyon, and then if we go into the brush here and we choose negative clarity, we can paint the clarity back out of the person and remove it. Okay, so you can use the brush is to kind of negate the things that you're doing globally, so you're doing things globally, and then if you need to like the faces going crazy with the clarity you can then go in and grab a brush and paint out the exact amount of clarity that you just put in, and now you have a neutral face. The face hasn't been touched. All right, so you have the ability to do that. And to know more about that. Make sure you watch the claire. Are the the local adjustment rushes? Okay, uh, local adjustment video making little adjustments.
Class Materials
bonus material with purchase
Ratings and Reviews
Bill Frye
A very informative course dealing with an important module within Lightroom. Significantly improved my comfort with and capabilities in Lightroom.
Raquel
Thoroughly enjoyed this package. I learned a lot and found everything Jared explained very useful to me. I'm new to using Lightroom. Thank you!
a Creativelive Student
I am only half way thru and I love this class! I knew there was more to LIghtroom and what I could accomplish and Jared did that for me! Big thumbs up for me!