Lessons
Class Introduction
01:39 2Location Scouting
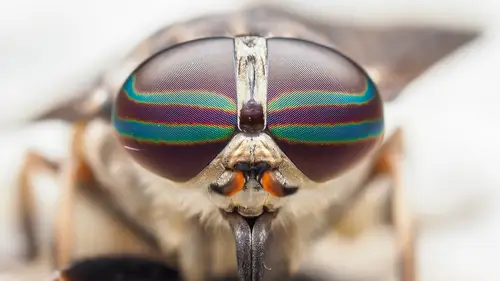
02:59 3What is Macro Photography
02:09 4What Makes a Good Macro Photo
03:44 5Gear
11:20 6Preparing for Outdoor Macro
02:00 7Camera Settings
06:48 8How to Get Started With Macro
11:59Lesson Info
Location Scouting
As you're scouting a location, you're looking for your subjects, really try to respect the environment. This is where your subjects live and you need to respect that and appreciate it as you're working with them. Be careful not to step on things, try not to disturb anything. Just try and capture your subjects in their natural environment. As you find a spot that you think might be promising, remember to look up and look down, change your levels. It's so easy to fall into the habit of looking at eye level, but that's not necessarily where the subjects are. So before you move on to a new location, take a minute, look around above you, squat down, get down on the ground, look around you on the ground. If you still don't find anything there, then move along. In addition to changing levels, don't forget to turn around and to move around. For instance, if you're looking on a bush or a flower or a plant, and you're on one side the whole time, before you leave and move along for your next loca...
tion, walk around that plant. Take a look, the sun might be shining from a different direction. Maybe there's spiders hiding underneath leaves, and by changing levels and changing location, you might find something that was right in front of you. I love going to new places like this state park to search for subjects. It's really easy to fall into the habit of hiking through the woods. When you're looking for subjects, you need to physically and mentally slow yourself down. As you're walking on the trails or off the trails, it's very easy to keep going. But if you slow down, stop and look closer, you're bound to find great subjects all around you. When I'm scouting a location, all I bring with me are my camera, flash, macro lens, and my diffusers. In my backpack, I probably have two or three extra batteries, memory cards, a telephoto lens for some longer range pseudo-macro work and that's it. When you find a great macro subject, get yourself into position and look for an opportunity to steady yourself. We don't have a tripod with us and we don't need it. We have image stabilization in the camera, that takes us so far. But the next step is to get a nice comfortable steady position. You can do that by getting down on the ground, resting on your elbows, or leaning against a tree or a log that's maybe near your subject just to give you additional support. In advance of shooting at a location or in advance of scouting a location, it's great to research that location. If you can find out from either a parks department website or from talking to locals or hikers in the area, park rangers are a great resource, you can find out what wildlife, what vegetation, what insects life is at that location, and that can really let you hone in on exactly where you want to shoot. When you are on location, and you're walking through the trails or you're walking from point A to point B, continuously look around you. You never know what you're gonna find, you're never know what's gonna present itself. So look for contrasts, contrasts against leaves, contrast against the ground or the stones. Look for movement, something scurries from one place to another, and that can help you zero in on exactly where you should shoot.
Class Materials
Bonus Materials with Purchase
Free Bonus Materials
Ratings and Reviews
Andrew Lamberson
I found the class both very informative and very motivational to get started in Macro photography. It is an entry-level class but it explains what you really need to know to be successful. I especially found the information on the value of using flash and how to modify your flash for it to be more effective especially helpful. I am an experienced wildlife photographer and have done some "Macro" with my telephoto lens, but this class motivated me to purchase a dedicated lens. I am really looking forward to spring and finding some good bugs!
Chris Baudec
Great presentation and great motivation in the post processing. I do wish that the would have been made available. After all, this is a Olympus sponsored event, and Oly settings are always welcomed.... and a tad difficult on the learning curve.
Gary Hook
Chris does a commendable job of explaining his techniques, reasons and potential pitfalls to avoid. Very thorough and much more enthusiastic about little bugs than I will ever be :-) but at the end one has a good concept on how to approach the task at hand. Nice closing with his practical examples of 'post' shoot production. One suggestion for inclusion would be some operating tips/techniques with a tripod/macro rail slider. His Olympus is way smaller/lighter than my Canon 5D so my hand holding will be at a minimum. Well done. Thank you