Lesson Info
17. 3rd Party Apps
Lessons
Class Introduction
06:11 2Equipment
10:44 3Shoot Differently
10:59 4Capture Apps
03:01 5iPhone Capture
07:20 6Lightroom Mobile Capture
11:59 7Post Production:Editing/Processing
06:10 8Lightroom Mobile Modules Overview
11:29Lightroom Color Module
16:04 10Lightroom Light Module
06:15 11Lightroom Geometry Module
05:46 12Lightroom Effects Module
03:41 13Lightroom Versions Module
04:01 14Lightroom Profiles and Presets Modules
05:43 15Lightroom Selective Edits Module
17:13 16Lightroom Mobile Organization, Sharing, Exporting
08:43 173rd Party Apps
14:52 18Wrap Up
00:51 19BONUS: Premiere Live Kickoff
27:43Lesson Info
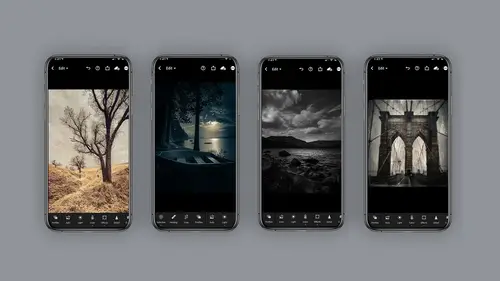
3rd Party Apps
third party apps are really fun. You could do some great looks with ease, and you're not regulated to just IPhone photography. You can actually import from your DLS are onto your phone or your IPad and use thes filters there. Really fun. Yeah, so I like to use all sorts of different APs. I change my mind all the time. I buy new ones. I I experiment, and I also do this because they don't always last. So, for example, this little caterpillar was shot in light room process in light room and then brought into snap see to add texture because you cannot add that texture in light room yet. So I happen to have different segments. I like to call them like special effects lighting concept. That's just what I like to dio. And I changed my mind now and again, too. But it's just good to get a organization. So let's talk about organizing. I will tell you on my phone. Currently, what I have is I have capture and those would be photo APS. I used to actually take the pictures I have drawing in sketch A...
PS. I have lighting apse, which also includes weather like snow and fog, that kind of thing I have concept and concept. APS tend to be kind of what I call one trick pony APs, meaning they're very specialized. And then I have postproduction apse, which often do layers like Leonardo or stack bulls or snap seat uh, mixtures is in there and mixtures you can use in Photoshop, and I often changed my mind. I mean concept. I have tangle in there, but that's really a drawing in sketch. So it's up to you. These are just ideas to get you started. The first app I'd like to look at is tintype, and I think it's super fun. I call it a concept app because it does this kind of wet plate four by five looks so it's very particular, and you can do all sorts of really fun cool images with tintype. You can shoot through it or you can load. I prefer to load images that I have shot in a different program so that I can control exposure. And here's the original of Brooklyn Bridge, and it's shot in light room and processed in light room so I can control the exposure. And then, after is just brought into tintype, I will tell you I find with tin type in particular, it wants to be a darker exposure. So if you've done an image to light, it tends to not look fantastic and how I like to go. I like to go, maybe to my all photos and just for giggles. I'm gonna pick this picture. It doesn't really matter, and then you get the controls. So it's so much fun. There are settings you may want to pay attention to in here. So there's like style settings, which controls color and tone, and in addition to that, you can crop it or not. Crop. So you have crop options and look how different these look just by changing the the button. It's single button pushing. There's not a lot of control in these, but there's there's some the blurred now the blur or the plate grain. Excuse me, The plate grain. I wanna let you know is really interesting. If you have it all the way down, you lose the texture and the color and see when you have it all the way up, it really moves it and the other button to be concerned about or aware of is the frame you could turn the frame off or on. I tend to like the frame on. It's really a fun app. They have this weird. I, um, intensity. I tend to not use this, so I almost always have this at zero. But that's just my particular taste and the blur. The thing about the blur I wanna let you know is you cannot control where it blurs. You can only control how much it blurs. Okay, so it always goes from the center out. And a lot of these third party apps. This is kind of the way it is. It's one and done, if you will. But how much fun, right? The next app I'd like to show you is lens flare And I am cuckoo for cocoa puffs for lens flare And what I love about this one also available for Photoshop. So again, I like to load a photo and I'm gonna go to my album and I'm gonna just a load a shot of Cuba I'm gonna hit OK, And when you click here on the effects look at all these different flares. You can load holy guacamole so much you can load. And let's say I just pick this one. You click once it will load you, then press on it and you can move it to location. You can squeeze up with your fingers to increase the size and rotation of it. You can then also click the edit button. There's so much to dio on this, by the way, you can change the scale so teeny, tiny to large. Who? I'm gonna leave it large for. Just second you can take the artifacts out, Which are those extra little bits that are showing up. Holy guacamole. Isn't this amazing? And I'm just gonna slide over. You can change the color of the flare. Oh, my gosh, I absolutely love this. Plus, there's masking available here. There's layers, There's filters. There's more in here. Go have fun. Honestly, it is so cool. And please remember, there is one of these in for Photoshop, which is very handy. Dandy lens flare. Gotta love it. All right, So I want to remind you, in addition to mobile device ing mobile device, you can also get thes APS for your IPad. And some people feel like they have a little more control that way. So as you choose IPad phone desktop, it's all up to you. The next filter I'd like to discuss is lends distortions. The name is a little weird because I'm not sure it's the best name board, but it is a application that allows you to do different colors. And as you slide over, you get different effects. So they have classic lights and you click on the item and it will show up in your piece. And if you click on the backward zero, it'll go away. There are there is a free version and a premium version, and they have different items available. So I like to use for my day for night photography. I sometimes like to use fog, and I'll put it in really low capacity. Do you guys notice here? The front. There's this editing slider here in the front, and I can affect the opacity. If I'd like, I could affect the scale by squeezing. So you get some really cool, blurry effects if you like. I'm just gonna hit OK on that one for a second. The other thing I like to do is I'm gonna hit the plus button down here in the bottom plus, and I'm going to slide all the way over. I like to use things like snow classic snow to be honest for stars. So if I do a day for night shot, I will often just use snow. I'm squeezing. They make it small snow for stars. You can also and do. Plus, you gotta make sure you hit the plus because if you don't hit the plus, then you're you're changing what you have. You can add rain. So here's some rain again. It's way too big. No big deal going to scale it down with my fingers and move it up. Maybe stretch it out again. The edit button is in the middle, and maybe I'll change the opacity hit. Okay, maybe I'll change the softness so you could make it softer or stronger. I'm not sure if you'll be able to see that on the screen. You can also change the brightness so you barely have any or you really have quite a bit so you can actually make window water on a windowpane with this. Anyway, there's a lot in here, and I use thes lens distortions often for my day for night. And, um, as I said, there's light source choices, fog, rain. But I need to be really clear. Not all of these air free. So you'll have to look on the unlimited to see what is cost you money. What is free? I have to be honest. I can't remember anymore because I've had it for so long. And, um, there's light volumes. There's color layers. There's light hits. There's overlays. The thing to remember is that they actually all just are in a row at the bottom. If that makes sense, so they're not different folders. I mean, you can't click on them to go to him separately, but they run horizontally anyway. This is a great filter. It's called lens distortion, and the premium one costs kind of costs a lot. I think it's like, um, 20 bucks a year, but for me, because I use it all the time, absolutely worth it. Product information available on the handout Tangled is another fun app. It's like an illustration kind of app here, and what it allows you to do is kind of do these line drawings, and it almost looks like a mono prints. Sometimes this can be a little bit of a one trick pony, but you know it Z all in how you use it. However, on this app more than others, seriously, the fine tuning or the editing is really what makes a huge difference. So check out this the effects slider. When you change the effect slider and click back on your image, it's going to change the scale of your of your picture being a little difficult right here. Of course, There we go. So look how different this line quality is and let me show it to you this way. So when you have your effects scaled down, low your lines, they're really small. But when you have them behi, then they get bigger and more fluffy or kind of spindly. It really depends on what you have, what image you're using and what you have it set at. So definitely on this one play around with it. There's a ton of different drawing styles, and then each one of those you can go in and fine tune. There's color shift if you have to have a color image so much in here, so this one, like I said more than more than the others. Um, you definitely want to play a play with the sliders again. This is called Tangled. You can do some pretty interesting effects. Can be, as I said, a little bit of a one trick pony. But give it a shot. And don't forget on the handout, you will find the product information sheet. Percolator is another fun app with ah lot under the hood. It allows you to use this kind of fun coffee metaphor to do lots of images. Let's see. I'm just gonna pick something off my You know what? I'm gonna just pick this image off my camera roll. It's gonna load up. And like some of the other APs, there's a lot under the hood for the editing. So right now there's fine grinding medium. I like. Leave it on extra fine. There's circles. There's charmed. There's rings could take a second for this toe rewrite. And then, um, there's over print. There's a ton in here. You guys can take a look. And then there's another section here to the right, with all sorts of different vibes and options. And then there's more. You can either do clear unserved. You could do smooth. You could do paper, cup light and sweet. You know, they have all these kind of fun, fun, little names they give these. Anyway, I have to tell you when I use most of these this but this one in particular, I tend to use this in combination with Photoshop or one of the other APS that allows you to melt images together. So it's pretty fun again. It's called percolator, and on the hand out there is a product information page. I've saved my favorite illustration App for last, which would be Prisma. I use this all the time. It's fun. It does a bunch of different illustration looks. It is. I just love it. I do want to point out a few things for it, so you get a bunch of different looks and this is forever changing. It is absolutely free. However, with the paid subscription, you actually get this high definition version, which takes a little longer to write, and it changes the look. So if you see her on the panel on the right, the high definition has a little more detail. The low definition is a little more soft. Let's just say there are editing buttons on the right that you can change your exposure up or down. You can change contrast and you can change these no matter which look you like. So let's say I say yes to that look and then I come back and I'm like, You know what? What else do they have in here? Let's try. This one is one of my favorite ones and look how cool that is. And I use it for Instagram because there's a lot of people who not instagram. Excuse me for my clients who want different icons for social media, if they're writing blog's or whatnot, and there are a few more items down here that you can slide, see how this changes the intensity. You can also change the sharpening. Oh, come on. Got a scroll up a little bit more. The sharpening which will make the line a little harder. You can change the shadow detail. That's gonna be a little subtle in this one, but I really want to go back here and remind you that HD is gonna get you a completely different look. So, as I said, this application is free, and the free version gives you one standard type, and it will print a logo in the bottom corner. But for the subscription, if you're gonna use it enough, it's pretty cool. And, uh, like I said, they have libraries. You could go there. There's favorites. There's all kinds of styles. Daily release, miscellaneous collections. Kind of fun kind. I love this one. Actually. Gonna go this one here on my favorite. Let's see if she's in here. I use her all the time. Yeah, not beautiful. Look at the tone on that shirt. Just gorgeous. In fact, I can show you. I use this one, which is, uh, Monaco on a Siri's. I did that. You confined on instagram Anyway, Many looks very versatile. There's a free version and a subscription version. And, like always, there is a product information page. Go have some fun with this one.
Class Materials
Bonus Materials with Purchase
Ratings and Reviews
Tiffany
I LOVED this class sooo much! Lisa did an amazing job of supplying a large amount of information balanced with a pace and teaching style so it wasn't overwhelming and so FUN to learn! Lisa helped me unlock so much potential in my device I didn't know was there. Everyone can learn from this class! Lisa is fun and real and you feel like you can connect with her. I am having so much fun with photos and have taken my images up a level with the education Lisa provided. TAKE HER CLASS, you will be so happy you did!!
Amy Vaughn
Lisa, your classes are wonderful and inspiring. Even though I already have a fancy DSLR, I love experimenting with mobile photography and have just been getting into using Lightroom a lot on my mobile devices. There were many cool ideas in this course that I wasn't aware of. I'd highly recommend it to others interested interested in creative mobile photography. Thank you so much for providing the slides as a pdf download - they are thorough, well organized and easy to reference when it isn't convenient to open a video file.
Thomas Hübinger
This course is a step-by-step guide on how to create better, more impressive photos with Adobe Lightroom. In her charming and unique way, the lecturer explains the content in an easy-to-understand way so that people like me who have never used Adobe Lightroom before can achieve very good results. The course is rounded off by a very extensive and detailed workbook. Thanks to the lecturer for this wonderful course!