Post Process: Stretch and Texture
Lesson 25 from: From Images to Art: Storytelling in Wedding PhotographyJim Garner
Post Process: Stretch and Texture
Lesson 25 from: From Images to Art: Storytelling in Wedding PhotographyJim Garner
Lessons
Day 1
1Evaluate Yourself and Your Business
28:52 2Transforming Our Business
26:59 3Reinvent in 2014
25:55 4Embrace the Philosophy
26:20 5Picture Taker vs. Story Shooter
25:30 6The Philosophy in Action: Testimonial
20:01 7Identify your Unique Style
40:105 Steps to Experimental Style
20:01 9Defining Your Goals - 10 Year Plan
26:26 10Unleash Real Profit
34:18 11Wedding Sales Part 1
29:58 12Wedding Sales Part 2
21:17 13Product and Partnerships
38:45 14Camera Gear
22:19 15Client Testimonial: Trica and Drew
24:26 16Refine Your Craft
24:46 17Experiential Awareness
41:41 18Shoot: Groom and Groomsmen
21:03 19Shoot: Bride's Details
17:04 20Shoot: Bride and Bridesmaids
22:46 21Shoot: Bride and Groom
19:37 22Shoot: Group Shots
23:21 23Shoot: Couple In Bright Sun
27:56 24Goals in Post Processing
31:00 25Post Process: Stretch and Texture
19:13 26Post Process: Skin
20:18 27Post Process: Hard Light Retouching
16:28 28Album Design: The Formula
40:16 29Album Design: The Album Design: Demo with Andrew Fundy
21:21 30Take Control: Workflow Part 1
29:08 31Take Control: Workflow Part 2
21:06 32Work Enviorments
13:36 33Master Client Communication and Experience
17:41 3410 Opportunities for Communication
44:04 35Refine, Reinvent and Thrive
14:04 36Location Night Shoot
32:42Day 2
Day 3
Lesson Info
Post Process: Stretch and Texture
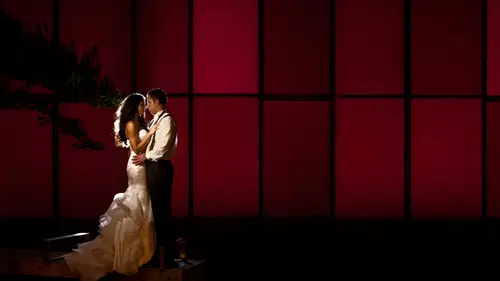
I love Photoshopped. It's so fun and relish, you know, it has an opportunity. You have so many opportunities in a photo shop. The sky's the limit. But, you know, I think here, let's start here. We'll start with a simple creating a spread. Let's grab. Maybe I love the flowing hair. There. You How's everything in the audience? You guys happy? Okay, so I'm just gonna copy and paste this into this last spread. I made it. Check it out. Okay. This Is that what I'm talking about? If you have a lot of images before I erase the images on this spread and this is what I do, I always go over the top. The last bread I made Oh, my God. Zehren here, look and you know, always have, like, open a new document. You just erase the photos, the last one, and save it as a new file. That's what I do as I create my album spread. But this is the last one of last breads we made and notice. It's celebrating the personality of each person's kind of like what we did yesterday. The shooting section noticed we put it...
in a strip and made it very small. Instead of a bunch of images on the page taking, we use that negative space to heal the and kind of make it fun to really get in close. These air still 2.5 inches tall. They're still pretty big, but it heals your eye again. And, boy, that that's about a two minute retouched to do all of it once fun is that can you imagine photo shopping every one of those separately and then bringing them in? We're gonna save you so much time today and fund is gonna create some albums spreads for us in the next section, and it's going to blast. Okay, so I'm going to get used to this new resolution. Gosh, this is tough. Okay? We're doing web resolution, so I'm gonna get you stood here, so I'm gonna throw out all of these, okay? And noticed they have the You could see all my shirt. My key strokes. All right, there we go. And I'm going to paste it in there. It is. All right for this particular spread Just real quick. I'm going. Teoh, go to the edge of her fly away hairs, create a marquee. We're gonna stretch that over. I'm gonna go. Command J. This is a new layer of you. Copy. Command T. I'm gonna pull it over Was free. Transform tool. I just stretched pixels. Okay. You need to be aware of that. Hold the space bar. I'm gonna move it over. Okay? Where are my? There it is. Okay, I'm gonna move that marquee right to the edge where I don't touch his shoulder. And I miss isolate just that into a nuclear command. J It's its own layer now. Sorry, I'm gonna open layers palette. I'm gonna get on the original layer. I'm hit Command J, which is lair. New layer, new layer of your copy right there. Command J and I hit free transform. We're gonna stretch that all the way over to the end, Okay? We just created entirely new experience. You know what? I don't want this strip here, so I'm gonna hold down the command tool and pull that down so it blends away. All right. They're my guides. Looks like the gutter is gonna go a little bit through shoulder, but I'm obeying the rule of thirds meeting. The subject is in 1/ OK, so now I'm gonna select everything, drag it down to the duplicate section and make a brand new copy above preserving the layers below. If you ever need to make changes down the road. Okay. Now, Trish Trish has got flyways one quick way of dealing with that guys I love to blur things away. Leave all these, but these little flyways gonna push in a little bit with my arrows. These little flyways are so easy to take care of. I'm just gonna go create any layer of that and blurry filter blur Gaussian blur and say goodbye to hairs. Can you go see that? So it blends in and even the light area goes in. So let's show you before and after. Okay. We could have rubber stamped out for a little bit, but I preferred blurring. I believe everything off. I'm gonna leave the rest cause I kind of like it. I suppose I could just no see, if I do that, it's not as efficient, especially with the Great Asians before I move on and talk about the difference between, um, opacity in your brushes and flow on your brushes. Okay? It's important. Let's grab a awful lee bright color so you can see this. First, let's go to a passing. Here's 100% Get a brandy lair second, Throw it away at the end. Oh, I am in blending Will be for but sorry, guys. Oh, here's a good shortcut First. Did you guys know? If you hold If you hold, option in command and steer and drag your stylish her mouth to the left, your brush gets smaller. Drag it to the writing, its larger Drag it up, It gets softer. Drag it down, It gets harder. I'm holding down control An option A very good quick shortcut. Okay, now, if I go, If I hold, I'm not sure you more this down. I want to really soft brush. So I would drag all the way up really hard brush dragged down. I'm gonna get a smaller brush right here so I can show you a passage E. Okay, we'll go about right here. 100% opacity. Fairly hard brush. OK, I'm gonna go down to 57. Notice I could go over the top. It is additive, but I have to pick up my mouse and put it back down. Okay? Let's compare that with flow. A short cut for flow. I use this shift and then one it's going to go to 10% and watch 10%. And as I hold it and move it more Inco's that I haven't left anything up. This is a fantastic retouching understanding this is gonna help you with with, especially with the stylist. Okay, you push harder or softer with stylist and Maurin could go down. But it's a much better way of working with skin and doing subtle retouching Just barely go. I'm often in shift 05 that is 5% flow and this is how I do skin. Okay, there are the times I like opacity, but flow is awesome. Everything's about the brush in Photoshopped as far as I'm concerned. Still, eat that layer and continue, So I'm a 5% flow. I have a little issue right here, so I'm going to hit control. It's going. I'm just gonna grab the color beheading option and hold on. It clicks and grabs a color, and I can paint enough to even rubber stamp. I could just paint color. I do. This was skin a lot, so I'm getting used to keep our guys work with May. Okay, I do. This was skin a lot, and I'll show you that in a second. But let's finish this up real quick. Let's add some punch to it. I'm gonna go create a whole new layer on top. Let's get rid of these layers. Oh, here's a quick shortcut. Shift option, command and E. And it creates that new layer on top automatically, if you need. I call it the Nebraska Command. It's five Finger Command, Nebraska shift option Command and e I threw away my hair. I'm gonna redo that real quick. Last. So right to here. New layer of your copy, which is command J. I'm gonna gosh and blur it. What is it doing? What is this? My f five Change my functions. Change function F five filter Blur. Got it. No big deal. So I got dot filter, blur, Gaussian Blur Quickly getting rid of that issue. Okay, Now we're gonna eat, grab a new layer over the top of everything. We're gonna use some curves. Gonna bring in the detail down here. I'm gonna hit be for brush and I have a 5%. I want you to see this. Get on the layer mask. You're kind of paint back a little detail in their silhouette. We don't have much, but I don't want to contrast them necessarily. We can also Hughes Satch it So notice. I'm just keep making layers on top or vibrance. Punch it up and I'm gonna finish with texture. Okay? I'm gonna go to my action set here. We're gonna go to texture overlay. So it says, Here's how much the actual set comes. This is with the transformational tool box. All these actions, you see the background tools, textures and skies. All that comes with it every time. Texas very end of the retouching process. The first step is to find the texture that fits the image and transform it into place. Easy. So opens a dialog box. We're gonna go to the transformation toolbox. It is the design pack, Texas and skies textures. Let's use the 1st 1 on there. I custom made this not long ago. Okay. Cool thing about textures. Is it? Again? It adds emotion, but it also adds a tone into the image. It's entirely new experience. And just for the audience, who's out Studio audience out there, you probably can't see. It's different for them to see this on the web. I'm gonna stretch it into place. I'm gonna bring it down. It's not too critical how you late in, I try to lay it in. So that's very, um, visible at first. And then I pulled back the opacity. So now you the soft rushed at low capacity to pay in a way, the texture for Monday. Wanna areas. You do this from skin, perhaps, but an alternate technique. And I'm gonna show you on alternate technique, and that is to blur it off off the areas that you don't want and that the tone will remain, but the texture will go away. So I'm gonna show you that we do some skin retouching. This preserves the beautiful tones. Look at that. Totally different experience is pretty heavy, man. I like it, though. Let's go to the layer and I'm gonna pull it back slightly. Intel. I feel it and not necessarily see it. Okay, it's still having I want to leave that for our Web audience. I know the quality will be the same. Now I have an opportunity to do. Um a couple of things. With this texture, I can leave it sharp like it is. Let's actually turn it way up. So you really see it? I could blur it subtly. So the whole thing becomes a background experience or a foreground experience. Sometimes on these larger pieces of art, we leave it as a foreground experience. But in this case, let's show you for the sake of education, pull it back. So I'm gonna blur, filter, blur, Gaussian blur. Jim, can you explain a little bit about what you mean the difference between a background experience and a foreground experience with textures? Yeah, the foreground experience would be like printing your images on a canvas that texture eyes incorporated in the foreground. Experience. Ah, background experiences. Hey, could it be the rain going by? Or could it be the texture on the wall behind you? We often in our studio, we don't have textured backgrounds anymore. We shoot our textured portrait. It's with a simple gray seamless, and then we'll throw different textures on the back, and it will blur them into that background. And so it will look as if we're had a textured seamless behind them. So Let's take it to the background. So I'm gonna pull that to about eight points of Goshen Blur and let's go 100% so you can see where Let's go down 100. And I think I'm at DPR. Yeah, my picks is okay, so now that we have background and see, it's fairly far in the background. But I'm going to show you some issues with this image, and it all is in error where I stretched it. Now, the first line of defense to construct stretched pixels are these textures. This second would be the grain, and we do this near the end of the process. So let's do that now. By the way, guys, they this image doesn't have any skin tone. I would be blurring it right off their skin or even a racing it using my flow brush tool. But let's do this. I'm gonna show you a quick grain layer technique. We create a new layer blank layer on top. We're gonna fill a 50% gray. You could go shift delete in the is the shortcut for Phil. 50% gray is already queued up. Push Okay, offered goes. I'm gonna stick the grand right on this layer. Let's go 100% so you can see it. Filter doors, noise, photo shop. Seven ways to do everything, by the way, actually averaged it out. I heard that from a friend of mine who is a full time Photoshopped professional. They literally averaged everything. There's a bunch of different ways to do every single thing in photo shop. But I'm giving you my down and dirty ways because it's about speed. Okay, let's start at nine pixels. Annoys. You're gonna put this blue layer into blending mode overlay, but by it disappears. Overlay blend. Imo takes anything 50% gray and it takes it away. So now we once had all these stretched pixels, but now they're hidden. You can't see them anymore because of a new fresh gray layer on top. You're able because this is so laying out. Lower the passing of it. If it's too heavy, definitely. Look at it 100% if because this is what I definitely do to all my enlarged images, So when you see you gotta look at it, see how it affects your experience when you're 100% like that if you get real close, you'll see that grain. Okay, let's finish it with diffuse glow. You call this one good? I want to do a few more images. I'm gonna drag all these images down, duplicate Immel and then flatten um, Command E. And that's layer merged layers. This is command Eve. Okay, so I have this brand new layer all by itself going to go filter, distort too few school on that layer. Okay. When you first do too few school, I want you to It comes out of the box like there's default. Take that grain turning to zero. We already already done grain. Have away Glo amount. Just go with 10. 15. Push, OK, unless it's a very low key image, that's gonna be just fine, because we're gonna have to opportunity lower that opacity. Here's what I like to say. With all effects and photo shop, you want to go past the point where you're comfortable and then dial it back to the emotional place. Always. You're gonna go when we do skin, you're gonna go. We're gonna go past the point where the skin is. Oh, gosh, That looks like plastic. But we're gonna dial it back and they're gonna find Tune it. Let's do a skin shot next. So I'm gonna pull back, so I just a little bit of pop. Feel it, Don't see it, but this. Yeah, it's it totally different on screen than in my screen, by the way, and that's okay, because it's the techniques and your in charge out there in the audience to figure out how much you want to dial in each one of these techniques. But the techniques air sound. We took the image way we did the height of the technique of fitting it to art piece right by adding areas, attracting areas. It said we next thing that's always on the list is hide and remove. The areas that we don't like in this case is just a few flyways. Okay, Another thing we might do at that point is liquefy, um, the liquefy tool can is really effective at, you know, shaving a couple of pounds or molding there some areas that might need fixing, um, then with did the techniques layer upon layer that take it from being that individual images, something more emotional experience. In this case, we added some tone. A bit of contrast, we added texture and grain and gave it a little pop with diffuse glow. Do you do the same process no matter what size the images? Or do you do different Photoshopped based on whether it's a a small print versus a wall art? And what's the difference in that process? It's photo shop. The difference between working on a small, small print and a large image right? It's it's the larger images require a lot more post production work. Bottom line, and you have to first in larger. You have to interpret it to the size it's going to be. This is three could be an entire wall, you know, a billboard. A billboard would be about 50 dp. I have done billboards in recent weeks, and it's 50 dp I It is massive, okay? And it's a gig gigabyte file. You must then dual these layers to This is an extreme example. But you must do all these layers who at that resolution now smaller images. You don't look at them at this the same way you don't look at him like at the grain level. I mean, you hold about this far from your face and that the techniques that use are very important as well, but not as impactful. Um, it doesn't reach you the same way. So, um, I believe album retouching with many images in the album itself can be super quick. You do these these techniques right over the top of everything, quickly brush out the areas you don't want and it works. It really works well, so there's a lot of time savings and working on small images you shouldn't spend a lot of time on.
Class Materials
bonus material with purchase
Ratings and Reviews
Ester Knowlen Photography
LOVE LOVE LOVE all the bits on how to create a wow shot without stressing about getting it/catching it by chance. So SPOT on!! A little bit of planning, a little bit of vision, and great ideas/recipe for amazing "wow" shots that are prompted and genuine (unique just like the people we shoot), rather than stressed over and chased. :) Amazing video!! :) Thanks Jim Garner!!
222 N 43rd Pl
This is such an amazing course. It is my first purchase that I have made with Creative Live and I couldn't be more pleased. Jim shared so much information and so many insights. It's great to be able to watch the segments over, picking up something new every time. Taking volumes of notes! I am starting to implement Jim's approach to photography—storytelling. I am just starting out in wedding photography and am so excited to have found this gem tutorial! I would highly recommend this to any photographer who wants to take their work from photographs to art.
Student Work
Related Classes
Wedding Photography