Lessons
Class Introduction
04:41 2Gear Basics Pt. 1: Cameras, Flashlights, Flash
24:53 3Gear Basics Pt. 2: Lenses, Tripods & Heads, Accessories & Apps
22:43 4Fundamentals of Night Photography
21:16 5Testing Gear
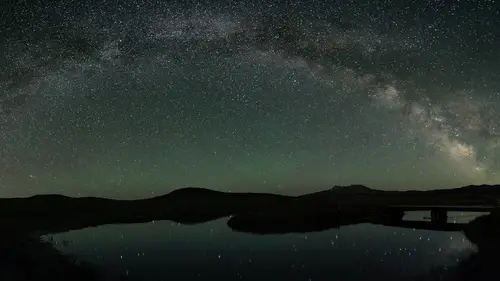
23:08 6The Color of Night
07:49 7Defining Your Style of Night Photography
01:18 8Shooting with Friends
02:42Lesson Info
Levels of Twilight
Now twilight can be one of the best times where we can balance all the different lights, especially in the city, where there's all those moving colors and when the city lights kind of just come on. We wanna really try to shoot that. We can balance the exposure and the colors best during the twilight period. Once we leave twilight, then the skies get really dark, and we don't see any of the sky, often times 'cause we're exposing for the city and the city lights and then our skies are left lifeless. So this is a shot I took on the Brooklyn Bridge. We have all the cars coming towards me. I specifically planned to shoot it during that twilight so we can get that rich blue sky. Even though it was overcast, there was enough light coming through during that twilight to really get those complementary colors to play off of each other. Let's walk you through the twilight phases and how we can really assess each light scenario in the field. Okay, so here we are. We've just entered civil twilight.
So the sun has just, again, dipped down six degrees below the horizon. The beautiful thing about civil twilight, it's such a soft and beautiful light. No harsh shadows from directly sunlight, okay. So we can see the city. It's sort of got a nice, even light to it. Really perfect. You can't miss it for taking a good shot here. But let's talk about the time. The sun is setting in about 15 minutes, okay. We're looking south here. So we just missed it. We're going from the golden hour to the blue hour and those two hours actually make up what's called the magic hour. And if you could do photography for two hours a day, I would choose to do the magic hour of each day. Now the magic hour is that sort of twilight at the beginning of the day and then that twilight at the of the day. Now as night photographer, I'm not getting up that early, so I miss out on half the twilights, but I try to take full advantage of those evening twilights. So the golden hour starts as the sun is setting and we get that bask of golden light upon the city. Then when it sets... When the sun just sets, it's no longer along the horizon, the light just hits the particles and clouds in the sky and that's the beginning of that blue hour, that civil twilight. Usually those blues would be nice and rich like a cobalt blue, and then they'll get darker as it fades. Now and after civil twilight which goes from when the sun sets till about six degrees below the horizon, then we're gonna hit nautical twilight. And that's another six degrees. That's six degrees to 12 degrees below the horizon, and that's when we'll start to see the first and the brightest stars of the night. You could still see the horizon, it's called nautical twilight, because all the sailors, they could still see the horizon, but they could start to gauge which way they were going by the stars. So that'll last for another 15, 20 minutes, and then we come to astronomical twilight. And astronomical twilight is when things start to get really dark, okay. We start to see pretty much all the stars, not any nebular or anything like that, there's still some brightness. We can still see a little bit of the horizon, but it's quickly fading, and the light is still moving. We'll have to make adjustments fairly quickly to our exposures through all three twilights. We lose about anywhere from two to four stops, from going from civil twilight to astronomical twilight here. So I'm at my 70 to at about 85 millimeter and I want to generally to make the colors a little bit more rich, I'm gonna underexpose by like half a stop to a stop right here. So my settings are, I put my ISO to the lowest, keep that image quality superior with a nice low optimal ISO, so I'm at ISO 100. There's also depth to this scene, even though it's really not starting until the Space Needle and stuff, so I wanna keep a nice optimal aperture, which would be f11. That's gonna ensure that I get depth all the way through. And then I can just let the shutter speeds go where they wanna go. Again, I'm in manual, so I'm using my meter to kind of judge where I'm gonna be. I'm taking control of this camera. So right now my meter's saying about a half a second. So I'm gonna put it on, just to get a quick shot, I'm just gonna press the trigger. I got it on a self timer, a two second self timer, so no shake. And boom, there we go, we've got a nice exposed histogram and really nice, no spiking on either way. Looks like a good shot to me. So now that we've got that one in the bag, how can we reinterpret this scene? How can we get this classic shot, but again rethink it and try something new and fresh?
Class Materials
Bonus Materials with Purchase
Ratings and Reviews
Christiane Menelas
This class was perfect in preparation for my trip to Zion and Bryce Canyon next week. I can't wait to put all this great information to good use! Very easy to understand, and fun to watch. I thoroughly enjoyed it!
user-56b1ca
This class was super helpful in what to buy and then how to get the pictures you want. Loved all the other stuff that I knew nothing about. I knew very little about light painting. Thanks for sharing this class with us. This class was one of the best I have seen.
Berus
This course is fairly comprehensive, and offers a good intermediate/advanced intermediate examination of night photography (NOT just astrophotography, which is only one form of night photography.) I don't necessarily agree with everything he's saying here, but that doesn't make it wrong - it's just a matter of preference. He is fairly equipment-centric, but getting into many forms of night photography DOES require some specific equipment. There's a lot of useful information contained here, and I can see myself consulting this course in the future to help solve and understand certain situations and problems that are unique to night photography. Recommended.